
This cream puffs recipe is a classic French dessert with crispy, hollow shells made from choux pastry, baked until golden brown. Each is filled with lightly sweetened whipped cream and dusted with powdered sugar.

Jessica’s Recipe Science
- Cooking the flour paste gelatinizes the starches and removes excess moisture, creating a structure strong enough to trap steam, which inflates the dough and forms a hollow center.
- Whipping cold cream with sugar traps air in the fat, creating a stable foam that holds its shape while staying light and smooth.
- Slowly decreasing the heat in 50-degree increments every 10 minutes ensures that the pastry is golden brown, hollow, and crisp.
Featured Comment 19
“This cream puffs recipe was incredible! The directions were so helpful and I followed it exactly as written and it couldn’t have come out any better! Thank you so much for all the details, it helped so much!”—Karina
Why It Works
This cream puff recipe is an elegant, impressive dessert made with a classic French pastry technique. Mastering how to make pâte à choux, or choux pastry, is simple. It starts with cooking the flour on the stove with butter and water, then whipping in eggs to create a thick, pipeable dough.
I use a specific baking method to ensure the pastry rises high and dries completely. When heated, the mounds of dough bake into super light, hollow shells, perfect for filling. Each bite delivers a crunchy crust loaded with silky whipped cream. The good news is these sweet treats can be made in advance.
Jump To a Section
Ingredients You’ll Need
- Pâte à Choux: The choux pastry (also known as eclair paste) is a simple mixture of water, salt, sugar, butter, and all-purpose flour cooked on the stovetop. This helps break down the starches in wheat, making it easier to absorb water. You can also use the dough to make smaller profiteroles or eclairs.
- Egg Wash: A mixture of whole egg and water or milk is brushed onto the surface of the dough before baking to give a glossy sheen and a golden hue.
- Whipped Cream: I use my classic whipped cream recipe, made with heavy cream, powdered sugar or granulated sugar, and vanilla extract. Make sure to use heavy cream or heavy whipping cream, and not whipping cream. They have a higher fat content, making them more stable when piped.
See the recipe card below for all ingredients and measurements (US and metric).
Ingredient Substitutions
This cream puff recipe is easy to customize! Try these delicious options:
- Filling Options: Add rich vanilla-bean-flavored pastry cream, also known as custard. Combine equal parts pastry cream and whipped cream for a light custard filling. Use cornstarch-based pudding mixes for a quick filling. Mix the whipped cream with some fruit jam or homemade Nutella. Fill the shells with ice cream for a frozen treat.
- Dairy- Free Options: Use plant-based butter to make the choux pastry. Use dairy-free whipping cream products or whipped coconut cream.
- Toppings: Drizzle on caramel sauce or chocolate magic shell right before serving, then top with fresh fruit, such as strawberries or peaches.
How to Make Cream Puffs
Step 1: Preheat the Oven
Preheating the oven to 425°F (218ºC) is crucial for cream puffs because choux pastry relies on rapid steam expansion, not chemical leaveners, to rise. The high heat quickly turns the dough’s moisture into steam, creating lift and forming a hollow center before the eggs set the structure.
If the oven isn’t fully hot, the puffs won’t rise properly. Placing racks in the upper- and lower-middle positions ensures even heat circulation. Lining the baking sheet with parchment paper prevents sticking and promotes uniform browning for crisp, golden shells.
Step 2: Make the Dough
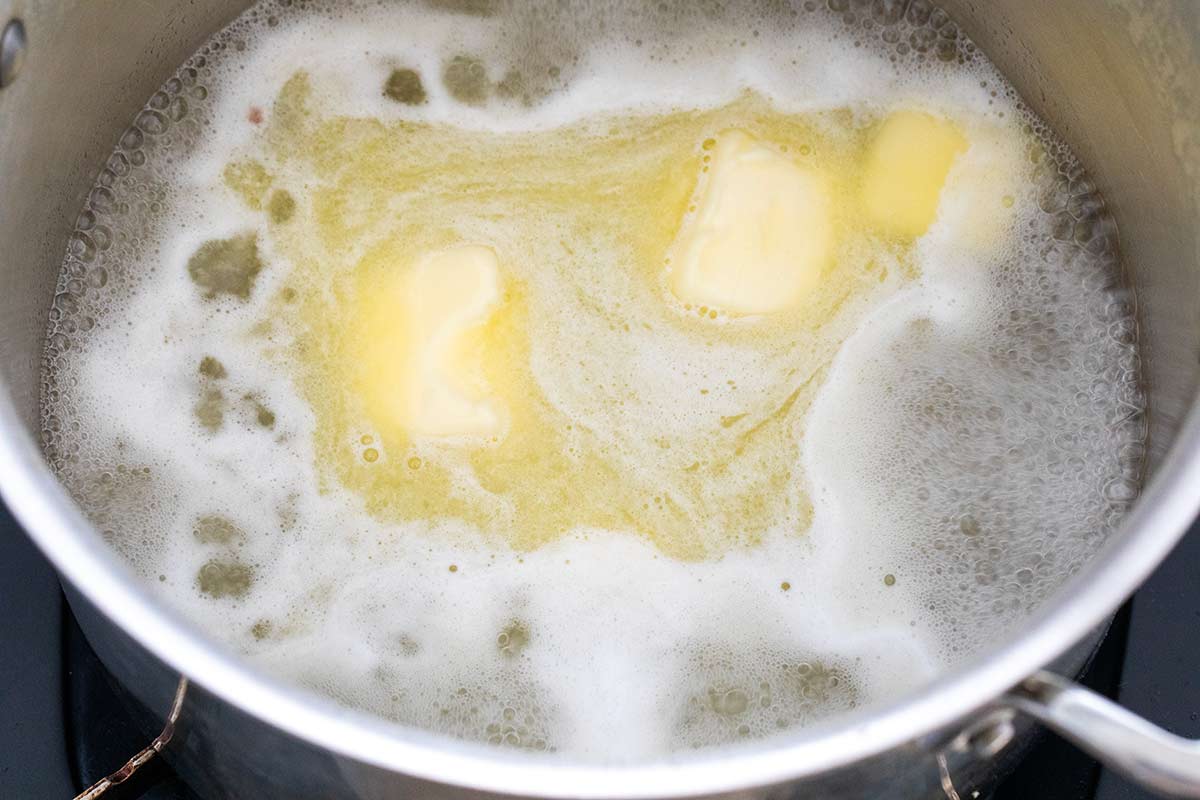
Bring the water, sugar, salt, and butter to a full boil in the pot, so the butter fully melts and evenly disperses in the liquid. This ensures the fat coats the flour properly in the next step, helping control gluten development for a tender shell.
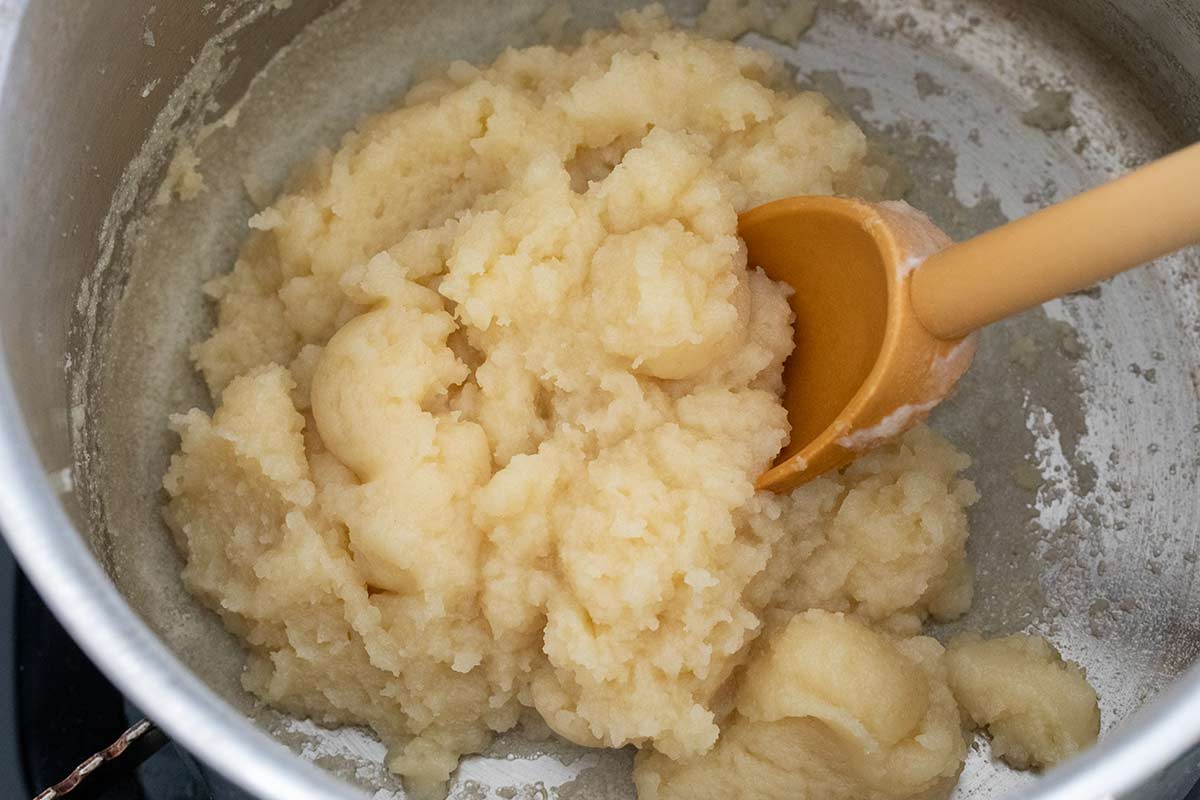
Once you add the flour, vigorous stirring with a wooden spoon hydrates the starches and forms a paste. Cooking the dough over medium heat is critical. It evaporates excess moisture and gelatinizes the starches, creating structure.
Tips for Perfect Execution: When the dough looks dry and leaves a thin film on the pan, that’s your cue that enough water has cooked off, setting you up for strong steam lift and hollow centers in the oven.
Step 3: Cool the Dough
Cool the hot dough in the stand mixer on low or medium speed before adding the eggs, so they don’t scramble! You want the dough temperature below 165°F (74 °C), where eggs start to coagulate. Target 130°F (54ºC) or below.
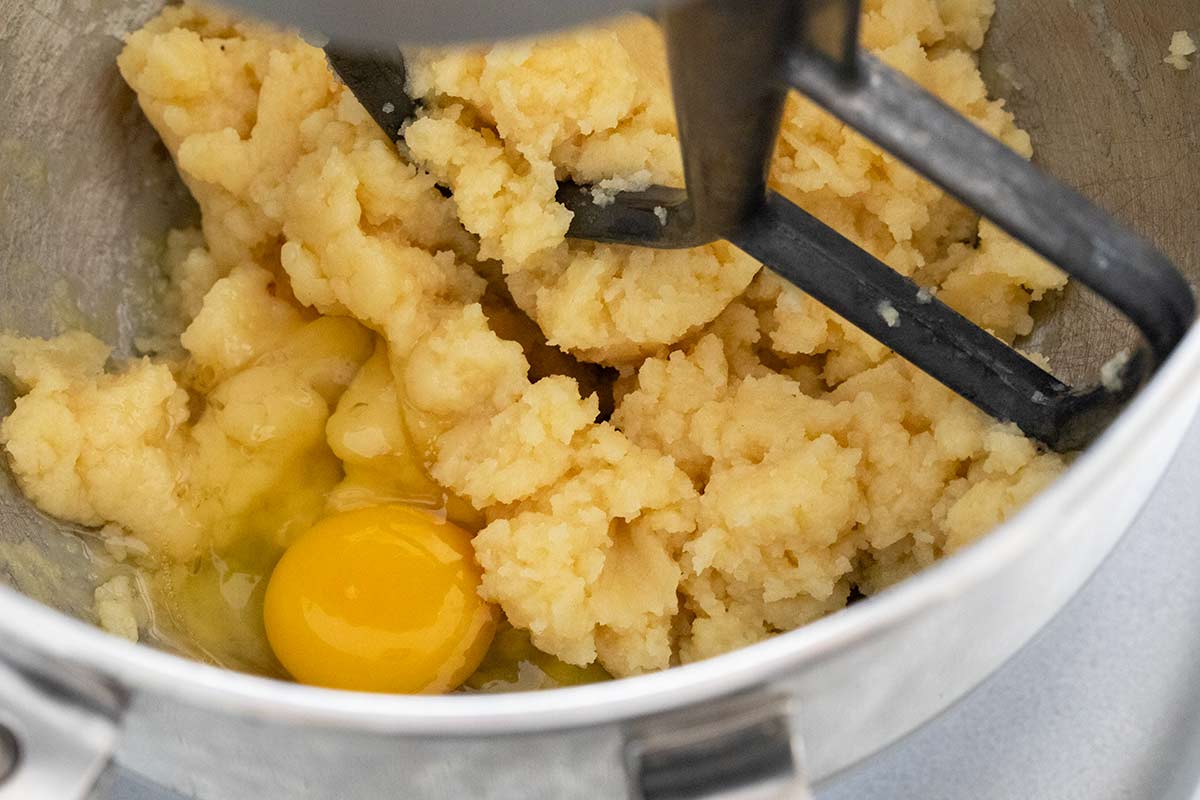
Step 4: Add the Eggs in Stages
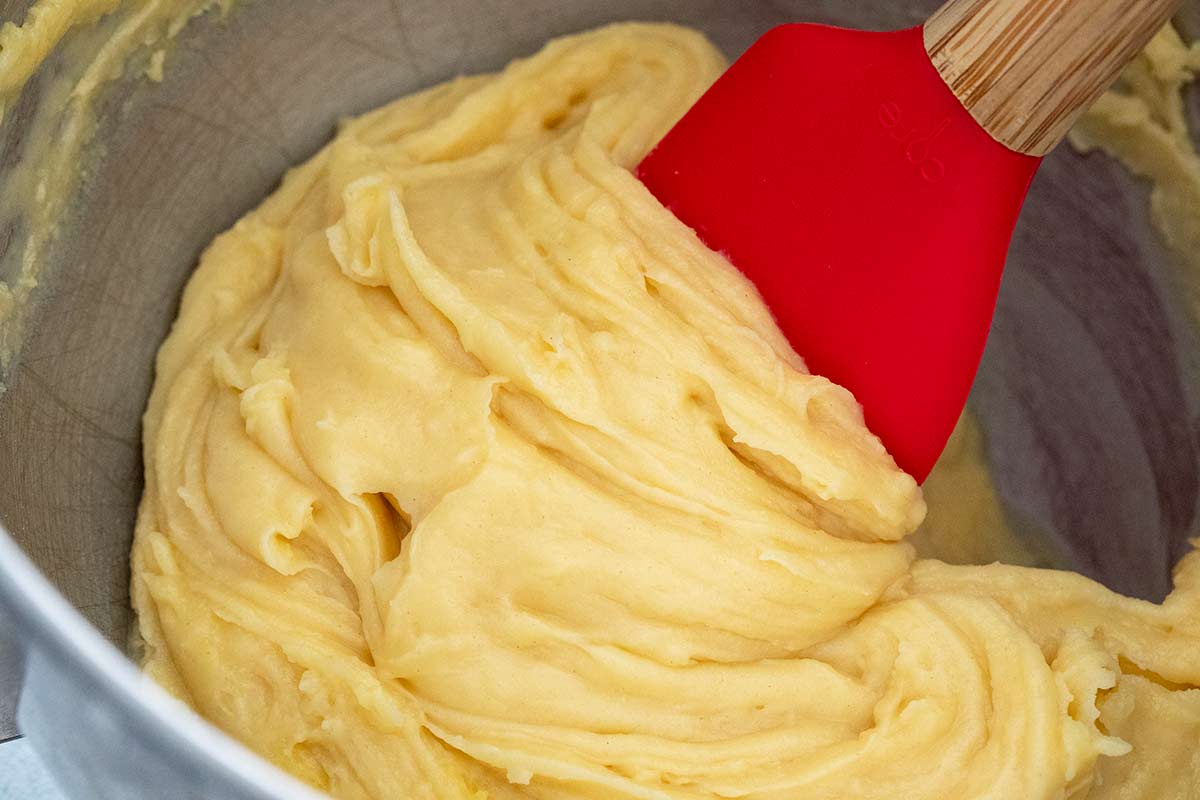
Gradually incorporating eggs helps the pastry rise when baked. Adding just enough eggs is vital so the dough resembles thick cake batter and holds its shape when piped.
Step 5: Piping the Dough
Pipe the dough onto the prepared baking sheets. Using a large plain tip like Ateco 806 helps control the flow of the thick choux paste, creating uniform rounds that bake evenly. Lightly greasing the inside of the bag reduces friction, allowing the sticky dough to pipe smoothly without air pockets that can cause uneven rising.
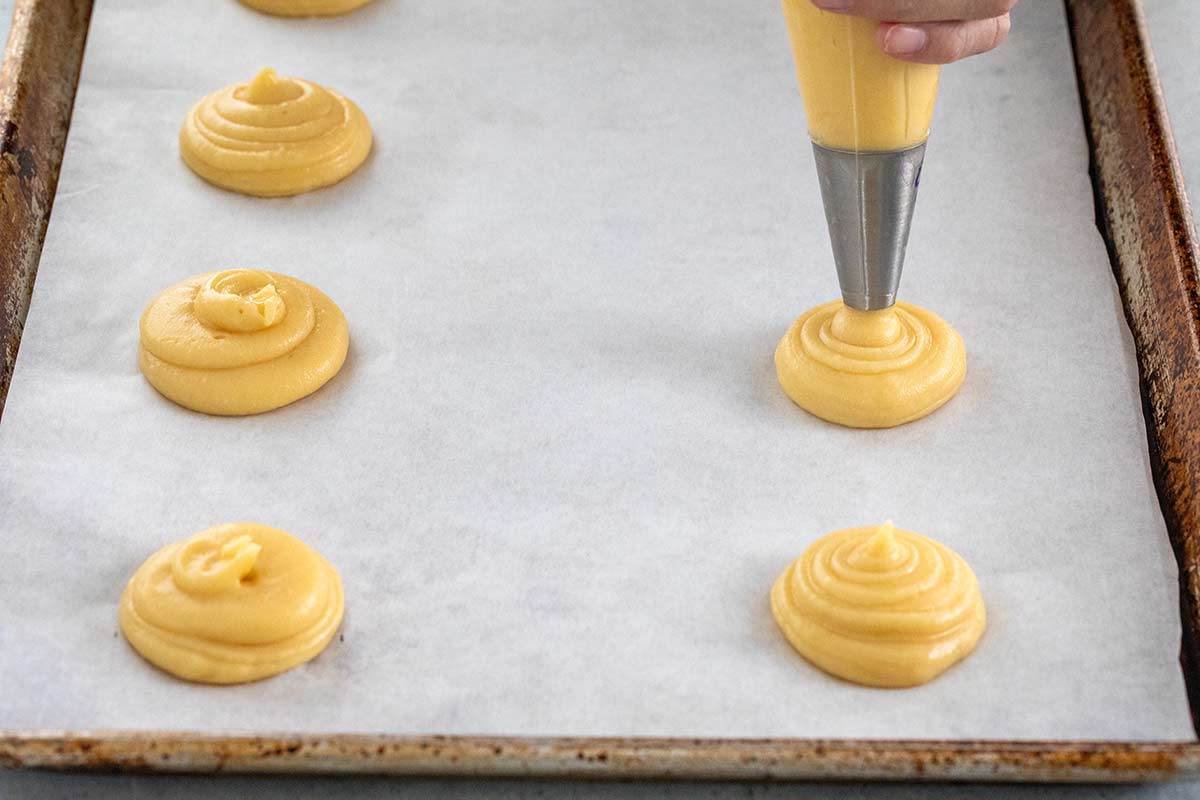
Spacing the mounds at least 2 inches apart allows room for expansion as steam rapidly inflates the structure in the oven.
Pro Tip: Dipping your finger in water to smooth down the piped “tails” is more than cosmetic. Sharp peaks brown faster and can burn before the puff fully rises. Smoothing the surface promotes even heat exposure, uniform expansion, and a round, stable shell.
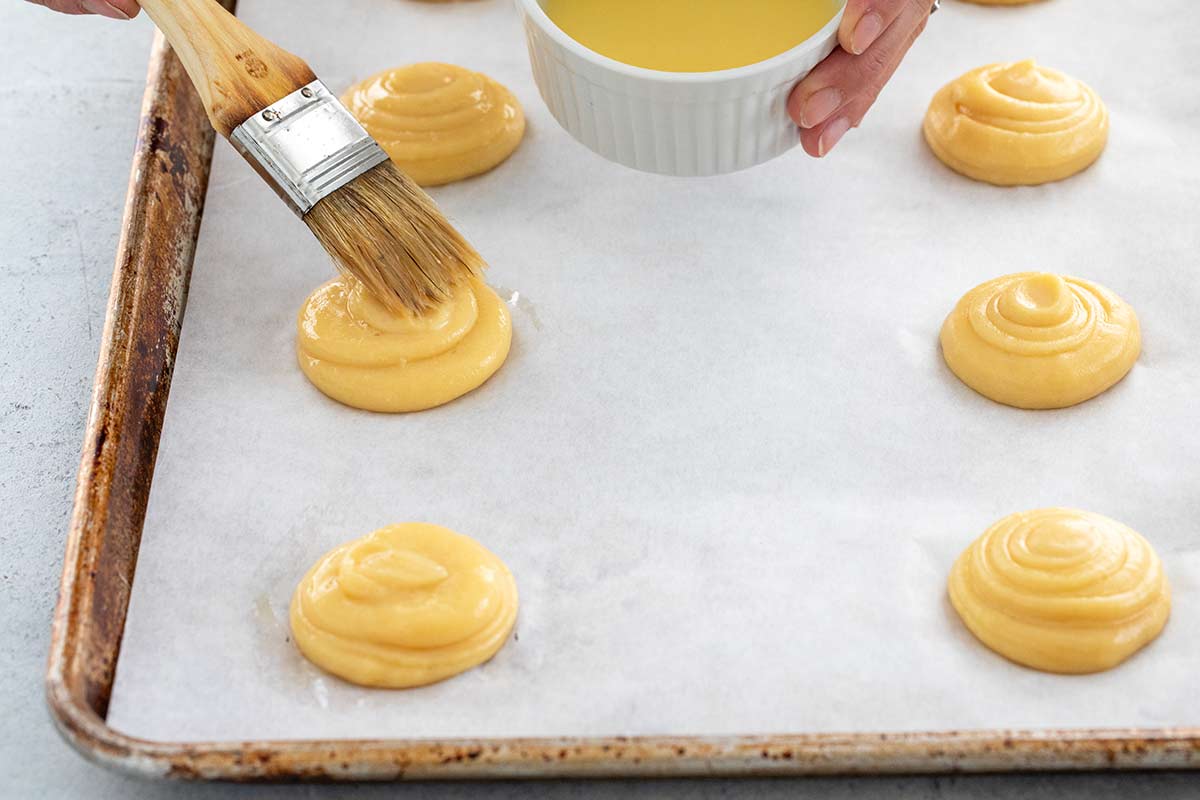
Step 6: Brush on Egg Wash
Brushing the choux with an egg wash adds a thin layer of protein to the surface, which enhances browning through the Maillard reaction as it bakes. The result is a deep golden color from the egg yolks and a slight sheen. It also helps smooth the exterior, reinforcing the structure so the puffs expand evenly while developing a delicate, crisp shell.
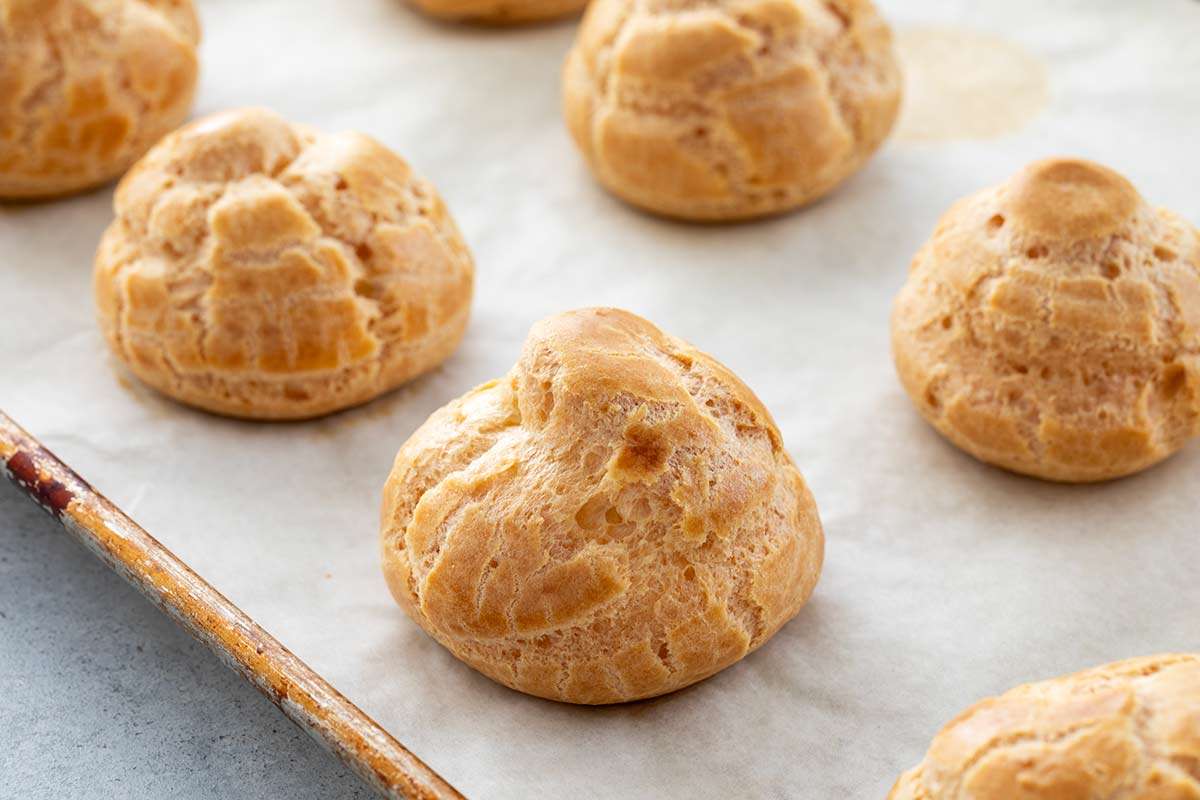
Step 7: Gradual Baking Process
The trick to making super round and tall cream puff shells is to use a particular baking method that gradually reduces the temperature every 10 minutes. The pastries are placed in a preheated oven at a very high temperature, 425ºF (218ºC). This makes the pastry cook and steam, giving it immediate lift while helping the proteins harden to create the outer structure.
Slowly decreasing the heat in 50-degree increments every 10 minutes until it reaches 200 degrees ensures the pastry is golden brown, hollow, and crisp without burning. Even though it is tempting, do not open the oven door! You want to keep the heat in so it dries out. Otherwise, it will take longer. If the cream puffs are not ready, pop them back into the oven at 200ºF (93ºC) until they finish drying out.
Expert Tip: The outside should be golden and crisp. Break open one of the shells and check that the pastry inside is hollow and not doughy. It should be dry, and some steam will release if it is still warm, but it should not feel soggy or undercooked.
Step 8: Make the Whipped Cream
A standard filling for cream puffs is homemade whipped cream or Chantilly cream. It’s sweetened with powdered sugar and pure vanilla extract, then whipped until smooth, forming stiff peaks. I learned in culinary school that when the cream is piped through the tip, the pressure whips it more, so don’t ever beat the cream to the point where it looks curdled.
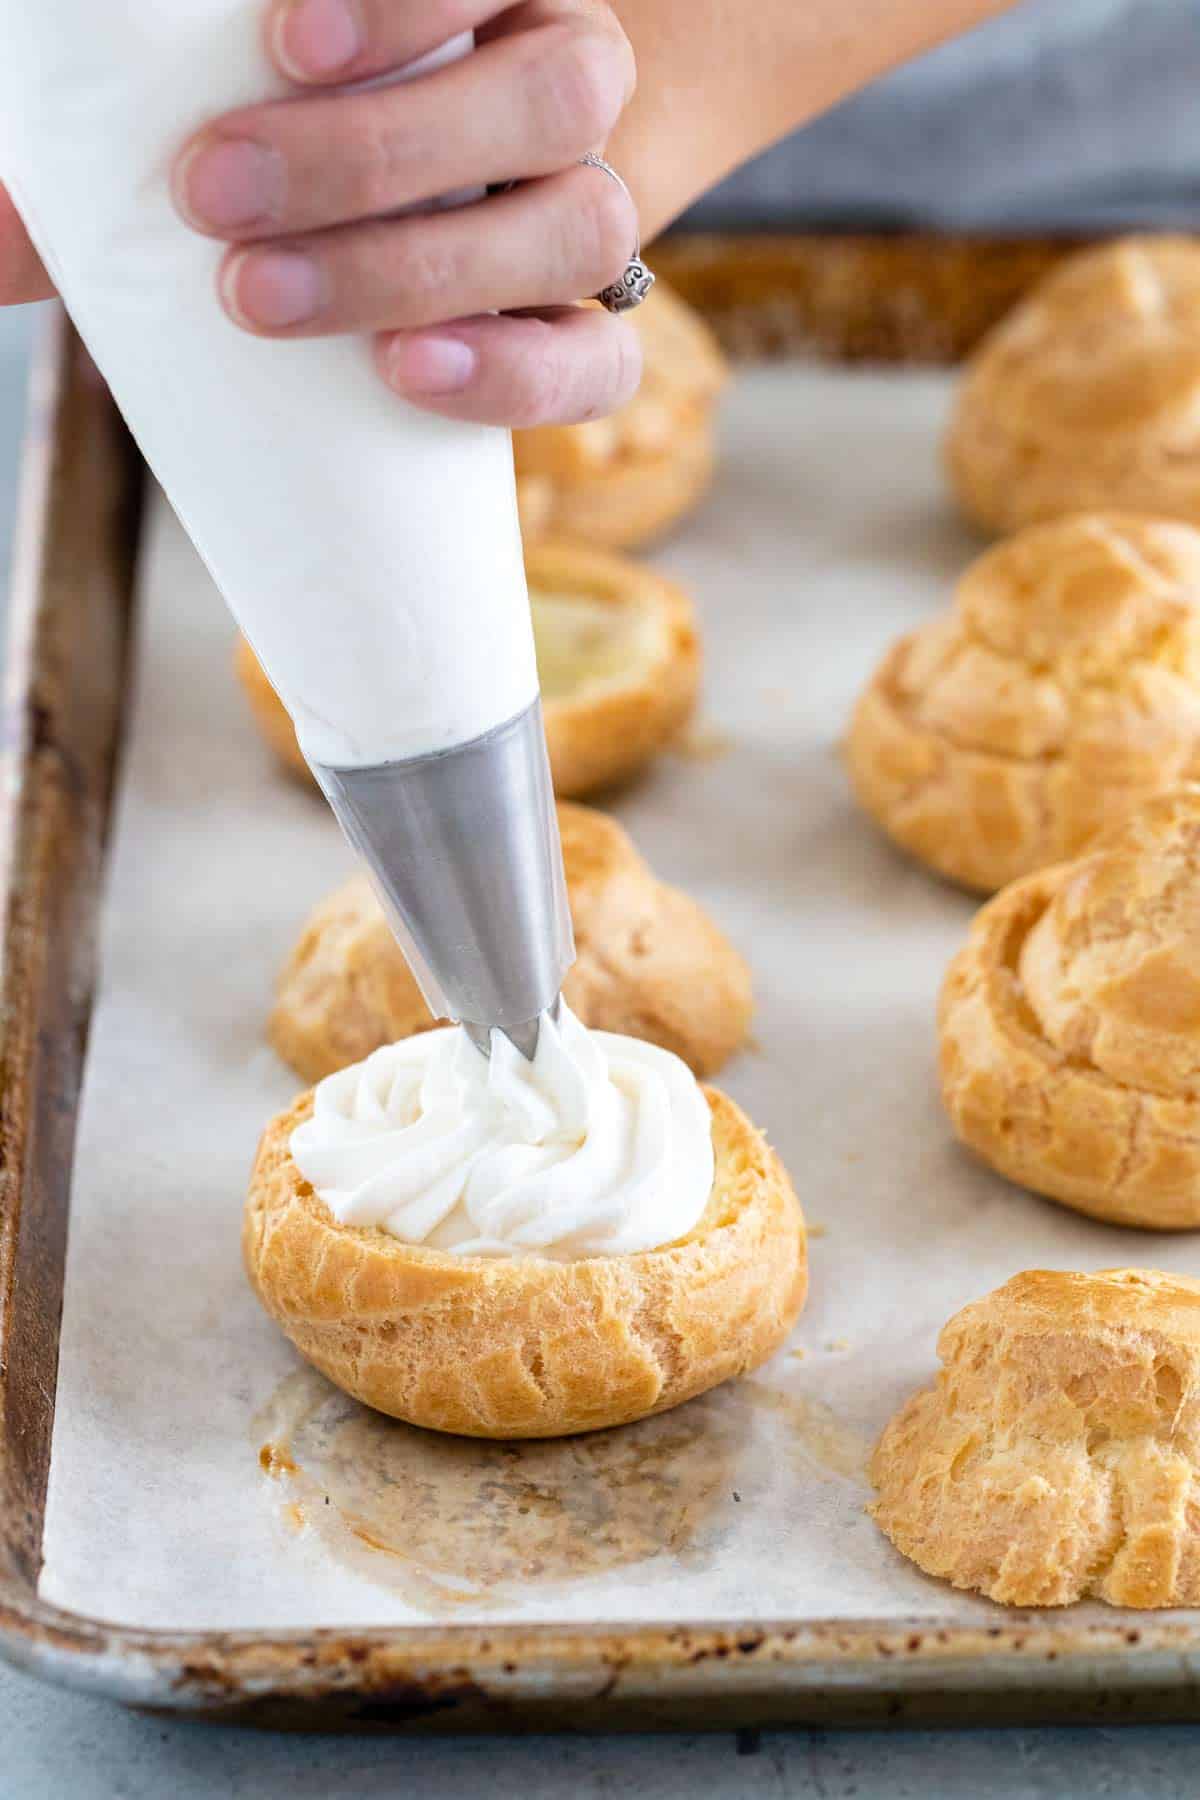
Step 9: Piping the Cream
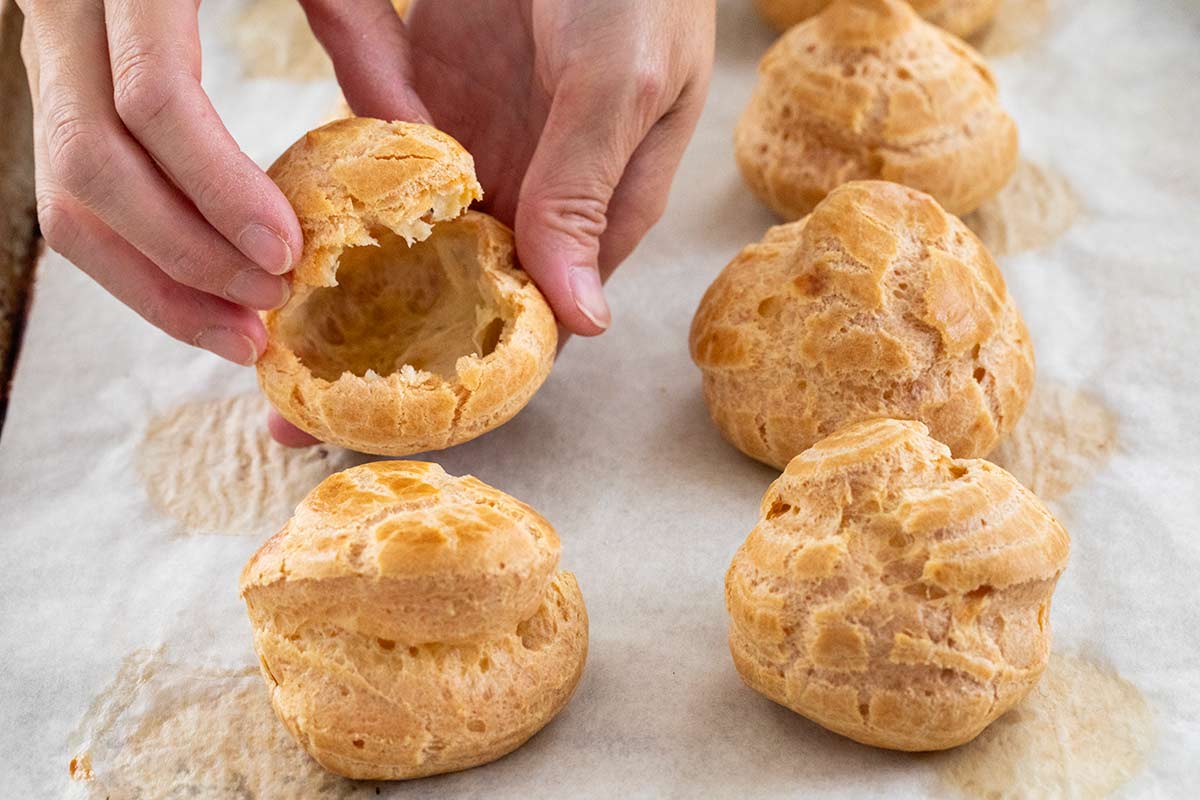
Cutting the cooled puffs with a serrated knife prevents crushing the delicate structure and preserves the hollow interior created by steam expansion. Using a large star tip, such as Ateco 824, creates ridges in the whipped cream, adding visual appeal and helping the filling hold its shape between the shells. Gently placing the lids on top maintains the crisp exterior while supporting the airy whipped center.
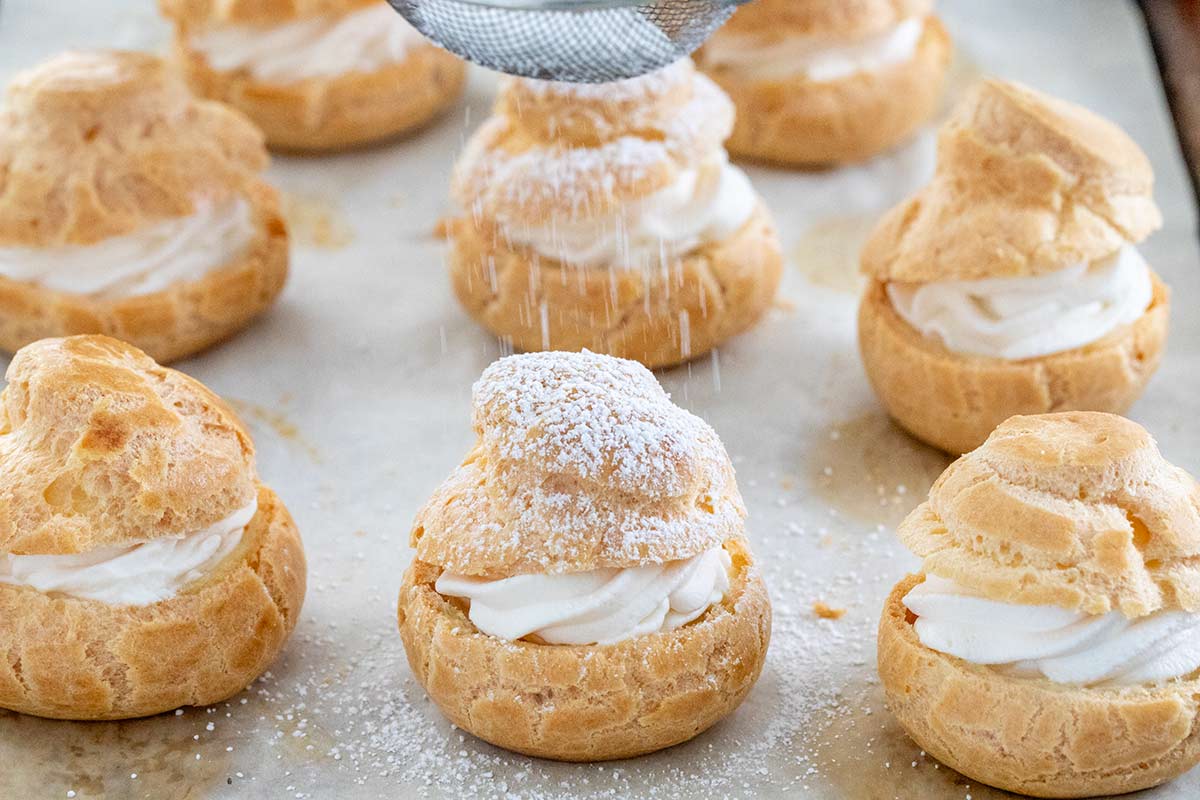
Step 10: Top with Sugar
Dusting the tops with powdered sugar adds a light sweetness and visual contrast, but it also absorbs surface moisture. Since cream puffs naturally soften over time as the filling releases humidity, serving them immediately preserves the crisp shell and airy texture. This is the dessert I make for special occasions when I want to impress my guests!
Make-Ahead Tip: If waiting to serve the cream puffs for more than an hour, refrigerate them uncovered so excess moisture can escape rather than condense on the surface, which helps prevent the shells from becoming soggy.
Frequently Asked Questions
I find that filled cream puffs will stay crisp when stored in the refrigerator uncovered for about 3 days. The refrigerator is cool but dry, so the shells don’t get soggy. When kept in a container, moisture from the humidity gets trapped, the powdered sugar dissolves, and the shells get damp.
Yes! You can make them up to 1 day in advance for the freshest and crisp-tasting pastry. Each component can also be made ahead of time. The shells can be baked and stored at room temperature for up to 5 days in an airtight container or frozen. The shells taste stale when not eaten on the same day. A quick solution to re-crisping the shell is to bake them at 300 degrees for about 5 to 10 minutes, then let them cool before filling and serving the same day.
Cream puffs can be filled and frozen, but they will not be as crisp in texture or as fresh in taste. It’s best to fill them from the bottom with whipped cream so the dairy isn’t exposed. Defrost them at room temperature until they feel soft when squeezed.
More Dessert Recipes


If you tried this Cream Puff Recipe, please leave a 🌟 star rating and let me know how it went in the 📝 comments below!
Cream Puffs

Ingredients
Pâte à Choux
- 1 ¼ cup water, divided
- 1 teaspoon granulated sugar
- ½ teaspoon kosher salt
- ½ cup unsalted butter, cut into 8 slices
- 1 cup all-purpose flour, spoon and leveled (see notes)
- 4 large eggs
- ¼ cup powdered sugar, for dusting
Egg Wash
- 1 large egg
- 1 tablespoon water, or milk
Whipped Cream (4 cups)
- 2 cups heavy whipping cream, or heavy cream
- ½ cup powdered sugar, or granulated sugar
- 1 teaspoon pure vanilla extract
Instructions
- Preheat the Oven – Set the oven racks to upper-middle and lower-middle positions. Preheat to 425°F (218ºC). Line two sheet pans with parchment paper and set them aside.
- Make the Dough – In a large heavy-bottomed saucepan, add 1 cup of water, sugar, salt, and butter. Bring to a boil over medium-high heat and stir until the butter fully melts, about 2 minutes.Turn off the heat and immediately add the flour. Vigorously stir with a large spoon (non-metal) until the flour is incorporated. Increase the heat to medium, and constantly stir until it clumps together, about 4 to 5 minutes. The dough should look relatively dry and just begin to leave a film on the saucepan.
- Cool the Dough – Transfer the dough to the bowl of a stand mixer fitted with a paddle. Slowly stir on low speed (setting 2) to cool to 130°F (54ºC) or just below, about 2 to 3 minutes. This prevents the eggs from curdling when added.
- Add the Eggs in Stages – Add eggs one at a time, mixing on medium-low speed (setting 4) until each egg is fully incorporated, about 30 to 45 seconds per egg. Once 3 eggs are added, check to see if the dough pulls away from the bowl's sides in thick threads, it will not clear the bowl. It should be shiny but firm and not runny, so it’s easy to control when piped. If it’s still too thick, add the fourth egg and mix for 45 seconds.
- Piping the Dough – Add a large plain tip to a piping bag (Ateco 806). Option to lightly grease the inside of the pastry bag with cooking spray. This helps keep the sticky dough from clinging to the bag. Add the dough to the pastry bag. Pipe onto the sheet pan, creating a 2-inch circular ball. Pipe at least 2 inches apart from each other. They will expand to about 3 inches after baking.Add ¼ cup of water to a small bowl. Dip your finger in the water and flatten any tails left on the top when piping to create a smoother surface.
- Brush on Egg Wash – In a small bowl, whisk together one egg and 1 tablespoon of water. Brush the tops and sides of each dough ball with the egg wash.
- Gradual Baking Process – Place the sheet trays in the upper-middle and lower-middle positions. Bake for 10 minutes at each temperature setting: 425°F (218ºC), 375°F (191ºC), 325°F (163ºC), 275°F (135ºC), 225°F (107ºC), 200°F (93ºC). Do not open the oven door! It will take about 60 to 70 minutes of total baking time.To check for doneness, break open one of the pastries. It should be as dry and feel light in weight. If needed, continue to bake the pâte à choux at 200°F (93ºC). Transfer shells to a cooling rack. Cool completely and reserve until ready to fill.
- Make the Whipped Cream – In a stand mixer fitted with the whisk attachment, add heavy cream, powdered sugar, and 1 teaspoon vanilla extract to the bowl. Whip on medium-low speed (setting 4) until the cream is frothy with bubbles on the surface, about 1 minute.Increase the speed to medium-high (setting 8), and whip until smooth, stiff peaks form, about 2 minutes. If needed, continue to whip in 5-second intervals. Do not overwhip, or the cream will become curdled.
- Piping the Cream – Working in batches, add the whipped cream to a pastry bag fitted with a large star tip (Ateco 824). Use a serrated knife to cut the shells in half to create a top and bottom. Evenly pipe the whipped cream into the pastry bottoms. Gently place the lids on top of the cream.
- Top with Sugar – Sprinkle powdered sugar on top of each cream puff. Serve immediately, or refrigerate, uncovered, if not eating within one hour.
Recipe Video

Notes
- Measuring the Flour: Use the spoon-and-level method. Scoop the flour into the measuring cup, then level the surface with the back of a knife. This adds a few tablespoons less flour than the dip-and-sweep method, so the pastry is not too dense.
- Smaller Cream Puffs: Pipe 1 ½ inch circles for about 21 smaller pastries.
- Egg wash: Whole milk can be substituted for water for a more browned surface, but shells will be slightly less crisp.
- Storing Unfilled Shells: Store baked shells at room temperature in an airtight container for 5 days or frozen for 1 month.
- Make them Crispy Again: Stored shells can be reheated at 300ºF (149ºC) on a sheet pan until slightly hardened on the outside, 5 to 10 minutes. Transfer to a wire rack and let cool before filling.
- Storing Cream Puffs: For the best taste, serve the same day. They can be refrigerated uncovered for up to 3 days.
Nutrition Facts
Percent Daily Values are based on a 2000-calorie diet. All nutritional information is based on estimated third-party calculations. Each recipe and nutritional value will vary depending on the brands you use, measuring methods, and portion sizes per household.


Sharon Dudley says
Can I mix half vanilla pudding with half whipped cream for the filling?
I first made creamy puffs in 1960. The old recipe ya really got a work with the wooden spoon mixing in the eggs one at a time. I’m gonna try this recipe tomorrow.
Thank you
Jessica Gavin says
Yes, you can mix vanilla pudding with whipped cream for the filling. Let mw know how it goes!
Summer says
What do you mean by thick threads leaving the bowl. Do you have to stand mix the eggs in? In your recipe it said the different increments of time for baking, what time do you do each decree ? I will try to make next week with berries. Would blackberries taste good? Can frozen berries work without it being soggy overnight?
Karina says
This recipe was incredible! The directions were so helpful and I followed it exactly as written and it couldn’t have come out any better! Thank you so much for all the details, it helped so much!
Jessica Gavin says
Great job, Karina! I’m so happy that you found the instructions helpful to make the cream puffs.
Dottie says
Instead of cutting the puff in half to fill, since the puff is hollow can it be filled by pushing the tip of the filling bag into the puff and fill it that way (like filling a jelly donut method)? Would there be any drawback in filling it this way?
Jessica Gavin says
Yes, you can absolutely fill the bottom of the cream puffs. I like the presentation of seeing the cream in the center. The only drawback I see for large cream puffs if there is some dough webbing in the center, it might prevent the cream from filling inside completely. Smaller profiteroles are filled from the bottom, it works great!
Lis says
Your recipe says 1 1/4 c water and your video says 1 c water. Which is correct?
Jessica Gavin says
Hi Lis- The water is divided into 1 cup for the dough, and then 1/4 cup to use for dipping your fingers to smooth out the tops.
Donna Rumohr says
I have made these a few times. My favorite is to fill with a scoop of vanilla ice cream, place the top on & cover with either caramel sauce or hot fudge. Mmmmm mmmmm
Elise Graham says
One of the first things I learned to cook. ?? love creme puffs.
Jessica Gavin says
That’s incredible! One of my favorite desserts.
Joan says
Looks Yummy!
Jessica Gavin says
You would love the cream puffs!
Lilian Chiw says
Thank you Jessica for the kind advice and being responsive.
Lilian Chiw says
Would like to ask what is the recommended way to store the cream puff (filled cream). I try many ways putting in airtight container and place it in the freezer and fridge both equally turned out soft and soggy. Would appreciate to you hear from you soon. Thank you
Jessica Gavin says
I’ve found that the best way to store cream puffs is on a plate, UNCOVERED! The moisture from the refrigerator doesn’t condensate on the pastry, preventing sogginess.
Maria Terry says
Made these for my husband for Valentine’s Day along with Jessica’s Beef Wellington. A lot of labor for the man I love. I never made Choux before. The directions were detailed and clear. One description detailed thick threads that didn’t pull away from the sides of the mixing bowl. I recognized that the minute I saw it. Takes a lot of time but not a lot of actual labor. Read the recipe before you begin. This recipe is worth your time. I filled mine with whipped cream and strawberries. I dipped the tops in melted dark chocolate. Tried the seeding method. Divine. I’ll try the cream and powdered sugar version too. This was an epic cooking night. My husband was so pleased. Best meal I ever made with my own two hands. Try the Beef Wellington too.
Jessica Gavin says
I am so impressed by you Maria! I’m thrilled to hear that you tried a challenging recipe and made it your own. I’m jealous of your husband! Great job!