Learn how to make pâte à choux for both sweet and savory treats. This classic choux pastry recipe bakes into golden-brown shells with a crisp exterior and a hollow center. They’re perfect for filling with cream, custard, ice cream, or cheese.

Jessica’s Recipe Science
- Cooking the flour mixture gelatinizes the starches and removes excess moisture, creating a stable dough that puffs up in the oven.
- Eggs create lift and structure in choux pastry, but too many make the dough loose. Add just enough so it pipes and holds its shape.
- Bake choux at 425°F for a steam-driven lift, then reduce the heat by 50°F every 10 minutes to set and dry the hollow shell.
Featured Comment 2
“I made these with a pastry cream filling, and they came out surprisingly well for the first time! The tops came out perfectly crackly, and most had that signature gap in the center.”—Daniel S.
Why It Works
Pâte à Choux or choux pastry is a classic French dough used to make a variety of elegant baked and fried desserts and appetizers. The recipe combines water, salt, sugar, butter, flour, and eggs. It requires lightly cooking the flour in the dough first, whipping it with eggs into a thick paste, then piping it into desired shapes.
The trick is that I use a gradual, gentle baking process to ensure the pastry dries completely inside, with golden-brown exteriors. When baked, the dough puffs up, yielding crispy, hollow shells begging to be filled. If you deep-fry it, the pasty becomes chewy, making it more like a donut-style fritter.
Jump To a Section
Ingredients You’ll Need
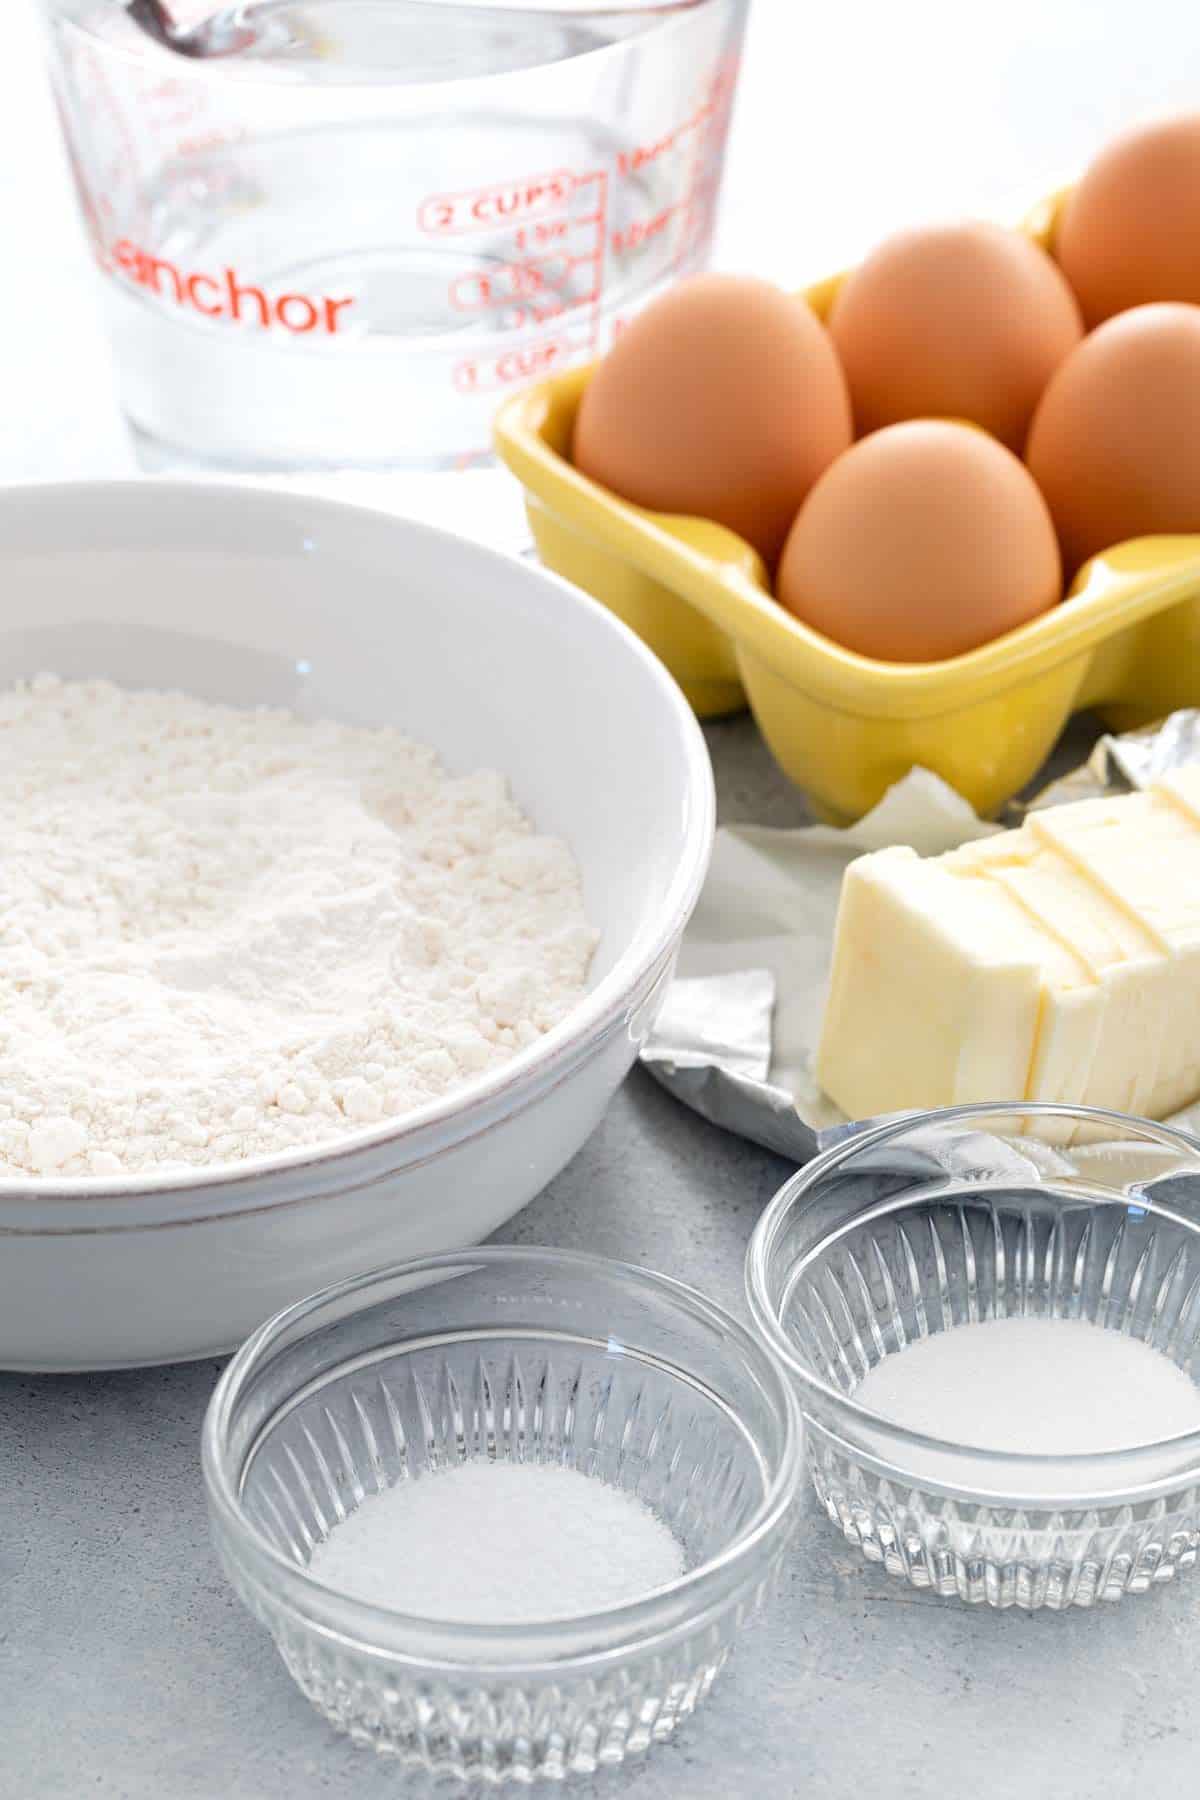
- Water: Provides the moisture needed to create steam, which is the driving force behind choux pastry’s rise.
- Sugar: Adds a touch of sweetness and promotes better browning through caramelization.
- Salt: Enhances flavor and balances the richness of the butter and eggs.
- Butter: Contributes flavor and tenderness while helping create a smooth, emulsified dough.
- Flour: Supplies starch that gelatinizes, building structure and trapping steam for a hollow center.
- Eggs: Egg yolks provide richness, while egg whites help the pastry structure set. The additional moisture provides lift as the hollow pastry bakes.
- Egg Wash: Creates a glossy, golden exterior and helps smooth out peaks and cracks before baking.
See the recipe card below for all ingredients and measurements (US and metric).
Ingredient Substitutions
This choux pastry recipe is easy to customize! Try these tasty options:
- Using Milk: Using milk instead of water in choux pastry adds extra richness, flavor, and browning. The milk proteins and natural sugars promote better Maillard browning, giving the shells a deeper golden color, while the fat adds tenderness. The result is a slightly softer, more flavorful pastry compared to using water alone, which creates a lighter, crisper shell.
- Make it Gluten-Free: You can substitute a 1:1 gluten-free flour blend (with xanthan gum) for all-purpose flour in choux pastry. The shells may be slightly more delicate, but they will still puff and form a hollow center with proper technique.
- Make it Dairy-Free: Use vegetable shortening, margarine, or plant-based butter. Use a plant-based milk instead of dairy milk.
- Savory Gougères: Add 1 cup of grated cheese, such as Parmesan, Gruyère, or cheddar, to the dough after adding the eggs.
- Filling Options: Whipped cream, vanilla custard for eclairs, jam, or homemade Nutella mixed with whipped cream, or ice cream for profiteroles.
- Toppings: Dip or drizzle with chocolate magic shell or caramel sauce.
How to Make Choux Pastry
Step 1: Preheat the Oven
Preheating the oven to 425°F is critical because choux pastry depends on an immediate burst of high heat to generate steam. That steam rapidly expands the water in the dough, creating lift and forming the hollow interior. If the oven isn’t fully preheated, the structure won’t set quickly enough, and the pastries can spread or collapse.
Positioning the racks in the upper- and lower-middle spots promotes even heat circulation. Parchment paper prevents sticking and allows the shells to rise uniformly without excess browning on the bottom.

Step 2: Boil the Water, Butter, and Salt
Stir and boil water, salt, sugar, and butter over high heat in a heavy-bottom pot on the stove top. This ensures the ingredients are evenly distributed throughout the flour.


Step 3: Add the Flour and Stir
Turn off the heat and immediately add the flour, stirring with a wooden spoon until fully incorporated. Return to medium heat and cook, stirring constantly, until the dough forms a smooth ball, pulls away from the sides of the pan, and leaves a thin film on the bottom, about 4 to 5 minutes.
The dough should look slightly dry. This step removes excess moisture, creating a thick, stable paste that can properly absorb the eggs and trap steam for maximum lift.
Ingredient Chemistry: Cooking the dough (called the panade) is what gives choux pastry its structure. Adding the flour all at once ensures even hydration and prevents flour lumps, while continued heating fully gelatinizes the starch granules and evaporates excess water—key for creating a strong framework that puffs and holds its shape in the oven.

Step 4: Cool the Dough
The dough is mixed for a few minutes in the bowl of a stand mixer to help it slightly cool down to below 130°F (54ºC). This prevents the eggs from cooking when they’re added to the dough.


Step 5: Add Eggs One at a Time
Eggs are what give choux pastry its signature rise. Add them one at a time to a stand mixer fitted with a paddle attachment, mixing on medium-low speed for about 30 seconds per egg.
The dough will look separated and chunky after the first few additions, but as you continue, it will become smooth and thick—similar to cake batter. Stop adding eggs once that thick, pipeable consistency is reached.
Tips for Perfect Execution: If you add too many eggs, the dough becomes too loose, won’t hold its shape when piped, and will bake up flat. Typically, 3 to 4 eggs are enough. To test if it’s ready, spoon a small amount onto a plate and check after 5 minutes. If it spreads and loses its shape, the dough is too fluid.
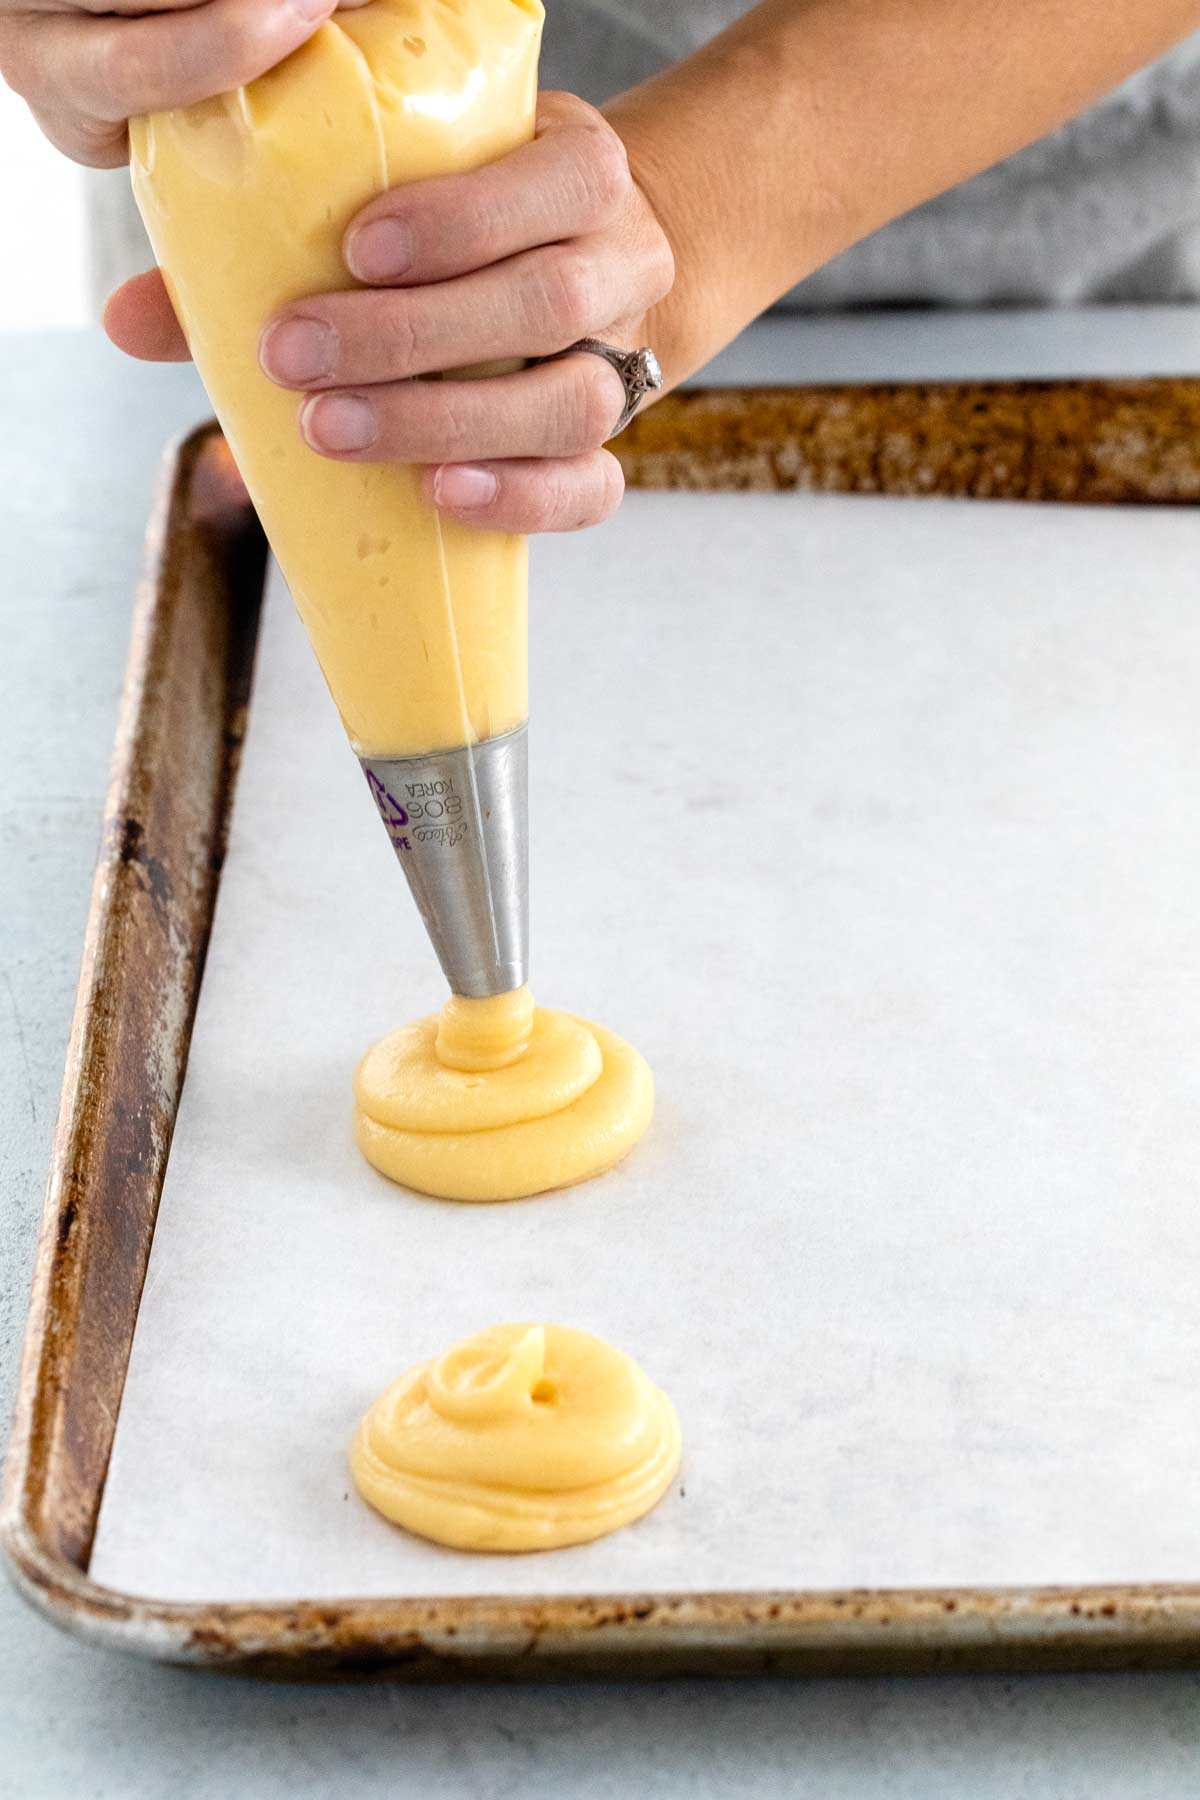
Step 6: Pipe the Dough
Now that the choux dough pastry is ready, choose your shape and if you want to bake or fry it. I recommend using a pastry bag fitted with a large round tip or star tip. A round piping tip is typically used for profiteroles and cream puffs with a round shape, or oblong eclairs. A star tip is used for Paris-breast and churros. Make sure to pipe onto a parchment paper-lined baking sheet about 2 inches apart when baking.


Step 7: Brush with Eggwash
Use your finger after dipping it in water to pat down any “tails” left on the pastry after piping. Brush the surface with egg wash for a more golden color.

Step 8: Step-wise Baking Method
We start the pastry at 425ºF (218ºC) to get the dough to steam and puff right away, then gradually reduce the heat by 50 degrees every 10 minutes until it reaches 200ºF (93ºC). This step-wise baking method ensures that the shell sets hollow and completely dry in the middle without burning.
This process takes about 1 hour in total time. Do not open the oven door! This will let out heat and make the pastries take longer to cook. Once complete, crack open a shell and check whether it’s fully dried. If not, bake longer at 200ºF (93ºC).

Frying the Choux Pastry: Alternatively to baking, when frying the dough, heat a high smoke point oil like vegetable, canola, soy, or peanut to about 350 to 360ºF (177 to 182ºC). There should be at least 2 inches of frying oil in the pot. Cut the piped dough into 4 to 6-inch strips and fry for about 2 minutes per side. Remove from the frying oil and immediately toss in the desired coating.
Step 9: Let them Cool
Cooling choux pastries completely on a rack allows excess steam to escape and the interior to finish drying, preventing condensation from softening the shell and ensuring it stays crisp when filled.
Storing and Freezing Tips: Baked shells can be stored at room temperature in an airtight container for up to 5 days or frozen for up to one month. To make the shells crispy after storing at room temperature or in the freezer, bake on a sheet pan at 300ºF (149ºC) until slightly hardened on the outside, 5 to 10 minutes. Transfer to a wire rack and let cool before filling with pastry cream.
Frequently Asked Questions
Choux pastry, or pâte à choux, is a light French dough made from water (or milk), butter, flour, and eggs. Unlike other pastries, it’s cooked twice. First, on the stovetop to form a paste, then baked in the oven. The high moisture content creates steam as it bakes, causing the dough to puff and form a crisp, golden shell with a hollow center. That airy structure makes it perfect for both sweet treats like éclairs and cream puffs and savory options like gougères.
This choux pastry recipe can be used to make cream puffs, profiteroles, croquembouche, eclair shells, gougères, choux au craquelin, and Paris-breast. The main difference is the shape and the size of the pastry dough piped. If fried, they can make Dutch crullers or Mexican churros tossed in cinnamon and sugar.
A common mistake when making choux pastry is mismanaging moisture and temperature. If you don’t cook the panade (the flour, butter, and water mixture) long enough, add too many eggs, or open the oven door too early, the structure won’t set properly. Since choux relies on steam for lift, these missteps can cause the pastries to spread or collapse. I also recommend gradually lowering the oven temperature toward the end of baking. This helps the shells hold their shape, dry out completely, and stay hollow inside without over-browning or burning.
Choux pastry and puff pastry produce airy results in very different ways. Choux is a twice-cooked, egg-rich dough that relies on steam to puff into a light, hollow shell. It’s used for éclairs, profiteroles, and cream puffs. Puff pastry, on the other hand, is a laminated dough with layers of butter folded into it. As it bakes, steam separates the layers, creating a flaky, buttery texture. Choux is piped and hollow, while puff pastry is rolled, layered, and delicately flaky.
More Dessert Recipes


If you tried this Choux Pastry Recipe, please leave a 🌟 star rating and let me know how it went in the 📝 comments below!
How to Make Choux Pastry (Pâte à Choux)

Ingredients
Choux Pastry
- 1 cup water
- 1 teaspoon granulated sugar
- ½ teaspoon kosher salt
- ½ cup unsalted butter, (4 ounces) cut into 8 slices
- 1 cup all-purpose flour, (4 ½ ounces) spoon and leveled (see notes)
- 4 large eggs
Egg wash
- 1 large egg
- 1 tablespoon water
Instructions
- Preheat the Oven – Set the oven racks to upper-middle and lower-middle positions. Preheat to 425°F (218ºC). Line two sheet pans with parchment paper.
- Boil the Water, Butter, Salt – Place the water, sugar, salt, and butter in a large heavy-bottomed saucepan. Bring to a boil over medium-high heat and stir until the butter is fully melted.
- Add the Flour and Stir – Turn off the heat and immediately add the flour. Vigorously stir with a large spoon (nonmetal) until the flour is incorporated. Increase the heat to medium, constantly stir the dough until it comes away from the sides of the pan, and clumps together, about 4 to 5 minutes. The dough should look relatively dry and just begin to leave a film on the saucepan.
- Cool the Dough – Transfer the dough to the bowl of a stand mixer fitted with a paddle. Slowly stir on low speed (setting 2) to cool to 130°F (54ºC) or just below, about 2 to 3 minutes.
- Add Eggs One at a Time – Mix one egg at a time on medium-low speed (Setting 4) until fully incorporated, about 30 to 45 seconds per egg. Once 3 eggs are added, check whether the dough pulls away from the sides of the bowl in thick threads; it will not clear the bowl. It should be shiny but firm and not runny, so it’s easy to control when piped. If it’s too thick, add the fourth egg and mix for 45 seconds.
- Pipe the Dough – Add a large plain tip to a pastry bag (Ateco 806). Option to lightly coat the inside with cooking spray to help keep the sticky choux from clinging to the inside. Add a pipeable amount of dough into a pastry bag.Pipe the choux at least 2" apart onto the sheet pan. They expand slightly during baking. Create 1 ½" circular mounds for smaller pastries, 2" for larger ones, or 3 to 4" long strips for eclairs.
- Brush with Eggwash – Dip your finger in water and flatten any tails left on the top when piping to create a smoother surface. In a small bowl, whisk together one egg and 1 tablespoon of water. Brush the tops and sides of each pastry.
- Step-wise Baking Method – Bake for 10 minutes at each temperature setting: 425°F (218ºC), 375°F (191ºC), 325°F (163ºC), 275°F (135ºC), 225°F (107ºC), 200°F (93ºC). Do not open the oven door! It will take about 60 to 70 minutes of total baking time.Break open one pastry to ensure that baking is complete. It should be as dry on the inside. If needed, continue baking at 200°F (93ºC) until the center is dry. They should feel light in weight. This baking method will work best if you bake one tray at a time.
- Let them Cool – Transfer pastries to a cooling rack. Cool completely and reserve until ready to fill.
Notes
- Measuring the Flour: Use the spoon-and-level method. Scoop the flour with a spoon and add it to a cup, then level the surface with the back of the knife. This adds a few tablespoons less flour than the dip-and-sweep method, so the pastry is not too dense.
- Eggwash: Whole milk can be substituted for water for a more browned surface, but it will be slightly less crisp.
- Storing Shells: The baked shells can be stored at room temperature in an airtight container for 5 days or frozen for 1 month.
- Reheating: Stored shells can be reheated at 300ºF (149ºC) on a sheet pan until slightly hardened, 5 to 10 minutes. Transfer to a wire rack and let cool before filling.
- Storing Filled Pastries: Once filled, the pastries taste best when served the same day or, for up to 3 days, when refrigerated uncovered.
- Frying Method: Add a pipeable amount of dough into the pastry bag. Add vegetable oil to a heavy-bottomed pot that comes up to 2″ from the bottom. Heat the oil to between 350 to 360ºF (177 to 182ºC). Pipe the dough into the oil and cut it into 4 to 6″ strips. Fry until golden brown, about 2 minutes per side. Remove from the oil and immediately toss in the desired coating.
Nutrition Facts
Percent Daily Values are based on a 2000-calorie diet. All nutritional information is based on estimated third-party calculations. Each recipe and nutritional value will vary depending on the brands you use, measuring methods, and portion sizes per household.


Daniel Sanchez says
I made these with a pastry cream filling, and they came out surprisingly well for a first time! The tops came out perfectly crackly, and most had that signature gap in the center.
Jessica Gavin says
That’s wonderful to hear, Daniel! Great job!