
This is the best banana cream pie recipe to serve during the holidays! Each slice has a fluffy topping of whipped cream and crunchy almonds on a flaky, buttery crust with vanilla bean custard.

Jessica’s Recipe Science
- Heat the milk, rum, and vanilla bean to 180 to 185ºF to avoid curdling and ensure a smooth custard.
- Cornstarch thickens and sets the custard, but the challenge is preventing the eggs from curdling. To avoid this, temper the eggs by slowly mixing in the hot liquid to raise their temperature gently.
- Layer 1/4-inch banana slices along the bottom and sides of the crust to infuse a strong, fresh fruit flavor throughout the pie.
Jump To a Section
Why It Works
Making homemade banana cream pie from scratch is worth the effort. To simplify each task, I like to break the recipe into three parts: flaky crust, custard filling, and whipped cream. I usually make the pie dough a day in advance so you can roll and shape it the next day.
The luscious vanilla pudding can be tricky, but don’t worry. I’ll give tips to prevent delicate eggs from curdling and guarantee a smooth and sliceable filling. Adding a blanket of fresh bananas over the crust produces bursts of sweet fruit flavors. Generously covering the filling with a mound of cream provides a pleasant surprise.
Ingredients You’ll Need
- Pie Crust: To hold the heavy, decadent filling, I use a classic pie dough called Pâte Brisée that consists of just flour, butter, salt, and water. I even use it for my double-crust apple pie recipe. It yields a tender and buttery texture, pairing perfectly with the custard.
- Bananas: Select ripe bananas with yellow skins without many brown spots. They will be sliced to add to the bottom of the crust.
- Custard Filling: Instead of using pudding mix, custard filling is easy to make from scratch using fresh ingredients. This recipe uses whole eggs, egg yolks, milk, butter, and vanilla to create a velvety texture. It can be pricey, but I infuse whole vanilla beans into the milk. One teaspoon of pure vanilla extract or vanilla bean paste is a good substitute. A little bit of rum adds depth and complements the vanilla flavor.
- Whipped Cream: The pie is topped with luxurious whipped cream made from heavy cream, powdered sugar, and vanilla extract.
See the recipe card below for all ingredients and measurements (US and metric).
Ingredient Substitutions
This easy banana cream pie recipe is simple to customize! Try these tasty options:
- Using Store-Bought Pie Crust: Purchase a single crust. If frozen, defrost the crust and bake according to the recipe.
- Using Vegetable Shortening: I recommend substituting half the butter with vegetable shortening. When served chilled, this will give a tender crust because shortening is softer than butter when cold.
- Quick Filling: Make the filling with store-bought vanilla or banana pudding mix. They may not firm up as much as the homemade vanilla custard. You’ll need at least 2 cups for the filling.
- Whipped Cream Alternatives: Use canned dairy whipped topping, cool whip, or coconut whipped topping.
- Toppings: Add mini chocolate chips, cherries, caramel sauce, nutella, banana chips, vanilla wafers, or nuts like pecans, walnuts, or peanuts.
How to Make Banana Cream Pie
Step 1: Prepare the Crust Ingredients
Cut the butter into 1/4-inch cubes, then refrigerate the ice water and butter. This helps create a flaky, tender crust as the butter melts in the oven, releasing steam that forms light layers.

Step 2: Break Down the Butter
In the stand mixer bowl, combine flour and salt at a low speed. Add chilled, diced butter and mix on low until the mixture resembles wet sand with pea-sized butter pieces. Avoid over-mixing; the dough should remain crumbly until water is added, ensuring a flaky crust.

Step 3: Hydrate the Dough
Add ice-cold water, 1 tablespoon at a time, mixing briefly after each. Stop when the dough looks lumpy with small crumbles and holds together when pinched, usually after 5 to 7 tablespoons. Avoid over-mixing to keep the crust flaky.

Step 4: Rest the Dough
It’s crucial to let the dough rest, chilled for 4 hours before rolling. This allows the gluten proteins that form to relax, preventing a tough bite.

Step 5: Roll the Dough
Remove the dough from the refrigerator and let it sit at room temperature for 10 minutes or until pliable. Lightly flour the counter and dough, rotating and dusting as needed to prevent sticking. Roll out to a 14-inch circle, just under ¼ inch thick.

Step 6: Form the Crust
I prefer a 9-inch glass pie plate for easy monitoring of browning. Place the rolled dough into the pie plate, pressing it gently along the sides and bottom. Trim, leaving a 1/2-inch overhang, tuck the excess under, and crimp with your fingers. Freeze it for 20 minutes to keep the butter chilled.
Step 7: Preheat the Oven
Position the oven rack in the center and preheat to 375°F (190°C). This temperature is ideal for developing a golden-brown crust, as it allows the butter to release steam gradually, creating flaky layers without over-baking. Place the pie dish on a sheet pan for easy handling.

Step 8: Bake the Crust
Since you don’t bake the custard filling, the crust must cook in two stages to create a sturdy shell. First, the shell is blind-baked with weights for 20 minutes in a glass pie pan. This process helps set the shell’s hollow shape and keep the bottom from puffing up in the center.
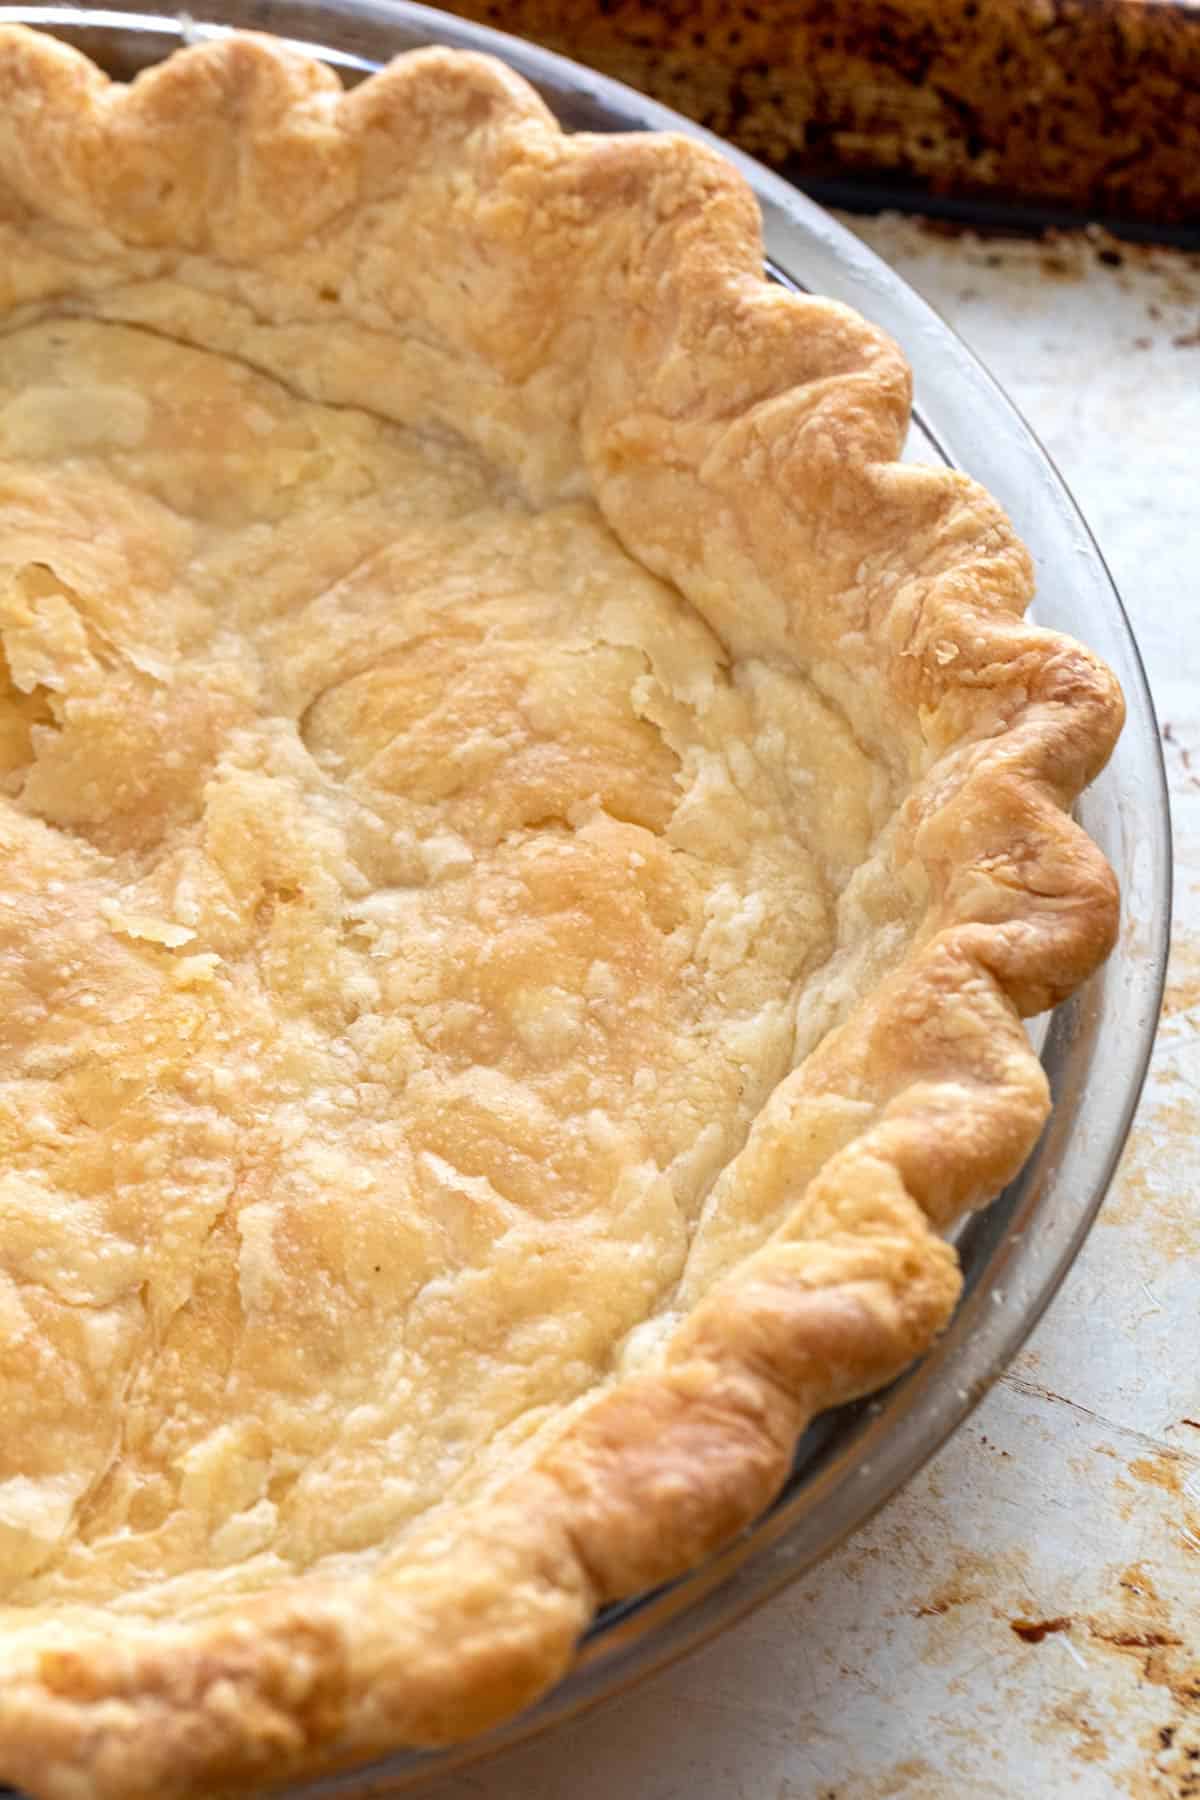
Afterward, you remove the weights and bake the crust until golden brown. It will shrink slightly on the edges, but that’s normal, as the proteins contract when heated. Before filling the pie shell, it needs to cool down completely.
Experimentation Encouraged: I’ve even made a version using a graham cracker crust that I use in my key lime pie. If you like the robust and sweeter taste of graham crackers, give it a try to switch things up!

Step 9: Prepare the Bananas
Slice bananas into 1/4-inch pieces and layer them across the bottom and sides of the pie shell, aiming for about 46 slices. Cover with plastic wrap, pressing gently to remove air and prevent browning, then set aside.

Step 10: Custard Filling
Whisk together the whole eggs and yolk in a separate bowl, then blend in the sugar-cornstarch mixture until smooth to ensure even thickening. When heated, this mixture helps thicken the custard by forming a gel structure.

Add the milk, rum, and a whole vanilla bean with its seeds in a medium pot for a deep flavor infusion. To avoid curdling, heat the milk mixture over medium-low until it reaches 180–185ºF (82–88ºC), just below a simmer.

Step 11: Temper the Eggs
Add a small amount of warm milk to the egg, sugar, and cornstarch mixture. This process allows the eggs to rise gently in temperature and mix with the hot liquid without shocking the eggs’ albumin proteins.

Pour the tempered egg mixture into the pot. The custard then cooks on the stovetop, continually stirring until it thickens. It’s normal to see some small clumps. Whisk in the butter to add richness.
Ingredient Chemistry: Whole eggs coagulate and form curds at 144ºF (62.2ºC) and above. The milk should not exceed 185ºF (88ºC) when tempering to prevent the proteins from curling. You’re only adding a small amount of hot liquid at a time, so it should not exceed 144ºF. Once the tempered eggs are added to the remaining milk, they can be safely heated to around 170 to 175ºF (76 to 79ºC) to cook the cornstarch so it thickens and gels once cooled.

Step 12: Add the Filling to the Crust
I always strain the custard through a fine-mesh sieve when it’s still hot to achieve a smooth consistency. Cool it slightly so it’s not steaming hot, but don’t let it reduce too much. Otherwise, the starches will become rigid and solidified, making them harder to spread.

Spread the warm custard evenly, then cover it with plastic wrap and refrigerate. The starches and butter in the filling will set after about 3 hours, or you can just let it sit overnight.
Pro Tip: Pull the pie out when you’re ready to make the whipped cream so the butter in the crust can come to room temperature. This will make the pie more tender and much easier to slice.

Step 13: Make Whipped Cream
In this recipe for banana cream pie, I use a stand mixer to make lightly sweetened whipped cream. Other techniques, like the blender or hand whisking, can be used if you prefer.
Use heavy whipping cream, powdered sugar, and vanilla extract to flavor the dairy. Whip until very smooth, stiff peaks form. From here, you can top the pie and spread it, or I like to add it to a piping bag fitted with a large star tip to make designs.

Step 14: To Serve
If desired, add a few more banana slices, sprinkle with sugar and torch them for a caramelized surface. For more garnish, almond slices add extra crunch and contrast to all of the pie’s creaminess.

Frequently Asked Questions
After slicing, tightly cover them with plastic wrap. This creates a barrier from oxygen, reducing oxidation due to enzymatic browning. You could also brush the surface with acidulated lemon water, 1 teaspoon mixed with 1 cup of water. A sweeter option is 1 tablespoon of honey combined with 1 cup of water. I use both methods to keep sliced apples from turning brown.
When making the custard, if the cornstarch isn’t heated high enough, nearly to a boil, it will not thicken. The texture changes from runny to very thick in just a few minutes. If it doesn’t, the recipe does not have enough cornstarch. it will thicken more once cooled so that it’s sliceable.
Yes! Freeze uncovered until the whipped cream and custard filling set, about one to two hours. Then, wrap it in plastic wrap for up to 2 months. Defrost before serving.
More Pie Recipes


If you tried this Banana Cream Pie Recipe, please leave a 🌟 star rating and let me know how it went in the 📝 comments below!
Banana Cream Pie

Ingredients
Pie Crust
- 1 ½ cups all-purpose flour
- ½ teaspoon kosher salt
- 14 tablespoons unsalted butter, cut into ¼" cubes, chilled
- ½ cup ice-cold water, chilled
Filling
- 3 bananas, ripe but not brown and spotted
- ½ cup granulated sugar, plus 1 tablespoon
- 5 tablespoons cornstarch
- 2 large eggs
- 1 large egg yolk
- 2 cups whole milk
- 1 teaspoon dark rum, optional
- ½ whole vanilla bean, split and scraped
- 3 tablespoons unsalted butter, softened
Whipped Cream
- 1 cup heavy whipping cream, cold
- ¼ cup powdered sugar, sifted
- ½ teaspoon pure vanilla extract
- 2 tablespoons sliced almonds, optional
Instructions
- Prepare the Crust Ingredients – Add ice cubes and water to a measuring cup. Cut the butter into 1/4" cubes. Place both items in the refrigerator until ready to use.
- Break Down the Butter – In a stand mixer bowl, add the flour and salt. Mix using the paddle attachment on the lowest speed (Stir) for about 10 seconds. Add the chilled butter to the bowl. On the lowest speed, turn the mixer on and off quickly for a few seconds to coat and prevent the flour from spilling over. Mix on low speed until the flour and butter resemble wet sand with pea-sized butter pieces remaining, about 60 to 70 seconds. Do not over-mix. The dough should not bind together before the water is added.
- Hydrate the Dough – Gradually add 1 tablespoon of ice-cold water to the bowl. After each addition, turn the mixer on for 2 to 3 seconds. Add enough water until the dough looks lumpy and hydrated but not wet or sticky. It should begin to clump together with small crumbles on the bottom of the bowl. Not all of the water may be needed, about 5 to 7 tablespoons is typical. When the dough is pinched, it should compress and hold, not be dry or crumbly. Do not over-mix. The dough will be pressed together before resting.
- Rest the Dough – Press the dough into a 1” thick round disc and wrap it in plastic, then place it in a resealable bag. Store in the refrigerator to rest for at least 4 hours, overnight, or up to 2 days.
- Roll the Dough – Remove the dough from the refrigerator and allow it to sit at room temperature for about 5 to 10 minutes to make it easier to roll. If it’s still too hard, let it sit longer until more pliable.Dust the counter and dough with flour. Rotate and dust with flour underneath and on top to prevent sticking and make it easier to transfer. Roll into a 14-inch circle, slightly less than 1/4" thick.
- Form the Crust – Place the rolled-out dough into a 9-inch pie dish and gently press against the sides and bottom. With a paring knife, trim the excess leaving a 1/2" overhang. Tuck the excess underneath the bottom crust edges. Crimp by pinching the pointer and thumb fingers. Place the crust in the freezer for 20 minutes.
- Preheat the Oven – Place the oven rack in the center position. Preheat to 375°F (190°C). Place the pie dish on a sheet pan.
- Bake the Crust – Place a piece of parchment paper inside the pie dish and add the pie weights to cover just the bottom and sides, do not overfill. Bake for 20 minutes. Remove from the oven, and allow the weights to sit in the crust for a few minutes to press down any puffed areas. Carefully remove the parchment paper with weights and set it aside. It will not be used again.Continue to bake again for 15 minutes, then remove from the oven. Use a spoon to gently press the base down and sides up, don’t force it too much. Finish baking until golden brown and dry, about 10 to 15 minutes. Transfer to a wire rack until completely cooled, 30 to 40 minutes.
- Prepare the Bananas – Cut the bananas into 1/4" slices. Layer them on the bottom and sides of the pie shell, about 46 pieces. Place plastic wrap over the bananas and press to remove air, then set aside.
- Custard Filling – In a small bowl, whisk together sugar and cornstarch, and set aside. In a medium bowl, whisk together the whole eggs and yolk. Add the cornstarch mixture to the eggs, and whisk until combined.In a medium pot, add the milk, rum, and whole vanilla bean with the scrapings. Heat over medium-low heat until it reaches 180 to 185ºF (82 to 88ºC) on an instant-read thermometer. It should not be bubbling, 7 to 8 minutes. Turn off the heat.
- Temper the Eggs – Place the bowl with the egg mixture in between a kitchen towel. Place the pot of hot milk on a towel beside the bowl with the egg mixture. Temper the eggs by slowly whisking in ¾ cup of the hot milk mixture, ¼ cup at a time, into the egg mixture. Whisk vigorously after each addition.Whisk the tempered egg mixture into the remaining milk mixture in the pot. Turn the heat to medium, and continuously whisk until the consistency thickens, about 2 to 3 minutes. There may be small lumps. Turn off the heat and whisk in the softened butter.
- Add the Filling to the Crust – Immediately strain the custard through a fine-mesh sieve placed into a clean bowl using a spatula to press. Add strained custard to the prepared pie shell. Use a spatula to smooth it out. Cover the surface with plastic wrap, directly touching the filling to prevent a film from forming. Chill in the refrigerator for at least 3 hours or overnight to firm up the filling. It can also be chilled in the freezer for 1 ½ to 2 hours before adding the whipped cream.
- Make Whipped Cream – Right before serving, make the whipped cream topping. In a stand mixer fitted with the whisk attachment, add heavy cream, powdered sugar, and vanilla to the bowl. Whip on medium-low speed (setting 4), until the cream is frothy with bubbles on the surface, 1 minute. Increase the speed to medium-high (setting 8), and whip until a fluffy consistency is reached, about 75 seconds for soft peaks. Continue to beat in 5-second intervals until stiff peaks form. Be careful as the texture will change quickly.Use a spatula to spread the whipped cream over the entire pie. Be careful not to overspread, as more agitation can cause the consistency to change. Alternatively, transfer whipped cream to a piping bag fitted with a star tip and make a design.
- To Serve – Sprinkle almond slices on top if desired. Refrigerate the pie until ready to serve.
Notes
- Whole Vanilla Bean: Can be substituted for 1 teaspoon of pure vanilla extract or vanilla bean paste.
- No Stand Mixer: Use a dough/pastry blender or your fingers to break the butter into the dough. For the whipped cream, use a hand mixer with the whisk or beaters attachment and a large bowl or whip by hand. Processing times may vary.
- Banana Garnish: Add sliced bananas on top of the whipped cream if desired. Alternatively, place bananas on a foil-lined sheet pan. Sprinkle with granulated sugar and use a mini torch to caramelize the surface.
- Storing: Loosely cover the pie with foil or transfer leftover slices to an airtight container for up to 3 days.
- Freezing: Transfer the whole pie or slices to the freezer. Freeze until the cream and filling firm up, about 2 hours. Wrap in plastic wrap and freeze for up to 2 months. Defrost before serving.
Nutrition Facts
Percent Daily Values are based on a 2000-calorie diet. All nutritional information is based on estimated third-party calculations. Each recipe and nutritional value will vary depending on the brands you use, measuring methods, and portion sizes per household.


Lesley Waterman says
Would this be too greasy with 14 tablespoons of butter flavored crisco with only 1 1/2 cups of flour?
Jessica Gavin says
Great question! Crisco is 100% fat and butter is about 80%. If you are swapping out all of the butter, I would recommend trying 12 tablespoons of crisco for the 14 tablespoons of butter so it’s not so greasy. Let me know how it goes!
monika says
I don’t have milk at the moment. Will oat milk work?????
Jessica Gavin says
I haven’t used oat milk, but since there are eggs and cornstarch, I think it should still thicken. It might not be as thick as using dairy since there are milk proteins, but it should still set up. Let me know how it goes!
David Bickel says
Instead of Sugar I us Stevia Leaf powder. Stevia has no calories unlike Sugar. Also, I use a chocolate crust that I buy at Whole Foods.
Jessica Gavin says
Thanks for sharing your pie modifications, sounds yummy!
Amber L says
OMG this looks so delicious! I’ll have to try the recipe sometime.
Jessica Gavin says
Yes, I can’t wait to hear what you think about the pie recipe!