
This decadent fudgy brownie recipe delivers intense cocoa flavor in every bite! I use three types of chocolate to make an ultra-rich batter. Your friends and family will be delighted and demand you make these again!

Jessica’s Recipe Science
- Using bittersweet and unsweetened chocolate adds richness and balance. Cocoa powder adds concentrated cocoa for depth.
- Melting the chocolate with butter and whisking in cocoa powder blooms cocoa solids, releasing aromatic compounds and intensifying chocolate flavor before baking.
- A high ratio of butter and eggs limits gluten and adds moisture. Skipping leaveners keeps brownies tender and fudgy.
Featured Comment 21
“These are amazing! Thank you for developing such a great recipe!”—Nina C.
Why It Works
When I’m developing a truly fudgy brownie, I focus on fat balance and chocolate layering. Melting multiple types of chocolate with butter creates a rich, unified base. I use just enough flour and mix gently to limit gluten development while providing structure. This keeps the brownie centers moist, while allowing the edges to set slightly for that classic brownie bite.
This is the homemade brownie recipe I turn to when I want something indulgent and reliable. It’s the perfect treat for holidays, bake sales, or anytime you need a guaranteed crowd-pleaser. The shiny crackly tops form as the sugar dissolves and sets during baking, creating a crisp contrast to the fudgy interior. Each square is deeply satisfying, so a small piece goes a long way when you’re craving a rich chocolate treat.
Jump To a Section
Ingredients You’ll Need

- Chocolate: There are three types of chocolate in this recipe: bittersweet, unsweetened, and cocoa powder. Bittersweet provides a balance of deep cocoa notes, sweetener, and rich cocoa butter. Unsweetened powder adds a punch of intense chocolate flavor.
- Butter: Adds richness and moisture while coating the flour, helping limit gluten formation.
- Flour: A small amount of all-purpose flour provides just enough structure to hold the brownies together for sliceable bars.
- Eggs: Eggs bind the ingredients, add moisture and richness, and help set the brownies as they bake, giving them structure while keeping the texture fudgy rather than crumbly.
- Sugar: Granulated sugar adds sweetness, helps retain moisture, and dissolves during mixing to create the signature shiny, crackly top while keeping the brownies soft and fudgy.
- Flavoring: Vanilla enhances the chocolate’s aroma, while salt sharpens the flavor and balances sweetness, making the brownies taste richer and more chocolate-forward.
See the recipe card below for all ingredients and measurements (US and metric).
Ingredient Substitutions
This homemade fudgy brownie recipe is easy to customize! Try these delicious options:
- Chocolate Swaps: Semi-sweet or dark chocolate can be substituted for the bittersweet bar.
- Cocoa Powder Substitute: Natural cocoa powder is lighter in color, more acidic, and has a sharper, bitter taste. Dutch-processed cocoa powder is treated with an alkaline solution, which makes it darker, less acidic, and milder in flavor.
- Make it Gluten-Free: Use your favorite gluten-free flour blends to replace the wheat flour.
- Add Mix-ins: Add chocolate chips, brown sugar, walnuts, chopped almonds, Kahlua, Irish cream to make Bailey’s brownies, espresso, or coffee. Add chocolate ganache or buttercream frosting to your brownies for a super decadent treat! I love to sprinkle flaky sea salt on the brownies.
How to Make Fudgy Brownies
Step 1: Heat the Oven
Setting the oven rack in the middle ensures even heat circulation so the brownies bake uniformly without overcooking the edges. Lining the pan with greased foil creates an insulated barrier that prevents sticking, promotes gentle heat transfer for a fudgier texture, and allows easy lifting without breaking the delicate crumb.
Expert Tip: Glass pans retain heat much longer after being removed from the oven, which can cause the brownies to dry out. Using metal is preferred, and it’s safe to leave these brownies inside to cool for hours. If glass is your only option, make sure to remove the brownies from the pan after 10 minutes, then transfer to a wire rack.
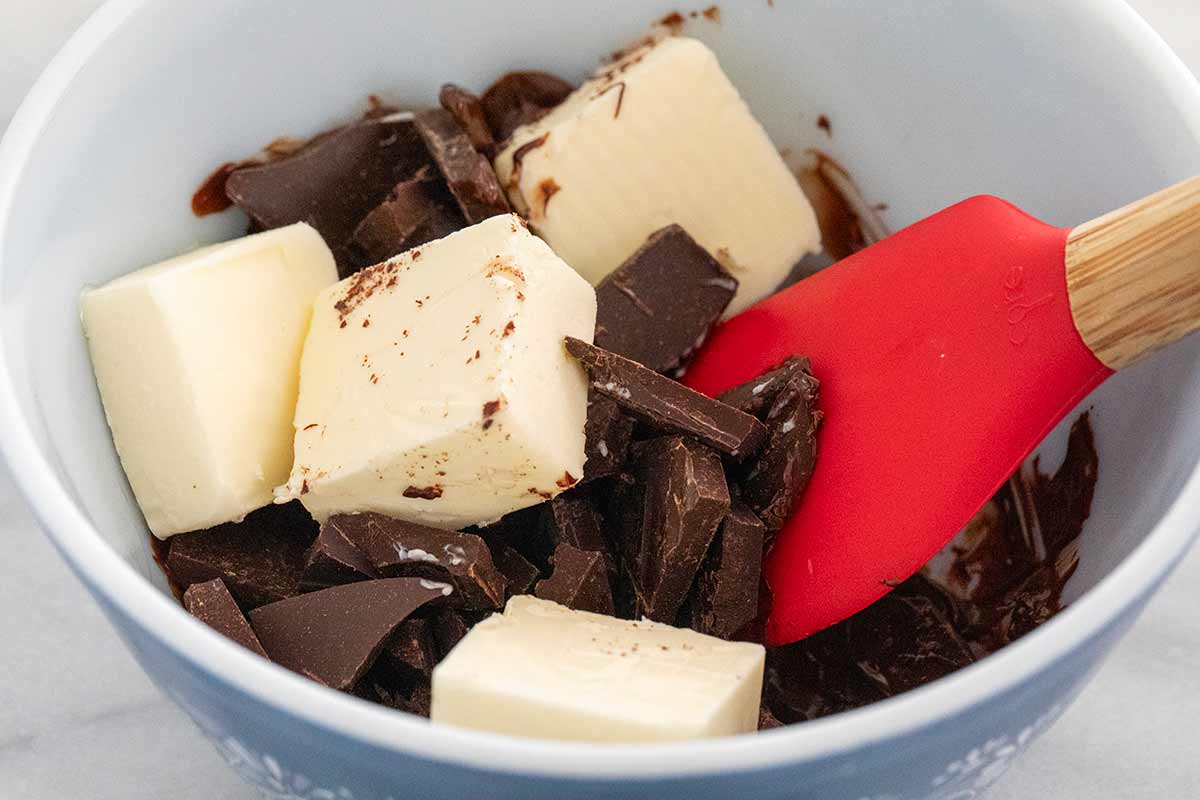
Step 2: Melt the Chocolate
Melt the chocolate pieces in the microwave on low power, then combine with the butter until smooth and glossy. You can also melt chocolate on the stovetop using a double-boiler setup. Just make sure the liquid’s temperature does not exceed 120ºF (49ºC) to prevent flavor loss.
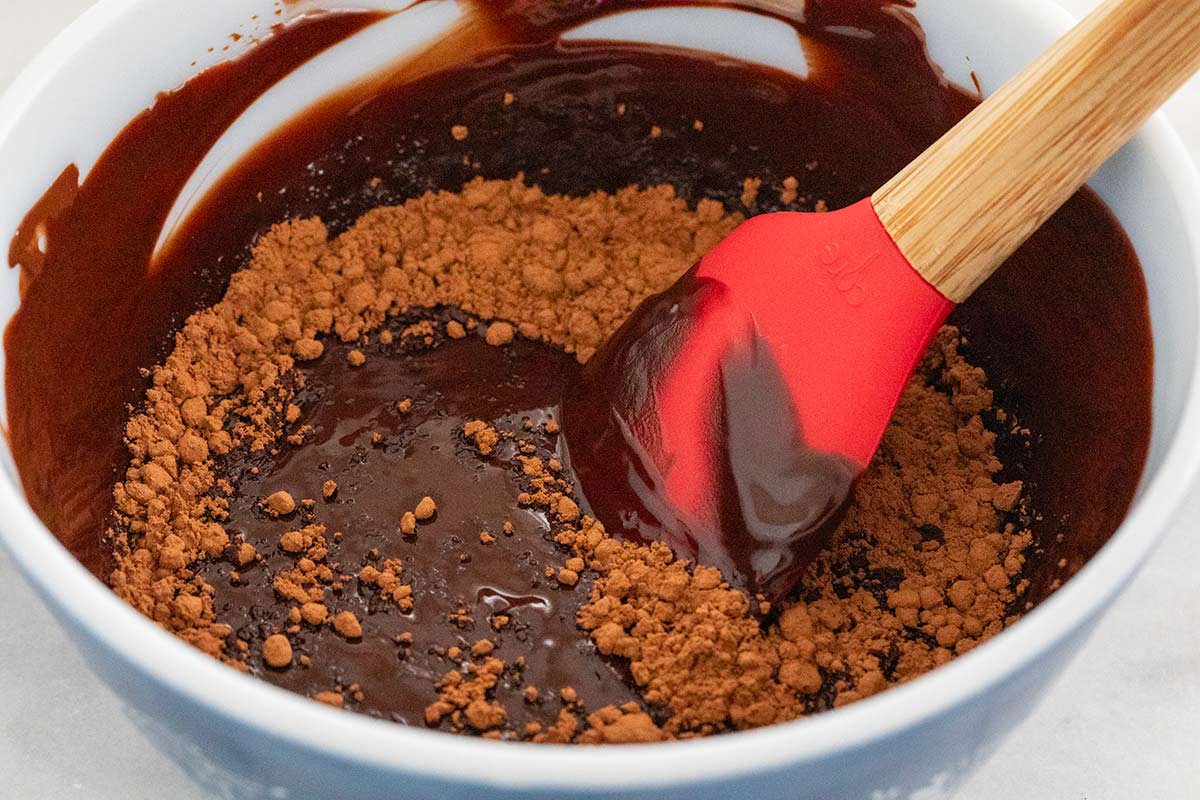
Step 3: Add the Cocoa Powder
Whisking the cocoa powder into the warm chocolate helps it fully hydrate and bloom, resulting in a deeper flavor. Cooling the mixture below 95ºF prevents the eggs from coagulating too quickly, ensuring a smooth batter and fudgy brownie texture.
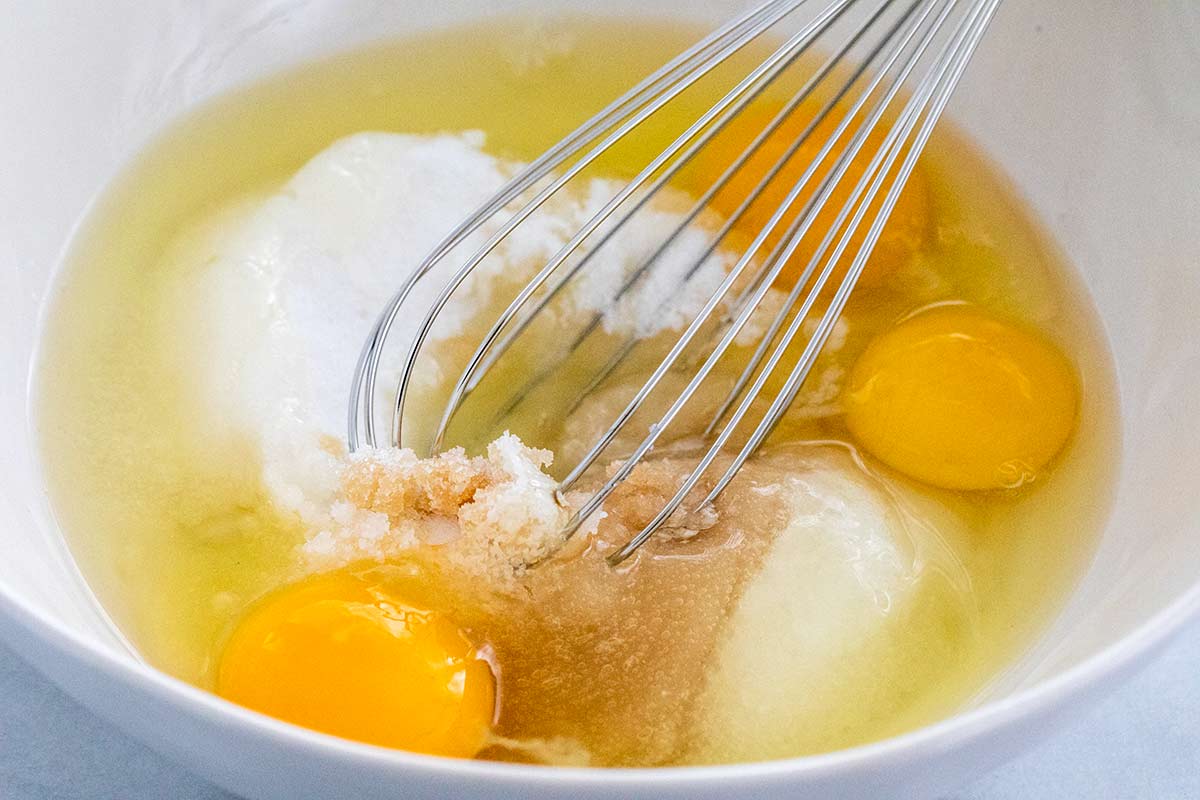
Step 4: Combine the Eggs, Sugar, and Chocolate
Whisking the eggs with sugar, vanilla, and salt first helps dissolve the sugar and create a smooth base. Gradually incorporating the cooled chocolate ensures proper emulsification, resulting in brownies with a cohesive, fudgy structure.
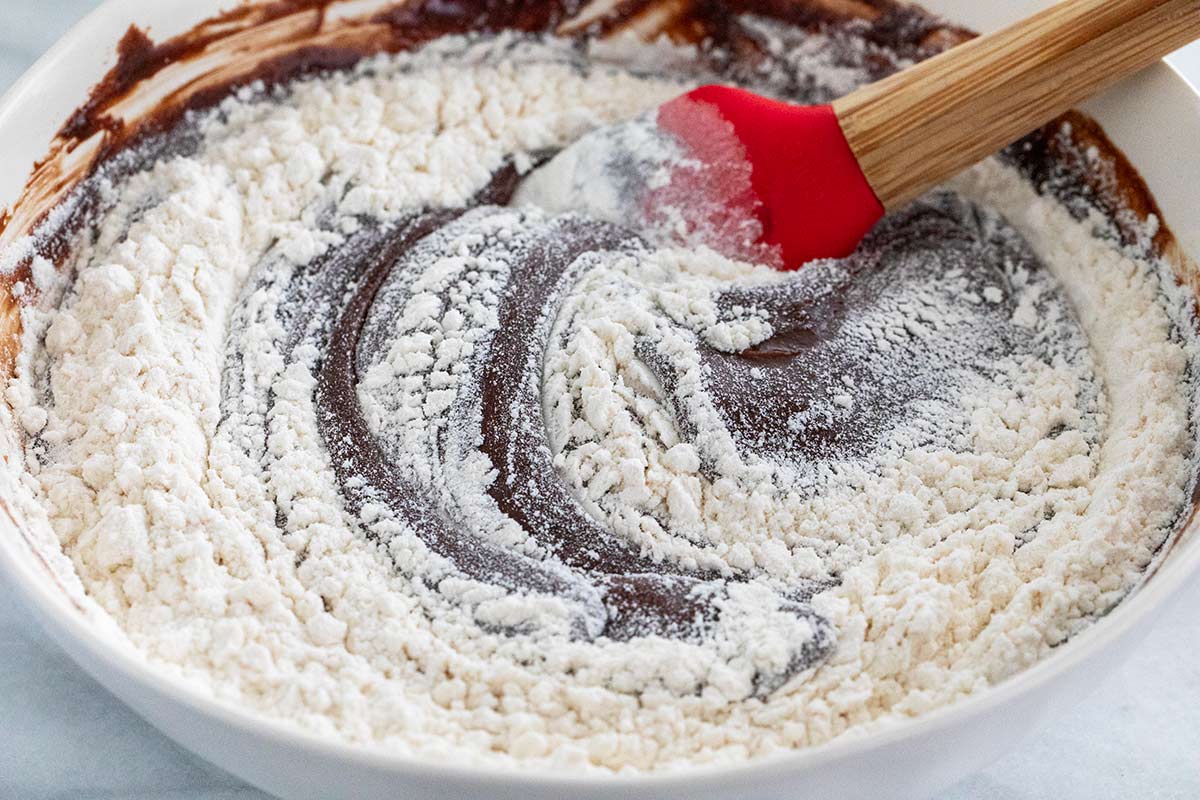
Step 5: Add the Flour
Gently folding in the flour minimizes gluten development. It’s important not to overmix the batter to prevent a chewy texture. Plus, if more air is incorporated, it will be tough and cakey.
Ingredient Chemistry: Adding a relatively small amount of flour, along with the large eggs, provides the batter with enough structure to hold together in a soft brownie bar shape. These ingredients create a dense form that breaks easily but is not too spongy.
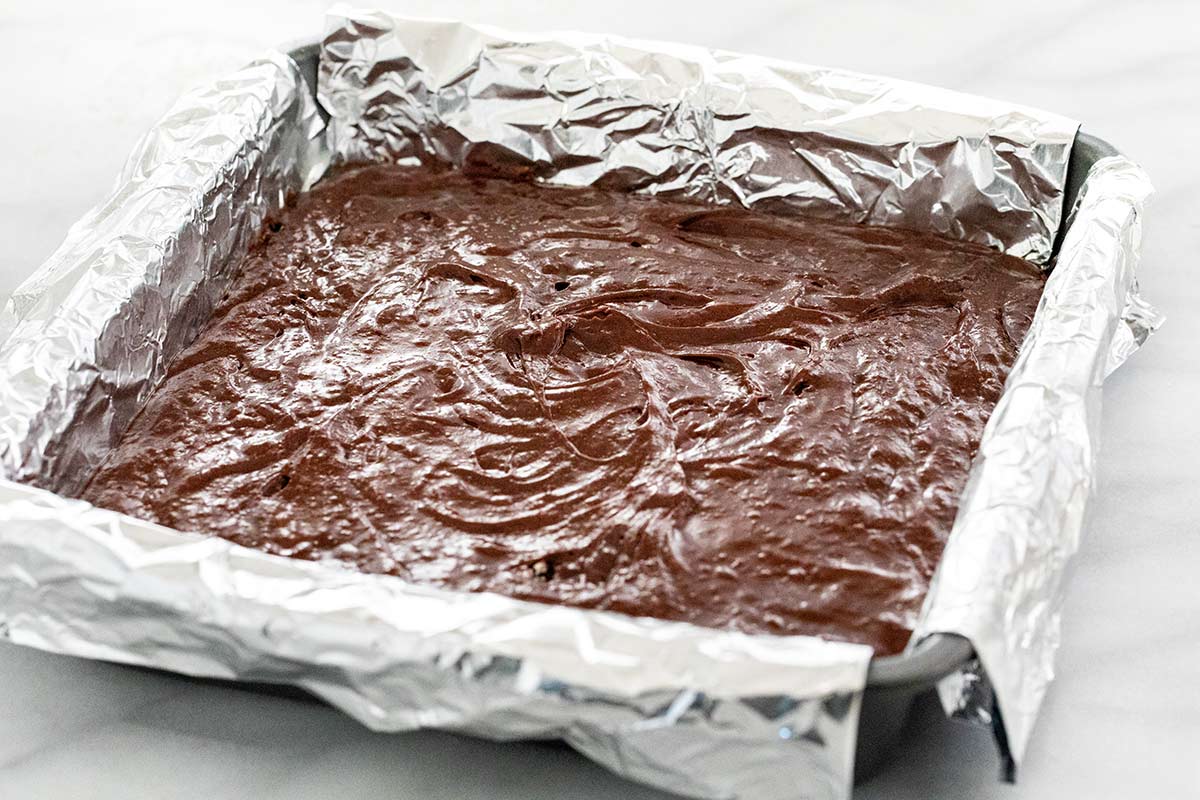
Step 6: Bake the Batter
Spread the batter out into a pan fitted with a greased foil sling to make it easier to remove the brownies (no stuck edges or bottoms). Bake in an oven preheated to 350ºF (177ºC) for about 30 minutes, then cool completely before cutting.
Tips for Perfect Execution: The best way to tell when these fudge brownies are done is when a toothpick inserted in the center comes out with a few moist crumbs stuck to it. A clean toothpick indicates the brownie is overdone. This recipe is supposed to yield moist brownie centers, but not gooey ones.

Step 7: Cool the Brownies
Before cutting, make sure the brownies are completely cooled in the baking pan on a wire rack. Giving it time to reach room temperature will allow the chocolate to set properly and make it easier to cut. I recommend cleaning your knife between cuts, as the fudge tends to stick to the sides of the blade.
Step 8: To Serve
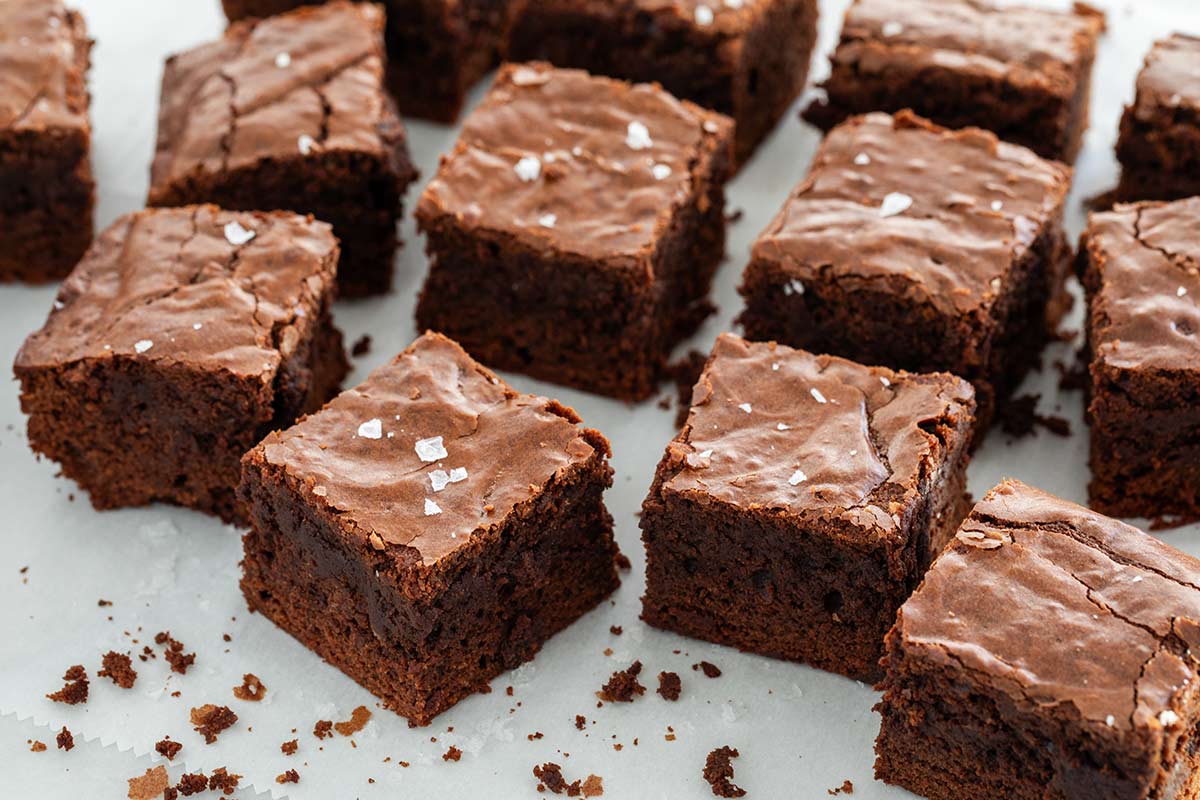
Use the foil sling to lift the brownies right out of the pan, then slice them into 16 pieces to reveal that gorgeous crinkly top. One bite in and you’ll see why this is truly my best brownie recipe—rich, fudgy, and absolutely irresistible.
Storing Tips: The entire tray or individually cut homemade brownies can be stored in an airtight container for up to 5 days at room temperature. Brownies can be portioned, covered with plastic wrap, and stored in a resealable bag in the freezer for up to 1 month. To defrost, let it sit out for a few hours before serving, or reheat in the microwave at 15-second intervals.
Frequently Asked Questions
It’s all about the fat! Adding a generous amount of melted butter and eggs to the brownie batter provides richness and moisture after baking. The fats also coat the flour, which helps minimize gluten formation.
That’s why each bite has a short chew, yet stays compact and fudgy just like the candy. No chemical leavening agents, like baking powder, are added because we want to keep the texture dense and tender.
Fudgy brownies rely more on fat and sugar than on flour, which limits structure and traps moisture, resulting in a dense, rich texture. Gentle mixing prevents gluten development and excess air, while slightly underbaking keeps the center soft. Cakey brownies use more flour, whipped eggs, and longer baking, creating a lighter, drier crumb.
If you like a more undercooked middle, make sure the internal brownie temperature reaches at least 144ºF (62ºC). That’s where the eggs will be set, reducing the food safety risk. I bake my tray at 190-200°F (88-93°C). An instant-read thermometer is a handy tool for checking doneness.
More Chocolate Favorites


If you tried this Fudgy Brownie Recipe, please leave a 🌟 star rating and let me know how it went in the 📝 comments below!
Fudgy Brownies

Ingredients
- 5 ounces bittersweet chocolate, chopped
- 2 ounces unsweetened chocolate, chopped
- 8 tablespoons unsalted butter, cut into 8 pieces
- 3 tablespoons unsweetened cocoa powder
- 1 ¼ cups granulated sugar
- 3 large eggs
- 2 teaspoons vanilla extract
- ½ teaspoon kosher salt
- 1 cup all-purpose flour
Instructions
- Heat the Oven – Set the oven rack to the middle position. Preheat to 350ºF (177ºC). In an 8-inch square pan, place two 8-inch wide pieces of foil in the pan perpendicular to each other to create a sling. Press down on the sides and corners to ensure that the foil is flush with the pan. There should be some overhang on the sides. Grease the foil with cooking spray. Set aside.
- Melt the Chocolate – In a small bowl, heat the bittersweet and unsweetened chocolate for 2 minutes in the microwave on 50% power. This will just start melting the chocolate. Add the butter slices to the chocolate, stir to roughly combine. Microwave at 50% power in 30-second increments, stirring after each duration until the mixture is completely melted and combined. About 1 ½ to 2 minutes.
- Add the Cocoa Powder – Whisk the cocoa powder into the chocolate mixture until smooth. Allow the chocolate mixture to cool to 95ºF (35ºC) and below to prevent the eggs from curdling.
- Combine the Eggs, Sugar, and Chocolate – In a large bowl, whisk together the sugar, eggs, vanilla, and salt until combined and smooth. Whisk the cooled chocolate mixture into the sugar mixture.
- Add the Flour – Gently fold the flour into the sugar mixture until no flour pockets remain. Do not overmix the batter.
- Bake the Batter – Evenly spread the brownie batter into the greased baking pan. Bake until a toothpick inserted into the center comes out with just a few crumbs attached, 30 to 35 minutes. Rotate the pan halfway through baking.
- Cool the Brownies – Completely cool the brownies in the pan, place on a wire rack, and let cool for about 1 ½ to 2 hours.
- To Serve – Use the foil sling to carefully lift and remove the brownie from the tray. Discard the foil and cut 16 individual pieces.
Notes
- Chocolate Substitutions: Semi-sweet or dark chocolate chips can be substituted for the bittersweet bar.
- Add Finishing Salt: Sprinkle brownies with a little flaked sea salt before and after baking to enhance the chocolate flavor.
- For Gooier Brownies: Remove the brownies from the oven at 28 minutes and test for doneness. Bake longer as needed, checking every minute. The longer the brownies bake, the cakier they will become, which can happen quickly.
- Make it Gluten-Free: Replace all-purpose flour with gluten-free flour. I recommend Bob’s Red Mill gluten-free 1:1 baking flour.
- Storing: Store in an airtight container at room temperature for up to 5 days, or freeze individually wrapped pieces for up to 1 month. Thaw at room temperature or reheat in 15-second increments in the microwave.
- Recipe Adapted From: America’s Test Kitchen, The Perfect Cookie.
Nutrition Facts
Percent Daily Values are based on a 2000-calorie diet. All nutritional information is based on estimated third-party calculations. Each recipe and nutritional value will vary depending on the brands you use, measuring methods, and portion sizes per household.


Cyndi says
This was a huge hit. I have an off the wall question for some people, but I was wondering how I could make this sweeter? I used 60% bittersweet and 20-22% butter fat cocoa. Would I up the sugar or lower the percentage of the bittersweet? I’m guessing it would be the chocolate but hoping I’ll be able to do it with the sugar for fear that I’ll get busted in the house as I’m the only one that thinks it needs to be sweeter. Any guidance would be appreciated.
Jessica Gavin says
I would start by using all bittersweet chocolate instead of unsweetened. You’ll get a sweeter taste and still have a strong cocoa flavor. Alternatively, you can try adding 1 1/2 cups of granulated sugar. Let me know how it goes!
Cyndi says
I will try the all bittersweet chocolate or maybe 3/4. That way I won’t get caught (I hope) Thanks for the tip
Carrie says
These were amazing! I baked them for 30 minutes and they ended up having a chocolate fondant layer which we loved! Might try baking them a little longer next time. Egg safety isn’t an issue where I live so this will be my ultimate slightly fondant-y recipe when I want that, and a few more minutes when I want something firmer.
Jessica Gavin says
Thrilled to hear that you enjoyed the brownie recipe, Carrie! THe fondant layer sounds so yummy!
Beth says
I’ve been looking for a very good danish taste like butter cookies for so long and the ones I saw and tried doesn’t satisfy my taste. Then I saw your recipe of butter cookies yesterday and gave it a try and FINALLY I’ve found the perfect recipe! It’s soooo good and perfect to the point that I looked for your book from amazon and bought it. It’ll arrive on Wednesday! Yayyy can’t wait to try more of your recipes. But for the meantime I will try this brownie, it looks yummy too.
Jessica Gavin says
Thank you for your feedback Beth! That’s a huge compliment, and I’m glad you found a Danish butter cookie that you enjoy. Thank you for your support in purchasing my cookbook, happy cooking and baking!
Karmen says
Hi Jessica, the first time I made it turned out really good but the second time bf third time the brownies were more black than brown, but it’s not burned. May I know why? Couldn’t seem to get an answer on google either.
Jessica Gavin says
Hi Karmen- I believe you mentioned that you used a different brand of cocoa powder? Do you happen to know if you used cocoa vs cocoa, or dutch processed? How was the taste? Was one batch more bitter tasting than the other?
Debra King-Abraham says
Hi Jessica,
I can’t wait to try this recipe. I, however, mistakenly purchased bleached whole wheat flour instead of all purpose flour. What’s the difference in the finished product if I use this flour?
Jessica Gavin says
Since there is bran in the flour it might be a bit more dry and chewy.
Nina C Cook says
These are amazing! Thank you for developing such a great recipe! I have always loved to cook & bake. Since the 1970s, I have always used the brownie recipe in the old Family Circle Cookbook. In our family, they were always called “Presidential Brownies” because I actually made them for a President and he adored them. Well, it is time for the Presidential Brownie recipe to be retired because these are even better! I did make one small adjustment, my husband begged me to add toasted chopped walnuts, which of course I did.
Jessica Gavin says
Thank you such much, Nina! That’s amazing that you made brownies for the president, so cool! Happy to hear that you enjoyed the recipe and it will be in the rotation. Chopped nuts sound like a perfect addition!
Tom says
Have you tried Cacao powder in chocolate for brownies? If you did, how?
Lisa Troxel says
I have same question!!!
Jessica Gavin says
I think that cacao would work nicely in the recipe. There are 3 tablespoons, just enough to give a deep flavor. Cacao is slightly more bitter than cocoa, but I think the sugar will balance it.
Linda says
Just to share, my mother taught me years ago to use a plastic knife(disposable) to cut brownies. They don’t stick to the brownies even if they are still warm. Give it a try!!
Stephen Rogers says
Yum!Yum! I wish I was your neighbor!
JJ says
Oh, Jessica! Thank you! FINALLY…a deep chocolate, chewy-rich brownie that requires NO OIL. As a young adult, then mom…back in the 70-80’s…I remember even box brownies that came out great, and the word ‘oil’ wasn’t in the recipe list. Then it all changed, and ALL recipes that I found required oil, which ALWAYS turned out gooey (not chewy), heavy, high around the edges, and flat and raw in the middle. Not much gets between me and anything chocolate, but oil-brownies sure did, and I couldn’t find any recipe that was without. Kudos! and I’ll be trying your recipe very soon.
The variety of chocolates look sumptuous, too. Thanks, Jessica…the chocoholic in me is coming out to the sunshine again! LOL
Jessica Gavin says
I can’t wait to hear what you think, you are the brownie expert!
JJ says
WOW!! I’ll never make a box brownie again. My own tips:
> eggs: room temp
> wet mix: cream slowly and thoroughly to remove sugar granules
> buy GOOD chocolate and don’t skip – use three kinds in the recipe
> cooks evenly and the center rises and stays up (no collapsing!)
> get yourself a brownie-edges cooking pan!