
This quiche Lorraine recipe features a delicious creamy custard filled with cheese and salty bacon, served in a homemade flaky pie crust.

Jessica’s Recipe Science
- Blind baking the crust before adding the custard partially cooks the dough, driving off moisture and keeping the bottom crisp.
- Starting bacon in a cold pan allows the fat to slowly render as it heats, promoting even crisping without burning.
- Using whole milk and heavy cream creates a custard with about 19–20% milkfat, resulting in a velvety texture rather than a firm, rubbery set.
Featured Comment 14
“This recipe is going to be a keeper in our family rotation. It was exceptionally flavorful and had my 6 and 10 year old clamoring for seconds. Honestly, I have yet to have a fail with one of Jessica’s recipes.”—Melanie
Why It Works
Quiche Lorraine is a great breakfast or brunch to share with family and friends. The name may sound fancy, but it’s just simply savory eggs and bacon all in one slice. The best part is that you can make it in advance, reheat it, and enjoy it the next day.
I use the same homemade pie crust from my apple pie recipe as the base. It’s sturdy enough to hold the heavy filling and yields crisp and tender pieces. For a smooth, silky custard, I use a combination of eggs, cream, and whole milk. Bake time is essential. Slightly underbaking the center allows the filling to set without risking overcooking. It’s the perfect slice to serve at your next gathering!
Jump To a Section
Ingredients You’ll Need
- Pie Crust: I use a pie crust recipe called Pâte Brisée. It has just four ingredients: flour, butter, salt, and water. My pie dough recipe is slightly higher in butter for a super-crisp, tender texture. You can also use store-bought crust as a shortcut.
- Pork: I use thick-cut bacon in the quiche recipe. Cured pork belly adds a deep, savory flavor and a hint of smokiness.
- Custard: A mixture of eggs, whole milk, heavy cream, salt, pepper, and nutmeg creates a luxurious, sliceable texture.
- Cheese: Grated Gruyère is the traditional cheese used in a quiche Lorraine recipe. It adds a complex, nutty flavor and gooey melt to the custard filling.
- Alliums: Diced shallots add a mild onion-and-garlic flavor to the filling.
See the recipe card below for all ingredients and measurements (US and metric).
Ingredient Substitutions
Now that you know how to make the best quiche Lorraine recipe, it’s easy to change up the flavor! Try these delicious options:
- Pork: Instead of bacon, add pancetta, prosciutto, salami, or diced ham.
- Cheese: Swiss cheese has a flavor similar to gruyere. Also, try Gouda, provolone, mozzarella, or cheddar.
- Alliums: Sauté diced onions, minced garlic, or leeks. Slice green onions and add them to the filling.
- Herbs: Add fresh herbs by sprinkling in chives, thyme, tarragon, dill, or basil.
How to Make Quiche Lorraine

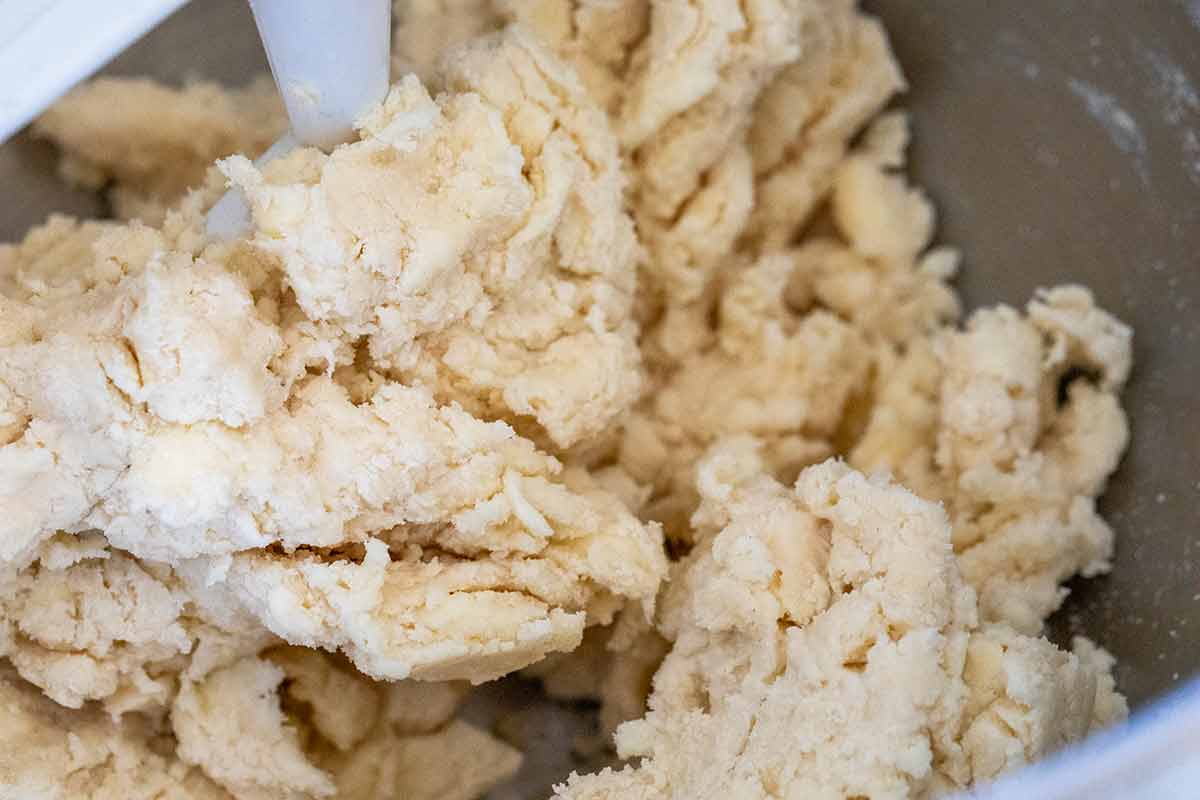
Step 1: Break Down the Butter
The pie crust can be made with a pastry dough cutter, but I use my stand mixer with the paddle attachment to combine the flour and salt. I then mix the butter on low speed until it resembles wet sand with coarse crumbles. This yields a tender and flaky crust.
Step 2: Hydrate the Dough
Gradually add the ice water 1 tablespoon at a time, mixing in between. Add only enough to the point where the dough can be compressed together, resembling modeling clay.
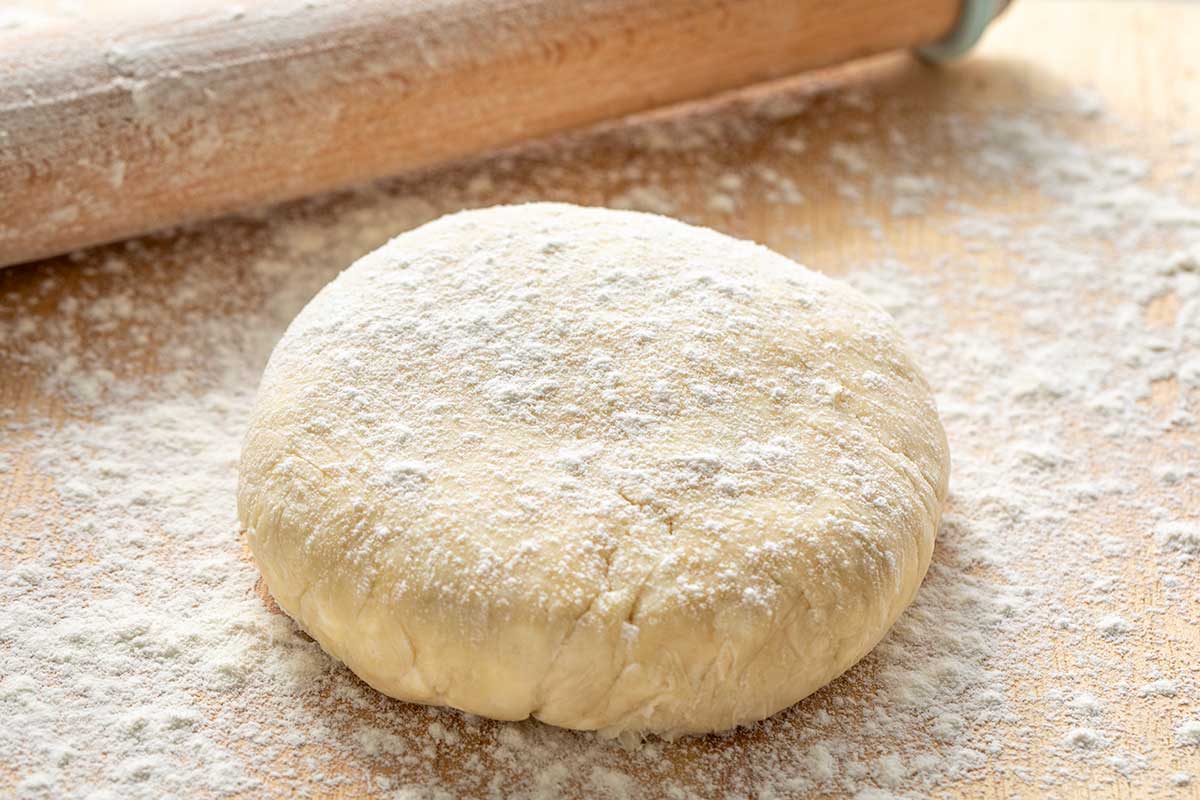
Step 3: Rest the Dough
Form the dough into a disc about 1 inch thick, then wrap it in plastic, and chill for at least 4 hours. This process prevents the dough from tasting tough due to gluten bonding during mixing. If possible, I recommend making the dough a day ahead to reduce wait time.
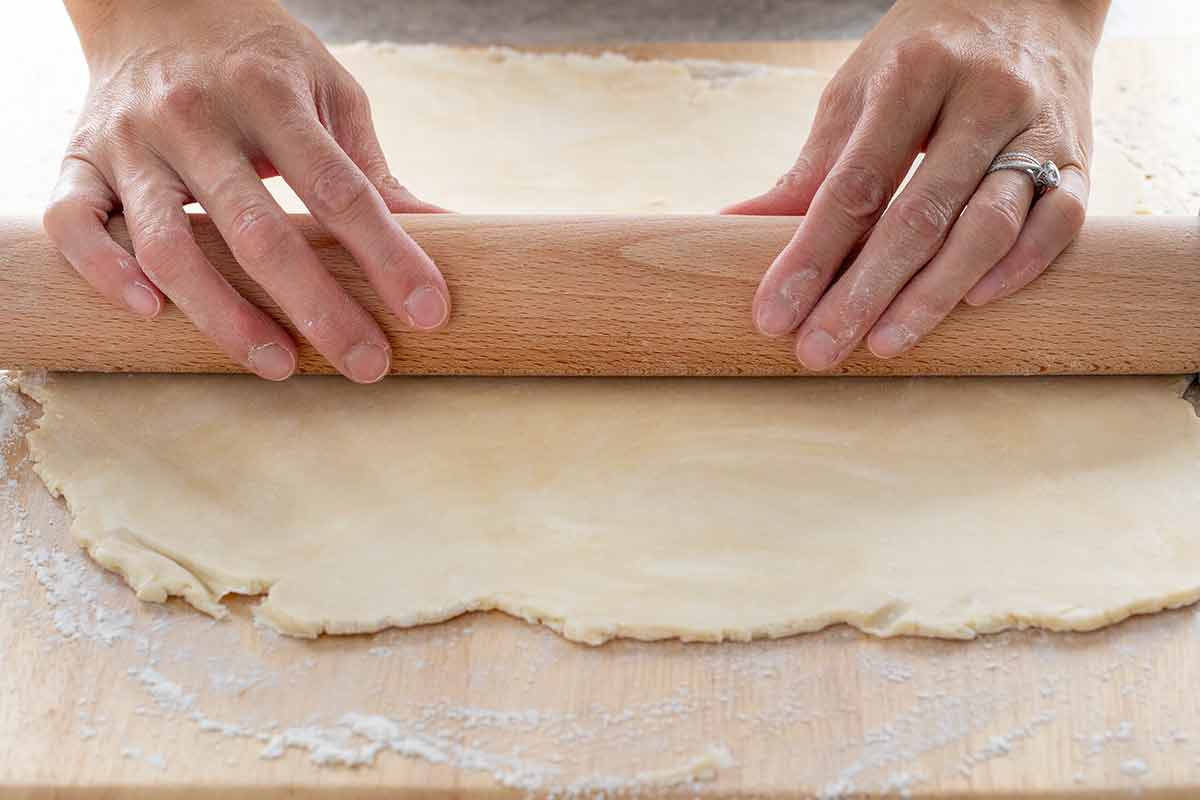
Step 4: Roll the Dough
Remove the dough from the fridge and let it sit at room temperature for about 10 minutes. I find that rolling it out to about ⅛-inch thick creates a delicate shell but is sturdy enough to support the filling.

Step 5: Form the Crust
Shape the crust on a 9-inch pie plate or tart pan and trim the edges.
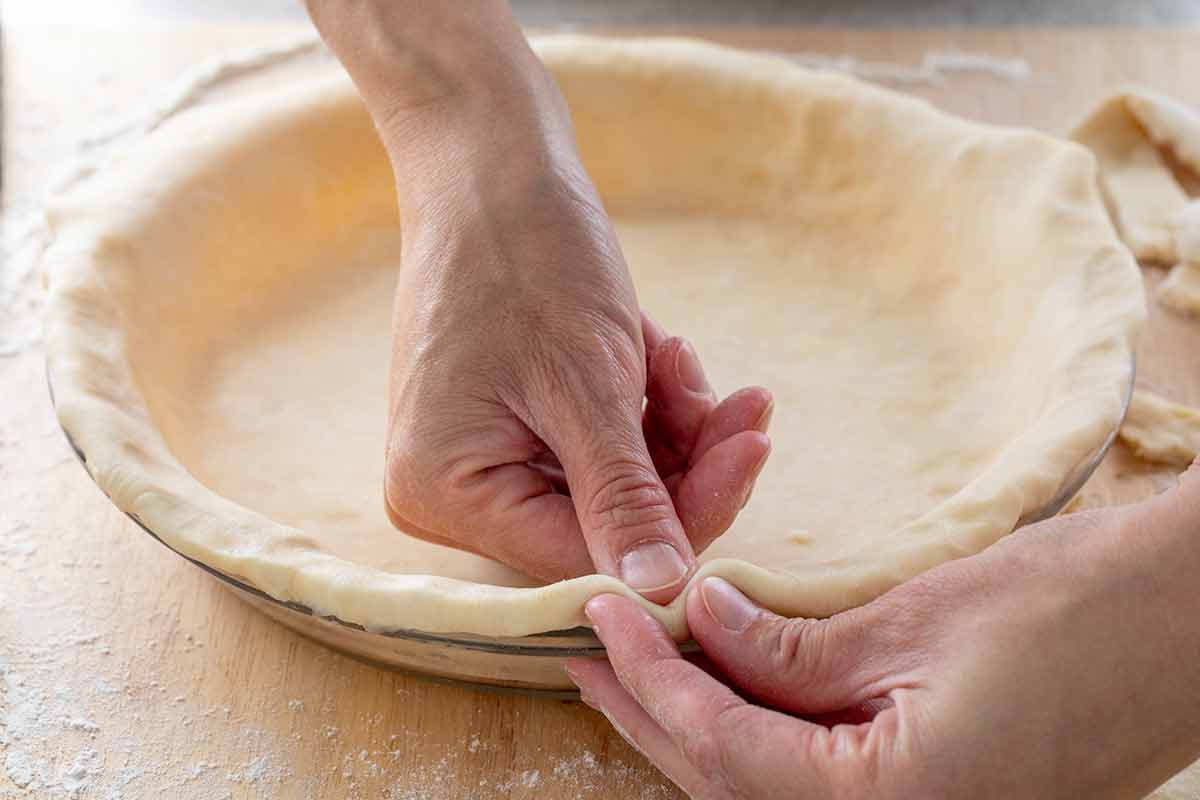
Work your way around the dish and crimp the edge.
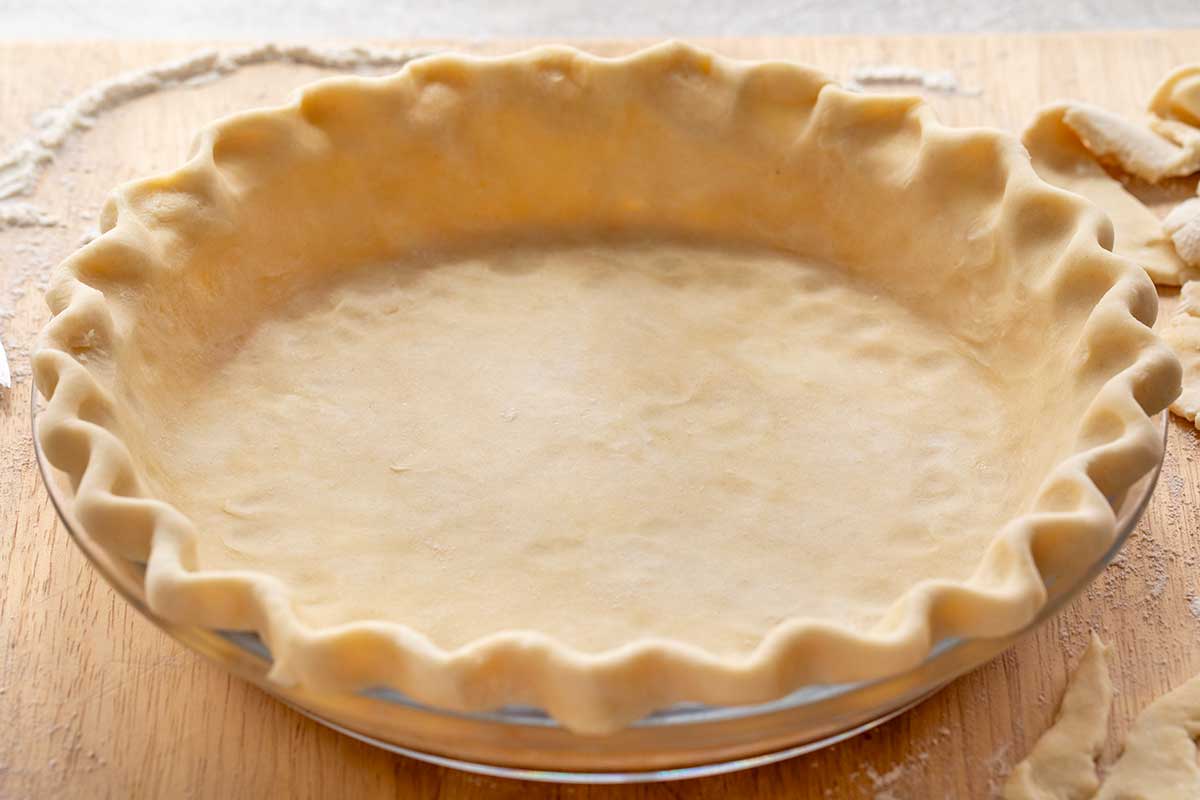
Chill the pie plate and crust in the freezer for at least 20 minutes to firm the butter up, so it stays flaky when baked. You can also make the shell in advance, cover it, and refrigerate it up to 2 days before baking.
Step 6: Preheat the Oven
To ensure even cooking, set the oven rack to the middle position and preheat the oven to 375°F (190°C).
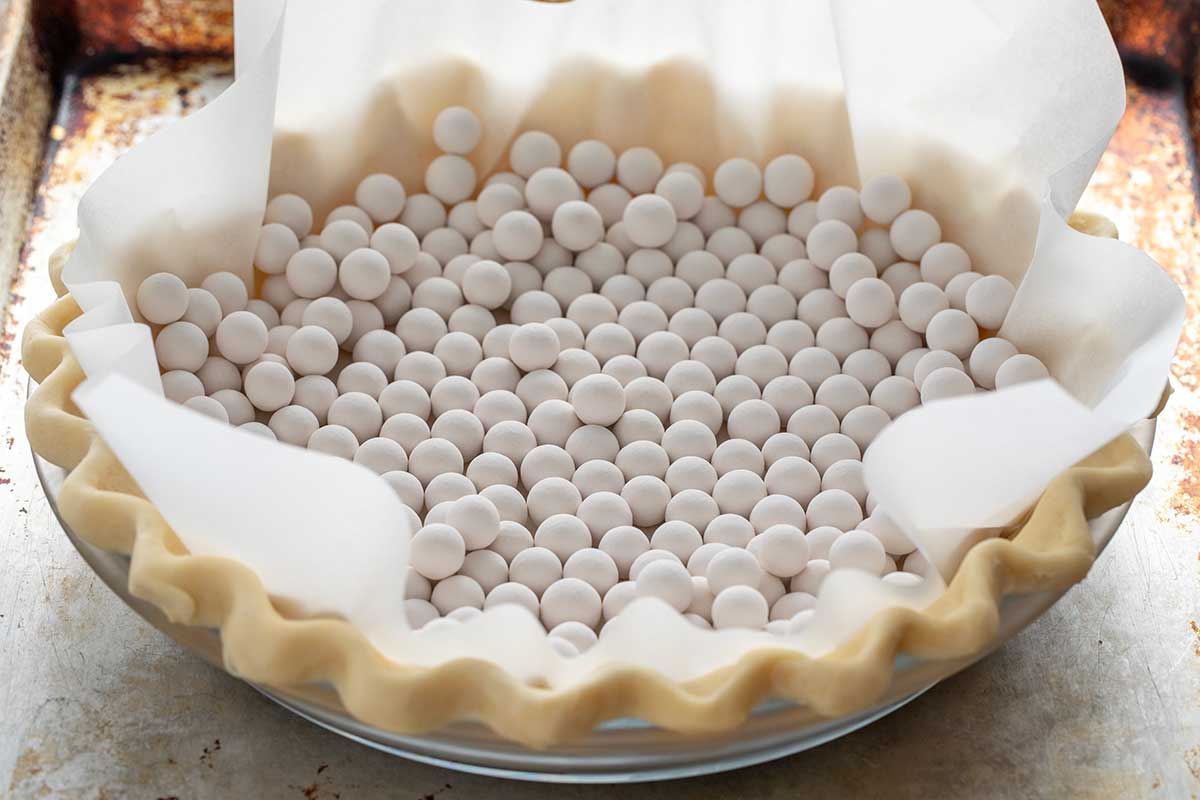
Step 7: Par-Bake Pie Crust
Line the crust with parchment paper and place about 2 cups (20 ounces) of ceramic pie weights or dry beans into the center. Cover the bottom and sides. Bake until the crust just sets and begins to turn golden, about 20 minutes.
I bake for 5 more minutes without the weights to slightly dry out the top and bottom of the par-baked pie crust. If you notice the middle puffs up a little after baking, keep the weights on for a few minutes to help it deflate.
Tips for Perfect Execution: You need to par-bake (blind bake) the pie shell before adding the filling. Because the custard is wet, partially cooking the dough prevents the bottom from becoming soggy. I use this technique when making other custard desserts like pumpkin pie.

Step 8: Cook the Bacon
Cut the bacon into ½-inch thick pieces and add it to a cold skillet. Heat the pan until the fat gently renders and crisps the meat rather than burning it. Cook bacon, draining the excess fat before adding it to the pie shell.
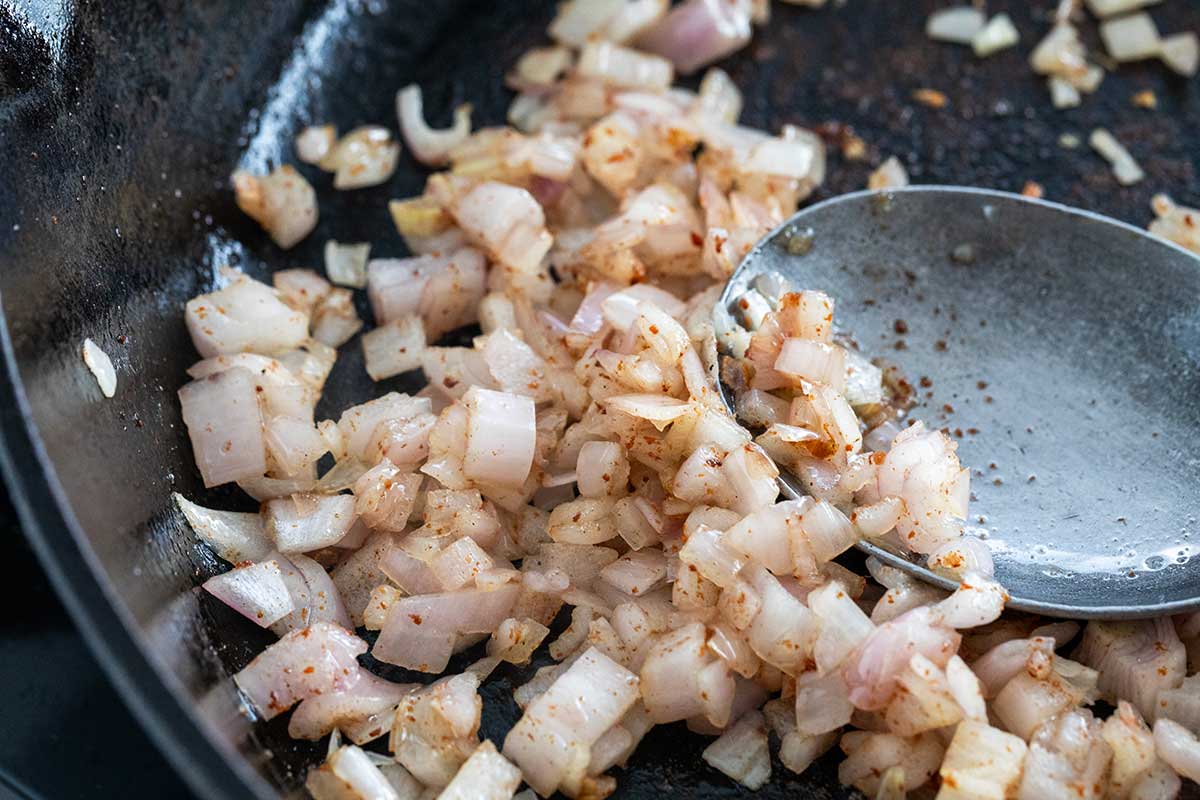
Step 9: Cook the Shallots
The wonderful flavor of the pork drippings is perfect for sauteing the shallots. These alliums pack the punch of garlic and onion flavor all in one. They add earthy and sweet notes to the quiche for more depth.
Step 10: Layer the Quiche Filling
Add half of the shredded gruyere to the crust in an even layer. Sprinkle the sauteed shallots on top, followed by the bacon pieces and the rest of the cheese. Layer the ingredients to ensure an even distribution in the custard.
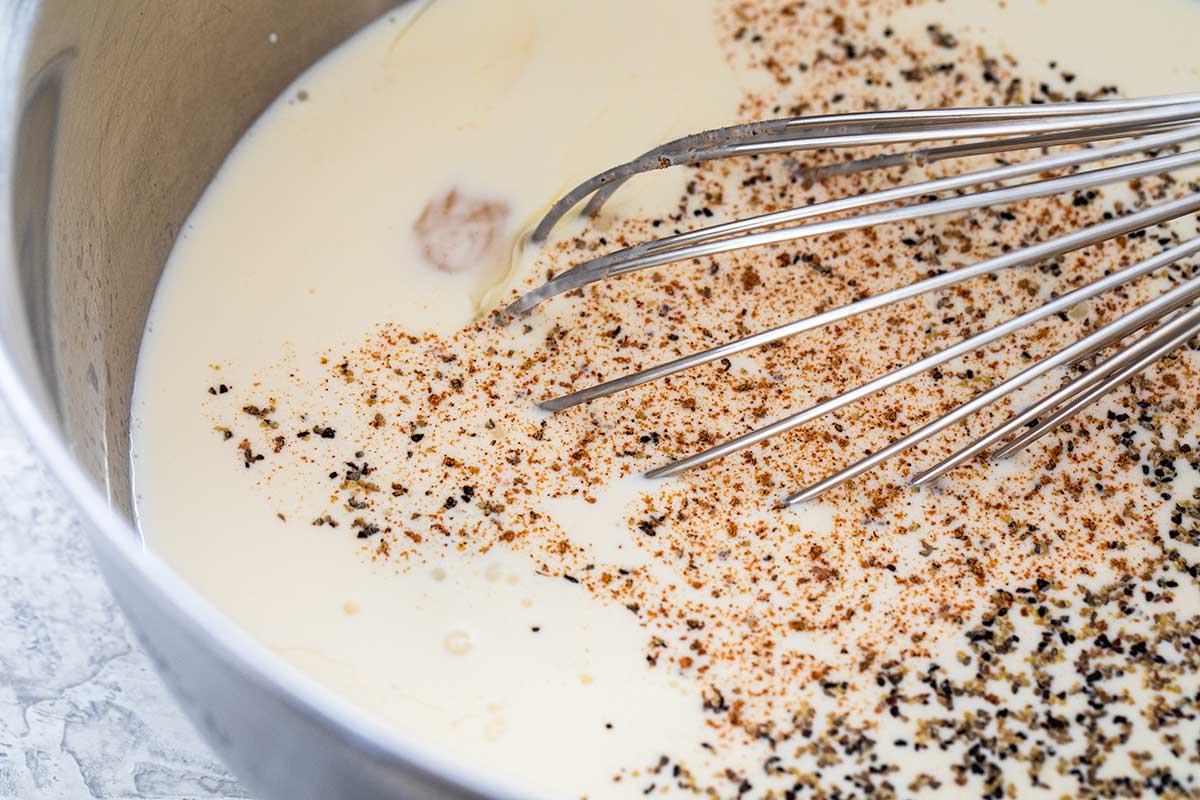
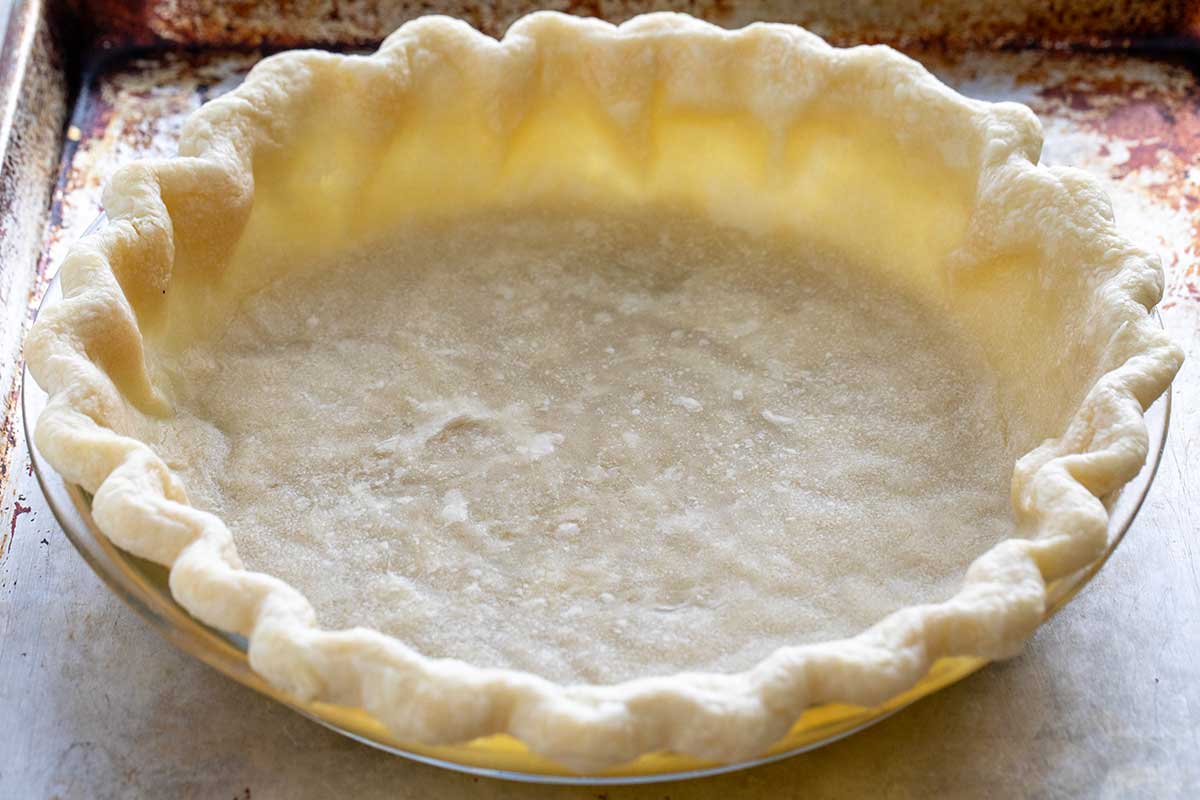
Step 11: Mix the Custard
Salt, pepper, and nutmeg add a savory seasoning with just a hint of sweet baked notes. Whisk eggs, yolks, cream, and seasoning ingredients together.
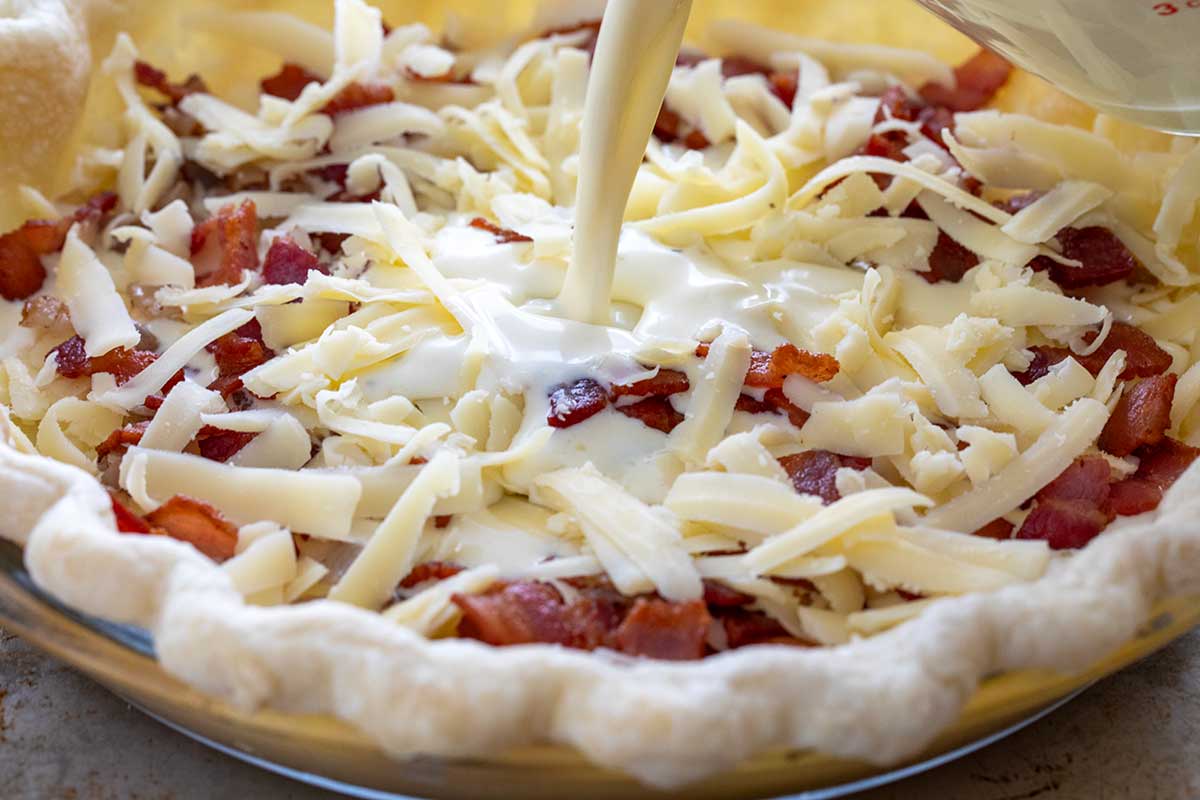
Slowly pour the egg mixture into the pie crust.
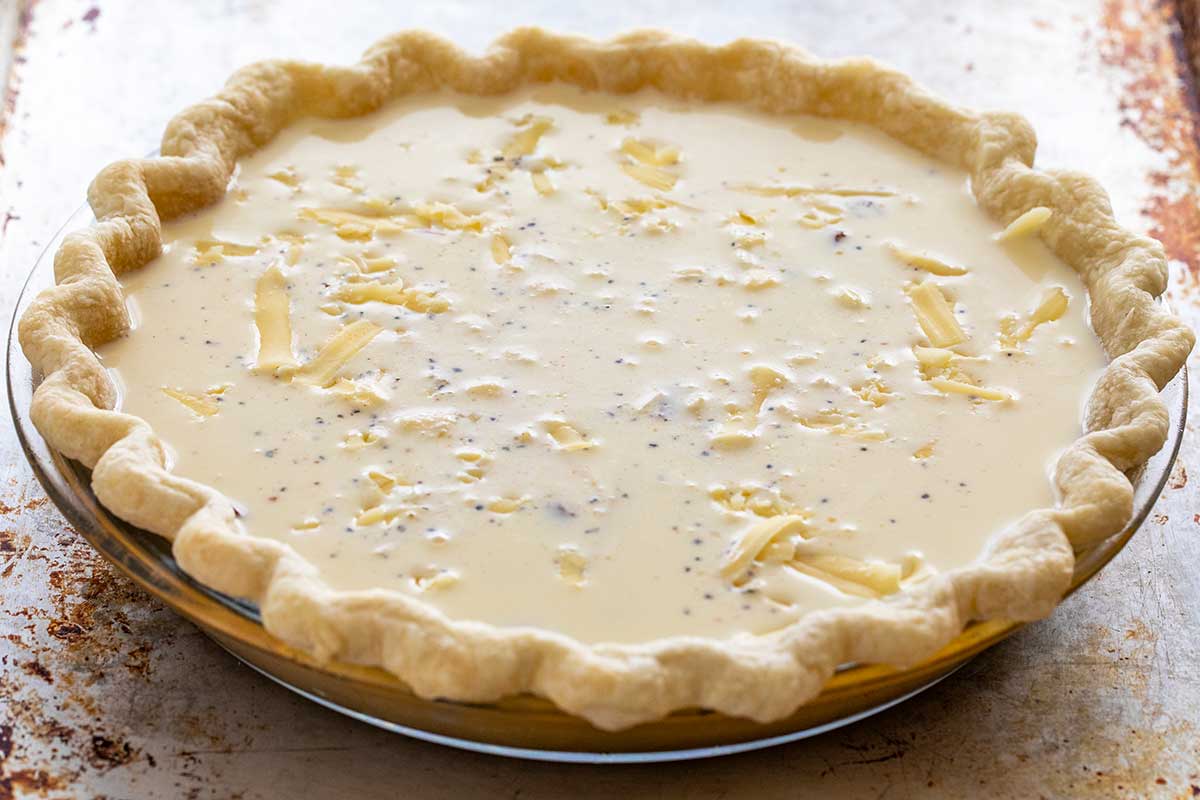
When cooked, the custard base should be smooth and creamy but hold a gel-like texture. To achieve this, you need fat and protein, both of which are found in whole milk, heavy cream, and eggs. I also limit the amount of egg whites so that the texture does not become rubbery.

Step 12: Bake
The quiche bakes at a moderate 375 degrees to gently heat the delicate egg proteins. The crust and top of the custard will brown when the surface temperature reaches 300°F (149°C) through the Maillard reaction. If the crust is browning too quickly, cover the edges with aluminum foil. To set the eggs for the best texture, bake until the custard’s perimeter sets, but the center is still slightly jiggly, about 45 minutes.
Expert Tip: When the center reaches between 185 to 190ºF (85 to 88ºC), it’s ready. An instant-read thermometer is handy for checking.

Step 13: Cool and Serve
Carryover cooking during the cooling process will finish firming up the custard without risking an overcooked, rubbery texture. A wire rack gives the best air circulation for cooling and prevents sogginess. The longer the quiche cools, the easier it will be to slice.
Frequently Asked Questions
It’s a French-style savory tart made with a velvety egg custard filling, pork, and melty cheese. In my version, I add crispy, smoky bacon and gruyere cheese.
The more milkfat added to the custard, the more velvety the consistency. The fat droplets interfere with how tightly the proteins in the albumin egg whites bind together. That’s why I use both whole milk (3.5% fat) and heavy cream (36% fat). Using equal parts yields about 19-20% milkfat, keeping fat levels balanced without making it overly rich or lean and rubbery.
To streamline the ingredients, half-and-half can be used as a substitute, but it contains slightly less fat, around 18%. It has slightly less total fat but will still yield a smooth, tender custard filling.
The egg tart is already rich with buttery crust, custard, meat, and cheese. Serve each slice with a refreshing leafy green salad, fruit salad, or crispy roasted potatoes.
More Quiche Recipes


If you tried this Quiche Lorraine Recipe, please leave a 🌟 star rating and let me know how it went in the 📝 comments below!
Quiche Lorraine

Ingredients
Pie Crust
- 1 ½ cups all-purpose flour
- ½ teaspoon kosher salt
- 14 tablespoons unsalted butter, cut into ½" cubes, chilled
- ½ cup ice-cold water
Lorraine Filling
- 8 ounces thick-cut bacon, about 8 slices cut into ½" pieces
- ½ cup shallots, ¼" dice
- 1 cup grated Gruyère cheese
- 3 large eggs
- 1 large egg yolk
- 1 cup whole milk
- 1 cup heavy cream
- ½ teaspoon kosher salt
- ¼ teaspoon ground black pepper
- ⅛ teaspoon ground nutmeg
Instructions
- Break Down the Butter – Using a stand mixer with the paddle attachment, add the flour and salt. Mix at the lowest speed (Stir) for about 10 seconds. Add the chilled diced butter and mix at the lowest speed. Turn the mixer on and off quickly for a few seconds to prevent the flour from spilling over.Continue to mix on low speed (Setting 2) until the mixture resembles wet sand with coarse crumbles, about 75 seconds. Use your fingers to break up any large pieces. Do not overmix. The dough should not bind together before adding the water. Alternatively, use a dough/pastry blender or your fingers to break the butter into the dough.
- Hydrate the Dough – Gradually add 1 tablespoon of ice-cold water to the bowl. After each addition, turn the mixer on for 1 to 2 seconds. Add only enough water until the dough looks lumpy but not wet or sticky. Not all the water may be needed, about 5 to 6 tablespoons is typical. When the dough is pinched, it should compress and hold, not be dry or crumbly. Do not over-mix.
- Rest the Dough – Press the dough into a 1” thick round disc, wrap it in plastic wrap, and place it in a resealable bag. Store in the refrigerator to rest for at least 4 hours, overnight, or up to 2 days.
- Roll the Dough – Remove the dough from the refrigerator and allow it to sit at room temperature for 5 to 10 minutes. If it’s still too hard, let it sit at room temperature until more pliable. Dust the counter and dough with flour. Rotate and dust as needed to prevent sticking. Use a rolling pin and flatten the dough into about a 14-inch circle, slightly thicker than ⅛-inch thick.
- Form the Crust – Place the dough into a 9-inch pie dish and gently press against the sides and bottom. With a paring knife, trim the excess dough leaving a ½-inch overhang. Tuck the extra dough underneath the bottom crust edges. Crimp by pinching the dough using the pointer and thumb fingers. Place the pie dish in the freezer for 20 minutes.
- Preheat the Oven – Set the oven rack in the middle position. Preheat to 375°F (190°C).
- Par-Bake Pie Crust – Place the chilled pie dish on a sheet pan. Place parchment paper on top of the crust, then add the pie weights to cover just the bottom and sides; do not overfill. Bake until the edges are lightly golden and just begin to set, about 20 minutes.Remove the crust from the oven and allow the weights to sit inside for about 4 to 5 minutes to press down any puffed areas. Remove the paper and weights; they will not be used again. Bake for another 5 minutes to dry the bottom of the crust before filling. The crust may be a bit puffy, but it will deflate as it sits. Set on a wire rack while making the filling.
- Cook the Bacon – In a large skillet, add the chopped bacon and turn the heat to medium. Once the bacon starts to sizzle, stir it occasionally until crispy, about 8 minutes. Transfer to a paper-lined plate to drain the fat.
- Cook the Shallots – Leave about 1 tablespoon of the fat in the pan. Add the shallots and saute until fragrant and translucent, about 2 to 3 minutes. Transfer to a small bowl.
- Layer the Quiche Filling – Evenly sprinkle half of the cheese, shallots, and bacon into the par-baked pie crust. Top with the remaining cheese.
- Mix the Custard – In a medium bowl, whisk together the eggs, egg yolk, whole milk, heavy cream, salt, pepper, and nutmeg. Slowly pour the egg mixture into the pie crust. Allow it to settle around the filling ingredients.
- Bake – Bake the quiche on a sheet pan until the surface and crust are golden brown, about 45-50 minutes. The center will be slightly jiggly. On an instant-read thermometer, the center should be 185 to 190ºF (85 to 88ºC). A knife is inserted about 1 inch from the edge should come out clean and not wet.
- Cool and Serve – Cool the quiche on a wire rack until it reaches room temperature, about 1 ½ to 2 hours. Slice and serve.
Recipe Video

Notes
- Store-Bought Crust: For an unbaked refrigerated crust, follow the same instructions for shaping and par-baking in the recipe. If using a frozen crust, defrost it before using.
- Storing: Cool completely, cover, and refrigerate for up to 7 days.
- Freezing: A whole quiche or slices can be wrapped and stored in a plastic bag for up to 1 month.
- Reheating: Reheat refrigerated individual slices in the microwave in 15-second intervals on high power until warmed through. Alternatively, bake slices in the oven at 375ºF (191ºC) on a foil or parchment paper-lined sheet pan for 10 to 15 minutes. If frozen, bake sliced for 20 to 25 minutes. Defrost a whole quiche, then bake until warmed through.
Nutrition Facts
Percent Daily Values are based on a 2000-calorie diet. All nutritional information is based on estimated third-party calculations. Each recipe and nutritional value will vary depending on the brands you use, measuring methods, and portion sizes per household.


Pat says
I seldom comment to online sources, but thought you deserve a double thumbs up for your posts. I enjoy reading and using your recipes even if I don’t respond. I always look forward to your posts and I hope you know you have many fans!
Jessica Gavin says
Thank you so much, Pat! I love hearing what you think about the recipes and how I can help you in the kitchen. Happy cooking!
Ann marie says
Hey Jessica if using a frozen pie crust you noted to let it defrost first but do you par bake as well or just fill and bake ? Thank you so much for great recipes.
Jessica Gavin says
Hi Ann Marie- Defrost the premade pie dough and parbake as instructed in the recipe.
Melanie says
This recipe is going to be a keeper in our family rotation. I did use a pre-made gluten free crust this time around. But will definitely make my own crust the next. It was exceptionally flavorful and had my 6 and 10 year old clamoring for seconds. Honestly I have yet to have a fail with one of Jessica’s recipes. Her baked chicken wings are a WEEKLY Saturday lunch staple.
Jessica Gavin says
Thank you, Melanie, you made my day! I love that you were are to use a gluten-free crust as well and had success. Maybe the kids can help next time, happy baking!
Cynthia says
It is a deep dish. It’s the only pie pan I own and have continued to have this problem. After the first blind bake I tried to push it back up and it fell right back down. After the second blind back I tried again and was afraid I was going to rip it so I gave up. Just to let you know, it’s the best quiche I’ve ever made. Everybody wants me to make it weekly for a quick breakfast (which will not be happening because it’s not quick for me ?) so it was a huge hit. I’m going to get a new dish and maybe some real pie weights and go at it again. Should I stick with glass? Thanks a lot for your advice, it’s greatly appreciated.
Jessica Gavin says
I would use glass so you can easily monitor the crust color change on the sides. You are the quiche queen!
Cynthia says
I used 3 cups of beans. I followed every step you had. I did have it rest longer then your recipe stated, 7 hours. I’ve only made 4 pies in my lifetime so lm not an expert on making them. All 4 of my pies have done the same thing. I had really high hopes on this one because the dough was so perfect. I use a glass pie pan with glass handles on it, is it maybe that? I know the handles makes it more difficult to make the perfect shape.
Jessica Gavin says
It could be perhaps the pie plate if it’s a deep dish. How tall are the sides? Also, after parbaking the dough is still a little pliable, so you can gently push the warm crust up the sides, then add the filling. The filling will help weigh down the dough and keep it from shrinking.
Cynthia says
I have never EVER had such an easy time making the crust! My quiche is now in the oven cooking. I seem to constantly have a problem with the crust collapsing on one side or the other though and can not figure out why. I make sure not to stretch it out while I’m going up the sides, and I make sure it’s pushed in all the way as I’m doing it. I did every step you had but once again it happened. Any advice
Jessica Gavin says
Did you use pie weights? How long did you let the pie dough rest? It’s normal for the crust to shrink, but with the right amount of weights, it shouldn’t collapse. Did it collapse during blind baking?
Claudia says
Can this quiche be served warm right from the oven for a luncheon or dinner or does it have to be cooled first as you suggest and then warmed up?
Jessica Gavin says
You must let the quiche cool or the custard filling won’t set. The longer the cooling time, the more firm the egg will be for slicing.