
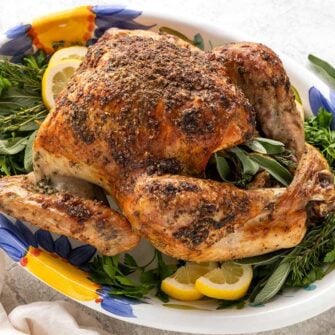
Learn how to make a juicy, flavorful roast turkey recipe to wow your guests. Whether you pick up a fresh, frozen, pre-brined bird or want to try dry-brining, it’s all covered here.

Jessica’s Recipe Science
- Dry brining a turkey with salt and sugar uses osmosis to draw out the juices, which are then reintroduced with concentrated seasoning. This process makes the turkey extra flavorful and juicy.
- For crispy, flavorful skin, sprinkle on salt and baking powder. The baking powder creates bubbles that make the skin extra crunchy.
- After adding the turkey, the oven temperature may drop by 25 to 50 degrees. To ensure even cooking, ensure the oven returns to 425ºF between buttering.
Featured Comment 19
“OMG this is the most tender, juiciest turkey I’ve ever had. Absolutely perfectly cooked. Thank you Jessica! My daughter agreed – our best turkey ever!”—Ellen V.
Why It Works
If you’re in charge of making the Thanksgiving turkey this year, I know it can be a little daunting. But no worries, I’m here to help! Over the years, I have tested many popular methods, such as roasting frozen, basted, and unbrined varieties. This roast turkey recipe is the best!
Jump To a Section
Ingredients You’ll Need
- Turkey: I recommend purchasing a 12 to 14-pound turkey. It can be unbrined or pre-brined. If pre-brined, skip the dry brine step in the recipe.
- Dry Brine: I season the turkey meat under the skin before roasting it with a mixture of salt and granulated sugar 12 to 24 hours before cooking the turkey.
- Surface Seasoning: Salt, baking powder, and black pepper are applied to the skin and cavity. This creates a golden brown, crispy, and flavorful roast turkey. I recommend refrigerating for about 24 hours, seasoning the turkey, and drying the surface for extra crispy skin.
- Vegetables: I like to add a mixture of onion wedges, carrots, celery, and thyme sprigs to the roasting pan. The vegetables keep the turkey drippings from burning as it roasts. You can serve the cooked veggies as a side dish or puree them into a soup.
- Citrus: A slice of lemon or orange added to the bird’s cavity adds a pleasant citrus aroma and flavor to the turkey gravy drippings.
- Butter: Melted butter is brushed several times on the turkey skin to promote browning, add flavor, and keep the turkey moist.
- Gravy: The drippings from roasting, turkey stock, and flour make a luxurious turkey gravy.
See the recipe card below for all ingredients and measurements (US and metric).
Ingredient Substitutions
This oven roasted turkey recipe is easy to customize! Try these tasty suggestions:
- Type of Turkey: Choose between different types of turkey, including organic, natural, free-range, Heritage, kosher, unbrined, or basted. Based on your preparation needs, use fresh or frozen turkey. Fresh offers quicker prep, while frozen allows flexibility.
- Vegetable Options: Add hearty potatoes, parsnips, or fennel.
- Herbs: Use fresh herbs like thyme, rosemary, and sage.
- Seasoning: Customize the seasoning blend by adding some garlic powder, onion, powder, paprika, cumin, or Italian Seasoning. Make it spicy with cayenne or Cajun seasoning. Try my Cajun turkey for a unique Louisiana-inspired flavor.
- Make it Gluten-Free: Opt for gluten-free flour, arrowroot powder, or cornstarch to thicken the gravy.
- Butter Swaps: For those with dietary restrictions, replace butter with olive oil, avocado oil, vegetable oil, ghee, coconut oil, or margarine.
How to Roast Turkey in the Oven
Step 1: Remove Giblets and Neck
Place the fresh or thawed turkey on a sheet pan and remove the giblets and neck from the cavity, setting them aside if you plan to use them for giblet gravy. Pat the surface and inside of the cavity dry with paper towels—this helps the skin crisp up during roasting.

Step 2: Dry Brine (For non-basted turkeys)
For unbrined turkeys, place a mixture of kosher salt and sugar underneath the turkey skin, in the breast and leg area, and inside the unstuffed turkey cavity. Remove the neck and giblets. The ingredients are similarly found in basted birds to season and up the juiciness level. However, you don’t need any water, just some space in the fridge.
Ingredient Chemistry: Dry brining works by osmosis, where the salt and sugar draw out the juices from the turkey and replace them with concentrated seasoning. This makes it incredibly savory. If you’ve never done this method before, it’s a game-changer.

Step 3: Season the Surface
To add flavor and crispiness to the skin, sprinkle on a mixture of kosher salt, baking powder, and black pepper. I use this on my crispy baked chicken wings. The salt and pepper season the surface, while the baking powder makes the skin more alkaline, accelerating the Maillard browning reaction.
The baking powder also reacts with any moisture left on the skin, creating carbon dioxide bubbles that harden and make the skin crunchier. I add this mixture right after the dry brining process, but I also do this for a self-basting (basted) turkey for extra flavor while air drying the day before.

Step 4: Refrigerate the Turkey
Place the turkey breast-side up on a V-rack in a roasting pan or on a wire rack over a rimmed sheet pan. Refrigerate uncovered for 12 to 24 hours to dry the skin. If you’re brining, after 24 hours, loosely cover the turkey with plastic wrap and refrigerate for up to 36 hours.
Pro Tip: Air dry the turkey in the refrigerator for at least 12 to 24 hours, uncovered, and elevated to remove any surface moisture. Steam is the enemy when roasting if you’re trying to achieve crispy brown skin. If you are short on time, you can skip the refrigeration step (only for a pre-brined turkey), but it will be less crisp.
Step 5: Preheat the Oven
Adjust the oven rack to the lowest position and preheat to 425ºF (218ºC). This ensures the turkey has enough space to cook evenly and develop a golden, crispy skin.

Step 6: Truss the Turkey
Add the aromatic sage, rosemary, thyme, and a lemon slice to the cavity and massage to infuse the flavor. First,
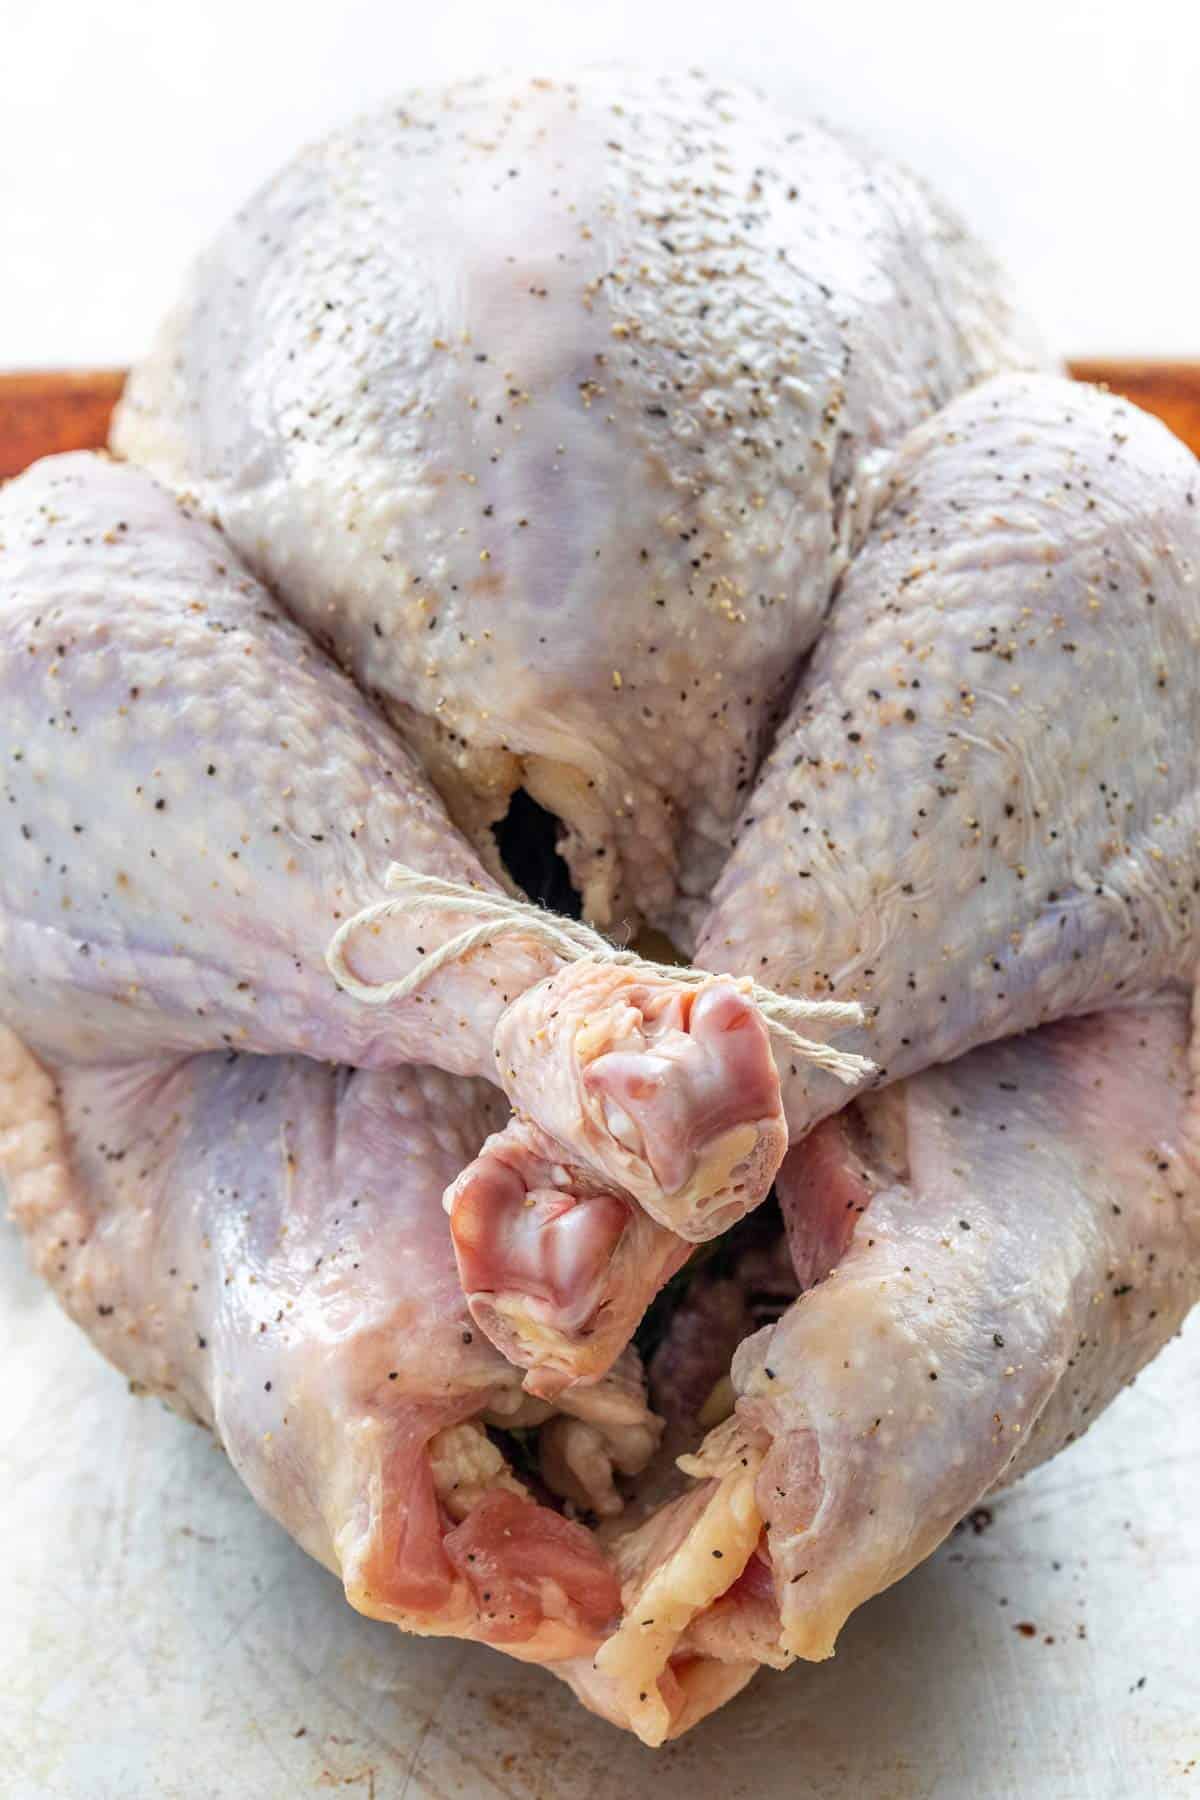
The process is similar to a whole roasted chicken. Tuck the wings back and tie the legs together with butcher’s twine.
Expert Tip: Avoid tying the legs too tightly, as this can slow down the cooking inside the cavity.

Step 7: Prepare the Vegetables
Spread onions, carrots, celery, and thyme sprigs evenly across the roasting pan. These aromatics infuse the turkey with additional flavor while roasting and help create a flavorful base to make gravy.
Place the V-rack in the roasting pan and line it with foil. Lightly coat the foil with nonstick spray or vegetable oil to prevent sticking. Use a knife to poke about 30 small holes in the foil for airflow, which helps the turkey cook evenly.
Tips for Perfect Execution: I find it helpful to line the V-rack with aluminum foil and grease it to create a nonstick surface. Poke vent holes to allow the fat drippings to drain into the pan and prevent soggy skin. Roasting the turkey initially on foil prevents the breast skin from sticking to the rack.

Step 8: Butter the Surface
Brush melted butter evenly over the breast, wings, legs, and thighs. Then, place the turkey breast side down on the foil-lined V-rack. Brush the remaining butter over the back, legs, and thighs for extra moisture and flavor during roasting.
The turkey will be roasted breast-side down on the roasting rack for the first part of cooking. This position gives a jumpstart to the dark meat of the wings, thighs, and legs, which take longer to cook.

Step 9: Roast the Turkey
Roast the turkey for 45 minutes, then flip it and remove the foil to allow hot air to circulate under the thighs.

Brush the breasts, wings, thighs, and legs with butter, and roast for another 30 minutes. The butter adds fat and helps deepen the golden brown color.

Brush the turkey again and roast for 10 minutes or until the breast and thigh reach the correct internal temperatures on a meat thermometer.
How Long to Roast a Turkey: Depending on the bird size, a 12 to 14-pound turkey cook time will be between 1 hour 35 minutes and 1 hour 45 minutes. If the bird is any larger, it could dry out, and you may also need to cover the breast if it darkens too much. I recommend roasting two smaller birds than one mega one.

Step 10: Check for Doneness
Use an instant-read thermometer to check for doneness. For the breasts, insert the probe from the neck-end parallel to the meat and check both sides. Check the thickest part between the breast meat and the drumstick for the thighs.
Avoid hitting the bones; otherwise, you’ll get a false high reading. The essential temperatures to shoot for are 160 to 165ºF (71 to 74ºC) in the thickest part of the breast and 170 to 175ºF (76 to 79ºC) in the thickest part of the thigh.
Pro Tip: If there are still uncooked areas (pink is okay!), you can roast longer in 5-minute increments. Sometimes, the leg and thighs don’t finish cooking. If that happens, you can cut them off and cook them on a sheet pan while the turkey rests.

Step 11: Rest the Turkey
After cooking, let the turkey rest for about 45 minutes. This duration allows the hot juices to reabsorb into the meat. Cutting it too soon will cause the juices to run out, leaving you with drier pieces. Let the bird sit uncovered to prevent trapped steam from ruining the crispy skin.
Carving the Turkey: Traditionally if you like to serve the whole turkey on a platter andcarve the turkey at the table, go for it. However, it can get a little messy, so I prefer to slice it up on a cutting board and not keep guests salivating.

Step 12: Make Turkey Gravy
After removing the roasted vegetables, scrape up the browned bits from the pan, using hot water if needed to release them. These bits add rich flavor and color to your turkey gravy.

Pour the drippings into a fat separator and let them sit for about 10 minutes. Combine the reserved fat with flour in a pan to create a roux. Gradually whisk in the juices and add enough stock to make 4 cups total.
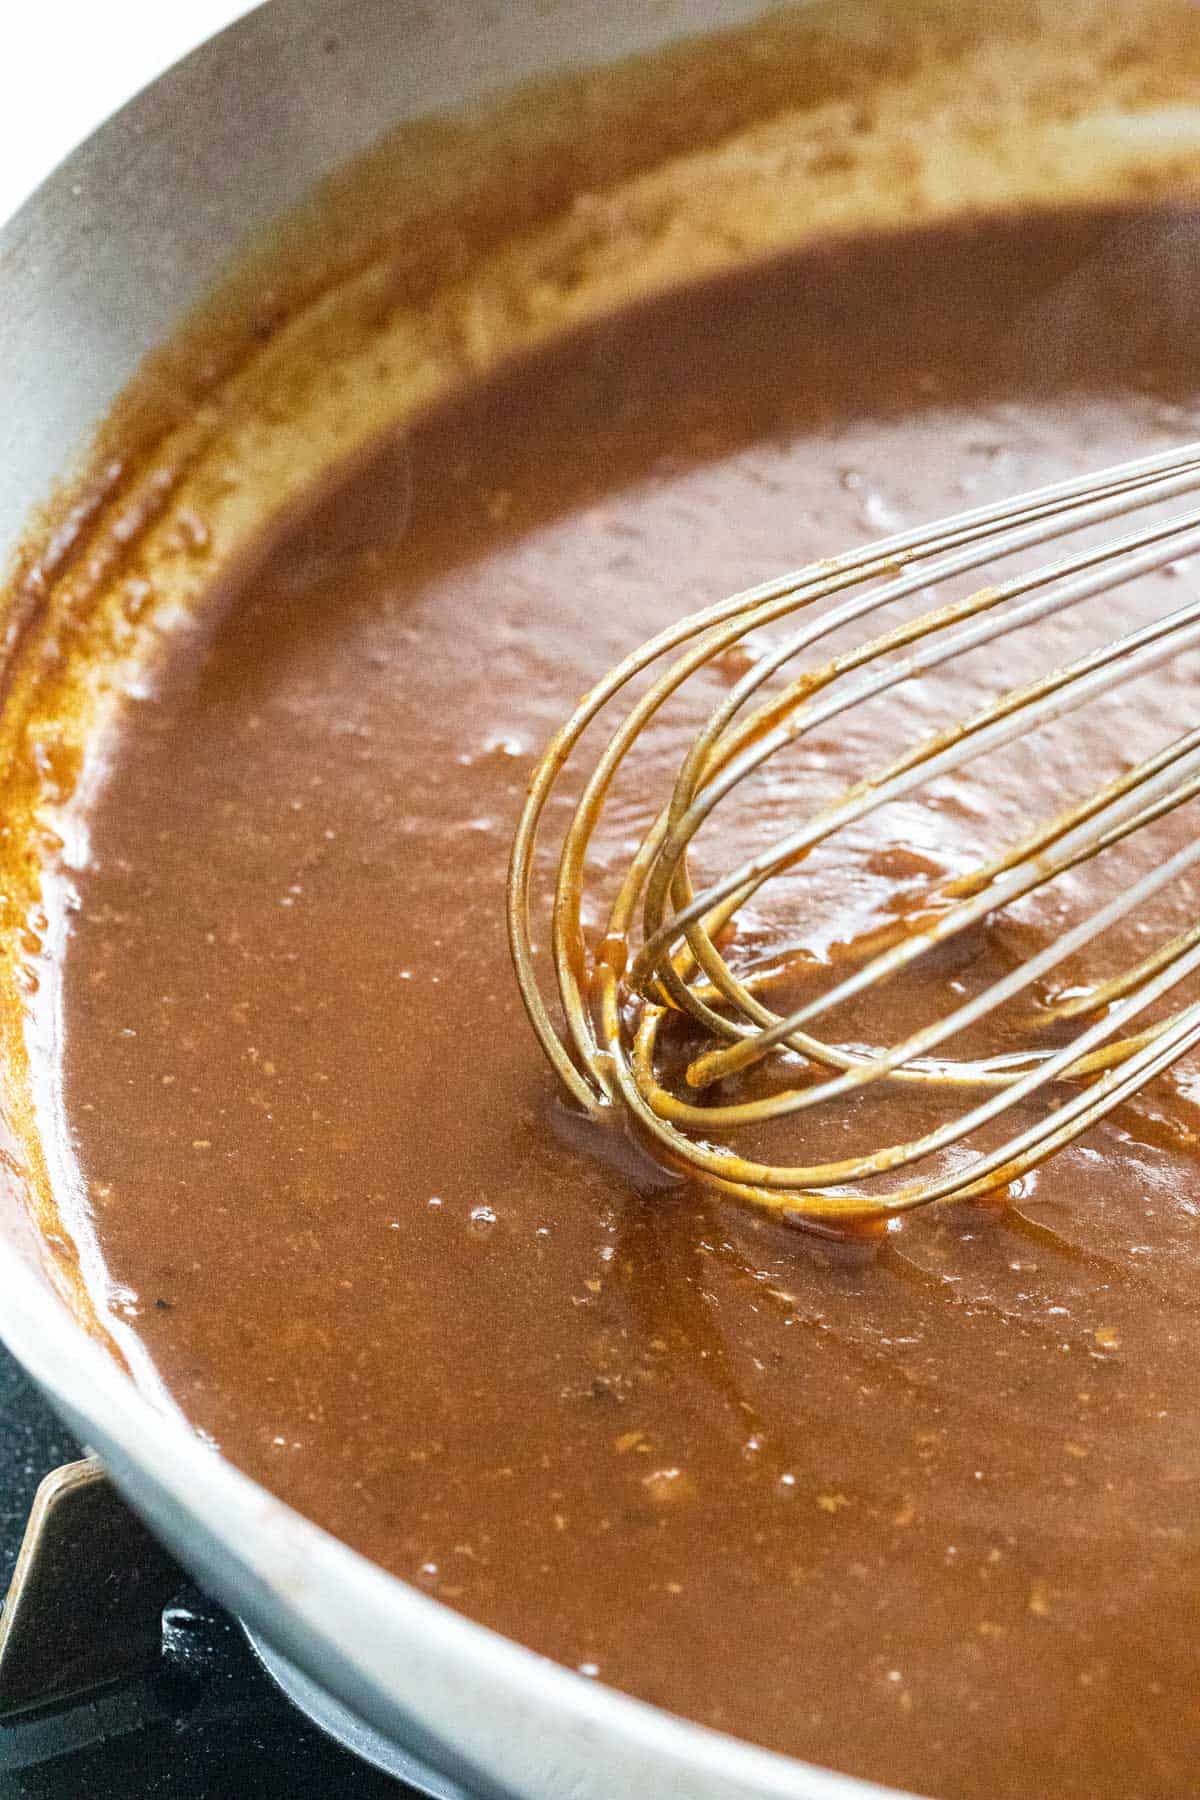
Cook over medium-high heat for 3 to 5 minutes, adjusting consistency by adding more stock for a thinner gravy. Season with salt and pepper, strain for a smooth texture if desired, and serve hot with the turkey.
Expert Tip: Plan for about ⅓ cups of gravy per person. For a smaller crowd, reduce the recipe by half.

Frequently Asked Questions
For convenience, a pre-brined, self-basting (basted) turkey is usually injected with salt, sweetener, seasonings, and sometimes phosphates for water retention. These are all meant to add flavor and retain moisture to skip the brining process at home. Check the label for those ingredients. An unbrined turkey, typically labeled as natural or organic. They may have water retention (around 6%) but no added salt. They require a little more work, but I prefer this option for more control over the flavor. I like to dry brine the turkey a day before roasting, but you can also wet brine if you prefer.
The main difference between roasting a frozen and fresh turkey is preparation and timing. Frozen turkeys are quick-cooled, which helps preserve the meat’s texture when thawed, allowing you to defrost it closer to the feast. Fresh turkeys are chilled to about 26ºF (-3.3ºC) and shouldn’t be refrozen, so buying them just a few days before you plan to roast is best. Both can deliver great results, but fresh turkeys require more precise planning around your cooking schedule.
It’s safe to assume you need 1 pound of turkey per guest. A 10-pound turkey is ideal for a smaller feast. I usually choose a turkey between 12 to 14 pounds in size. It cooks in a reasonable amount of time while achieving juicy meat and beautifully browned skin.
Defrost a frozen turkey in the refrigerator 1 day for every 4 pounds. For example, a 12-pound turkey needs at least 3 days. If wet-brining, salting (dry-brining), or air-drying in the refrigerator for crispier skin, defrost 4 to 5 days in advance.
It’s common for the temperature to drop by about 25 to 50 degrees after placing the turkey in the oven. Maintaining around 425ºF (218ºF) after flipping and brushing is crucial to ensure the meat cooks through. I will turn the oven temperature up 25 to 50 degrees during transitions for a few minutes to quickly heat, then turn it back to 425 degrees when roasting to maintain the temperature.
Serve This With


If you tried this Roast Turkey Recipe, please leave a 🌟 star rating and let me know how it went in the 📝 comments below!
Roast Turkey Recipe

Ingredients
Dry Brine (For non-basted turkeys)
- 3 tablespoons kosher salt
- 4 teaspoons granulated sugar
Surface Seasoning
- 4 ½ teaspoons kosher salt
- 2 teaspoons baking powder
- 1 teaspoon black pepper
Roast Turkey
- 12 to 14 pound turkey
- 2 yellow onions, cut into 16 wedges
- 2 cups carrots, cut into 2" pieces
- 2 cups celery, cut into 2" pieces
- 10 sprigs of thyme, divided
- 5 sage leaves
- 2 rosemary sprigs
- 2 garlic cloves, peeled and smashed
- 1 lemon slice, or orange slice
- 9 tablespoons unsalted butter, divided
- kosher salt, as needed for seasoning
- black pepper, as needed for seasoning
Gravy
- ½ cup reserved fat, from pan drippings or unsalted butter
- ½ cup all-purpose flour
- 4 cups roasting juices, from pan drippings
- 1 quart turkey stock, or chicken stock, as needed
- kosher salt, as needed for seasoning
- black pepper, as needed for seasoning
Instructions
- Remove Giblets and Neck – Place turkey on a sheet pan. Remove the giblets and neck from the cavity and reserve them if using to make giblet gravy. Use paper towels to dry the surface and inside the cavity.
- Dry Brine (For non-basted turkeys) – Omit this step if using a basted, salt-injected, or kosher turkey. In a small bowl, combine 3 tablespoons of kosher salt and 4 teaspoons of sugar. Lift the skin from the breast and leg area. Rub 1 tablespoon of the mixture underneath the skin of each breast. Rub 1 ½ teaspoon underneath each leg. Rub the remaining mixture inside the cavity.
- Season the Surface – In a small bowl, combine 4 ½ teaspoons kosher salt, 2 teaspoons baking powder, and 1 teaspoon black pepper. Evenly rub the mixture on the surface of the breast, wings, legs, thighs, and back.
- Refrigerate the Turkey – Place turkey breast-side up in a roasting pan with V-rack or on a wire rack set over a rimmed sheet pan. Refrigerate uncovered for at least 12 to 24 hours. If brining for up to 36 hours, loosely cover the turkey with plastic wrap after 24 hours. Transfer the turkey breast-side up to a clean sheet pan. Clean the roasting pan.
- Preheat the Oven – Adjust the oven rack to the lowest position. Preheat to 425ºF (218ºC).
- Truss the Turkey – With the turkey on the sheet pan, thoroughly dry the surface and the cavity with paper towels. Add 5 sprigs of thyme, sage, rosemary, garlic cloves, and lemon slice inside the cavity. For basted turkeys, add 1 teaspoon of salt to the cavity.Massage the inside of the bird with the aromatics to infuse the flavors. Tie the legs together with butcher's twine or tuck the legs under the skin at the tail if still connected.
- Prepare the Vegetables – On the bottom of the roasting pan, evenly spread onions, carrots, celery, and 5 sprigs of thyme. Place the V-rack inside the pan and then line it with foil. Spray the foil with nonstick cooking spray or grease with vegetable oil to prevent sticking. Use a knife to poke 30 holes in the foil.
- Butter the Surface – Melt 6 tablespoons of butter. Evenly brush it over the breast, wings, legs, and thighs. Place the turkey breast-side down on the foil-lined V-rack. Brush the remaining melted butter over the back, legs, and thighs.
- Roast the Turkey – Roast for 45 minutes. For a turkey smaller than 12 pounds, roast for 30 minutes. Remove the turkey from the oven, but immediately close the door so the oven returns to 425ºF (218ºC).Carefully remove the foil and discard it. Use two large wads of paper towel, and tilt the turkey so the juices drain from the cavity. Then flip the bird so that it is breast-side up. Melt 2 tablespoons of butter and evenly brush it over the breast, wings, legs, and thighs. Roast for 30 minutes.Remove the turkey from the oven, and allow the oven temperature to return back to 425ºF (218ºC). Melt 1 tablespoon of butter and brush it over the breast, wings, legs, and thighs. Transfer back to the oven and rotate the pan for even cooking. Roast for 10 minutes.
- Check for Doneness – Roast until the thickest part of the breast is 160 to 165ºF (71 to 74ºC) on a meat thermometer, and the thickest part of the thigh reaches 170 to 175ºF (76 to 79ºC). If needed, continue to roast and check for doneness every 10 minutes. When it reaches 5 degrees below the temperature range, especially for the breast, check after 5 minutes.
- Let it Rest – Transfer the turkey to a cutting board and rest it for about 45 minutes before carving. Discard the thyme and transfer the roasted vegetables to a bowl or serving platter and cover to keep warm.
- Make Turkey Gravy – Scrape the browned bits stuck to the pan's bottom. A small amount of water or heating the pan over low heat can help loosen the bits. Pour the juices, fond, and fat drippings into a measuring cup or fat separator. Allow it to sit until the fat rises to the surface, about 10 minutes. Reserve the fat. Alternatively, chill in the refrigerator for quicker separation.Pour the juices into a measuring cup. Add store-bought turkey or chicken stock to reach a total of 4 cups. In a large saute pan, add ½ cup of reserved fat and ½ cup of flour. If you don’t have enough fat, use butter. Heat the pan over medium heat, whisk, and cook for 1 minute.Turn the heat to medium-high. Gradually pour the juices into the pan, continuously whisking for 3 to 5 minutes, or longer for a thicker consistency. For a thinner sauce, add more stock. Season with salt and pepper to taste. If desired, strain for a smooth texture. Serve hot with sliced turkey.
Recipe Video

Notes
- Using Diamond Crystal Kosher Salt: This recipe was developed with Morton Coarse Kosher salt. Increase the amount by 50% for Diamond Crystal kosher salt.
- For Larger Turkeys: Double the dry brining and surface seasonings for turkeys between 15 to 24 pounds.
- Refrigeration Time: I find that 20 to 24 hours yields flavorful meat as the salt has enough time to dissolve, but you can dry brine for up to 36 hours for even juicier meat. However, loosely cover the turkey’s surface after 24 hours.
- For the Crispiest Skin: At the end of cooking, broil the turkey breast-side up on the roasting rack. Check every minute to ensure the skin doesn’t burn.
Nutrition Facts
Percent Daily Values are based on a 2000-calorie diet. All nutritional information is based on estimated third-party calculations. Each recipe and nutritional value will vary depending on the brands you use, measuring methods, and portion sizes per household.
Recipe Resources


Linda Cicerchia says
Thank you Jessica for this recipe! My turkey was so tender and delicious. I will be making this next year too!
Jessica Gavin says
Yay! Great job with the roast turkey recipe, Linda. Thrilled to hear that you’ll be making it next year too.
Ellen Veccia says
OMG this is the most tender, juiciest turkey I’ve ever had. Absolutely perfectly cooked. Thank you Jessica! My daughter agreed – our best turkey ever!
Jessica Gavin says
Whoo hoo! That makes me so happy to hear that your family enjoyed the turkey recipe!
Rebecca says
We followed your recipe and advice last year and it will now be a tradition for our family as long as I’m doing the turkey!!! It turned out so well and was delicious. Such fun to have a beautiful looking and beautiful tasting turkey! Thank you Jessica and Happy Thanksgiving ?
Jessica Gavin says
Yay! Thank you for making the turkey! I hope you have an incredible thanksgiving as well!
Brent Abdullah says
I’m going to try this technique, but really, no basting? Are you sure? Im guessing basting will limit the crispness of the skin, I get that, but the meat being juicy is so much more important.
Jessica Gavin says
If you are brining the turkey the moisture should be more retained in the meat and not on the surface. I brush the surface a few times with melted butter to help brown the surface, add flavor, and prevent moisture loss.
BRENT A ABDULLAH says
Followed your directions to a T and the turkey was perfect… juicy and delicious. Our guests ran late and I made a mistake putting foil over the turkey which softened the skin but it was perfect when it came out and the meat was still delicious. The flip is a game changer… but I have handles on my pan and I got myself a couple times. Ended up buttering the skin 4 times just to be on the safe side and it was perfectly golden brown. The gravy was really good as well. Thank you for the input.
Jessica Gavin says
Thank you for your feedback! I’m thrilled to hear the turkey turned out well. Yes, covering creates steam on the surface. But I’m glad everything turned out well. Cheers!
Tylie Petersen says
Thank you Jessica for the recipe! The turkey turned out perfectly moist with a super crispy skin. Will probably make it again for our Christmas dinner!
Cyndi Lew says
I just made this and it was great! The skin turned out so crispy and delicious, I just wanted to eat all the skin. But I was good and let other people have some too. The meat was flavorful and moist as well. I would make this again!
Jessica Gavin says
Thank you so much for your feedback Cyndi! Nice of you to share the crispy shin with your loved ones, haha!
Carol Scully says
Last minute question: I’m dry brining now. Do I wait to put the baking powder/salt/pepper concoction on tomorrow before I put it in the oven? That’s how I understand it when I read ‘right after the dry brining process.’ I am second guessing myself now. Thanks!
Jessica Gavin says
I usually put it on right after I dry brine, so that same day. It air dries with the dry brine overnight. However, I have tested putting the baking powder mixture on the day I roast the turkey, and that would work just fine too!
Carol Scully says
Thanks!! I did put it on last evening. I’ll let you know how it all turns out! Happy Thanksgiving.
Jessica Gavin says
Wonderful! Happy thanksgiving!
Nicole says
Nice tips. Concerned about the lack of seasoning but excited to do
Jessica Gavin says
Can’t wait to hear how it goes!