This homemade cherry pie recipe is an impressive dessert with slices of delicious fruit filling baked inside a flaky, buttery crust. I share tips for pitting the cherries and making a stunning lattice crust.

Jessica’s Recipe Science
- Roll the pie crust ¼-inch thick to give a sturdy structure. You want it to hold in the fruit filling without being too thick.
- Halve some of the cherries to fill in the gaps between the whole ones, preventing the filling from rolling out the crust when slicing.
- Benzaldehyde gives cherries their distinct flavor and is also found in almonds. To enhance the flavor, add almond extract to the filling.
Jump To a Section
Why It Works
If there’s one dessert I can’t resist, it’s a thick slice of cherry pie, especially when made from scratch. Cherries are in season during summer, so grab a few pounds and load them up in a homemade pie crust. I use my go-to dough recipe, which I prepare in advance to speed up prep on bake day. Don’t worry. It’s easy to swap in frozen cherries to make during the holidays.
When you imagine the ideal filling, it should burst with a sweet and tart flavor balance and be easy to cut and serve. Halving some of the fruit to prevent it from spilling out of the crust allows for better packing and juicier consistency. Plus, using just the right amount of cornstarch helps tighten the sauce when it cools.
Ingredients You’ll Need
- Pie Crust: I use a classic recipe called Pâte Brisée for a flaky pie crust texture. It’s incredibly versatile. I use it for my savory chicken pot pie and blueberry pie. The pie crust recipe ingredients are simple: all-purpose flour, ice-cold water, unsalted butter, and salt.
- Cherries: Fresh cherries typically pop up at the markets between May and August. I use sweet red cherries (Prunus avium), like Bing or Lambert. They have a firm, juicy texture and deep red for that characteristic appearance.
- Cornstarch: Cornstarch is an effective thickening agent as you need half as much as flour, and I like how it gives a clear, glossy appearance.
- Sweetener: I use granulated sugar for a clean sweetness, unlike canned products, typically consisting of high fructose corn syrup.
- Flavoring: A small amount of cinnamon and vanilla extract adds warmth and dimension. I add almond extract because it has a similar taste profile to cherries, elevating the natural flavor. Lemon juice and zest add a hint of citrus aromatics and tartness.
- Butter: Pieces of butter are added to the top of the cherry filling to prevent the crust from sticking.
See the recipe card below for all ingredients and measurements (US and metric).
Ingredient Substitutions
Now that you know how to make the best cherry pie recipe, it’s easy to customize! Try these tasty options:
- Using Store-Bought Pie Crust: Purchase enough for a double crust. If the crust is frozen, defrost it and bake according to the recipe.
- Cherry Substitutes: The blush yellow Rainier has a milder flavor and is a more tart cherry. I would increase the sugar level to about ¾ cup when using this variety or other sour cherries (Prunus cerasus).
- Using Frozen Cherries: Do not defrost frozen cherries. Combine them with the filling ingredients and bake so you don’t lose the sweet juices.
- Using Canned Cherry Filling: It’s already sweetened and has cornstarch, so add directly to the crust.
- Sweetener Swaps: Brown sugar, honey, or maple syrup can add more dimension to the cherry filling.
- Flavoring: Add cardamom, ginger, nutmeg, or allspice. For an oaky flavor, add bourbon whiskey.
How to Make Cherry Pie
Step 1: Prepare the Ingredients
Prepare ice water, and cut the butter into ½-inch cubes, and refrigerate. Chilled ingredients ensure the butter stays solid, so when it melts during baking, it releases steam, creating light, flaky layers in the crust.

Step 2: Break Down the Butter
What’s important is how you break down the butter. I use a stand mixer, but a dough cutter, food processor, or your fingers will work to make pea-sized pieces. This process will create little pockets of fat that steam up and flake during baking.

Step 3: Hydrate the Dough
Add ice-cold water 1 tablespoon at a time, pulsing the mixer for 1 to 2 seconds after each addition. Stop once the dough looks lumpy and begins to clump. The dough should hold when pinched without being wet or crumbly.

Step 4: Rest the Dough
Divide the dough into 1-inch discs and cover with plastic wrap. This recipe for cherry pie uses a high-fat ratio in the all-butter pie crust. It needs time to chill and solidify, so it’s easier to roll out and allow the gluten protein network to relax.
The result is a pliable dough that’s tender and not tough. There is a four-hour wait time, so I recommend making the dough a day or two before so you can grab it and roll it out.

Step 5: Roll the Dough
Let the dough sit at room temperature for 5 to 10 minutes before rolling to become more malleable. I use a shallow 9-inch pie dish that’s about 1 ½-inches high. It gives an excellent ratio of crust-to-filling and prevents shrinking like a deep dish often does.

Transfer the pie dough to the dish, and trim the excess with a paring knife, leaving a 1/2″ overhang to fold over later. Place the prepared pie dish in the refrigerator to keep it cold.

Roll the other dough into a 13 by 10-inch rectangle for the top lattice pie crust. Cut the dough into ten strips about 13″ long and 1″ wide. Transfer to a sheet pan and refrigerate to make it easier to weave.
Expert Tip: I prefer a glass pie dish because it’s easier to monitor the browning. Glass takes a little longer to heat up than metal, but it retains heat better during the cooling process. The carryover cooking after baking helps the crust become golden brown with no raw dough areas.

Step 6: Cherry Filling
For this recipe, you need two pounds of sweet cherries, about 5 ½ cups once pitted. Cutting down at least 2 ½ cups into halves releases more of the fruit’s liquid, resulting in a juicier texture and a more concentrated flavor.

Combine the cherries with sugar, cornstarch, lemon zest, lemon juice, cinnamon, vanilla, and almond extract. This mixture helps thicken the cherry juices and enhances flavor during baking.
Pro Tip: In addition to using a cherry pitter, I have a few easy methods to remove cherry pits.
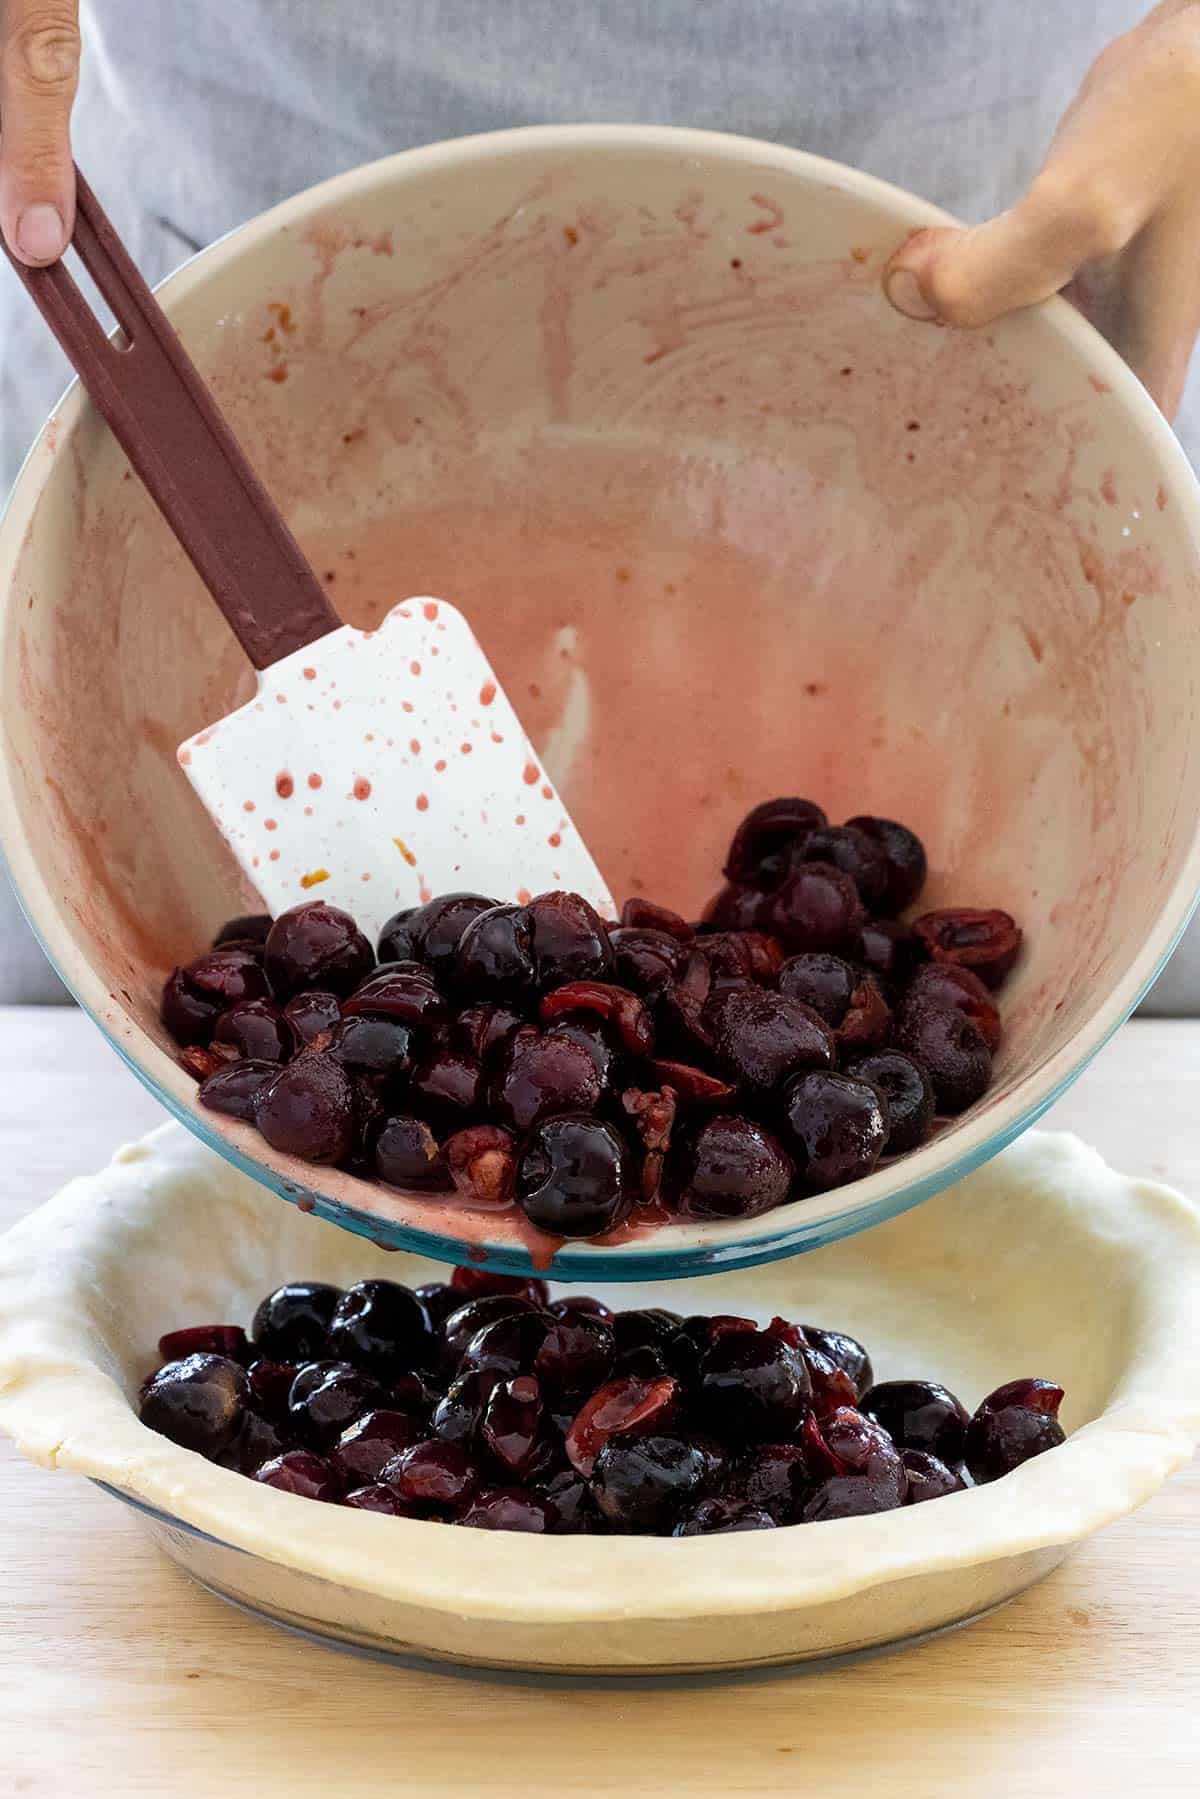
Step 7: Add the Filling
Pour the cherry filling into the pie dish, spreading it evenly to fill any gaps. Dot the cherries with cubed butter to help prevent sticking to the lattice crust.


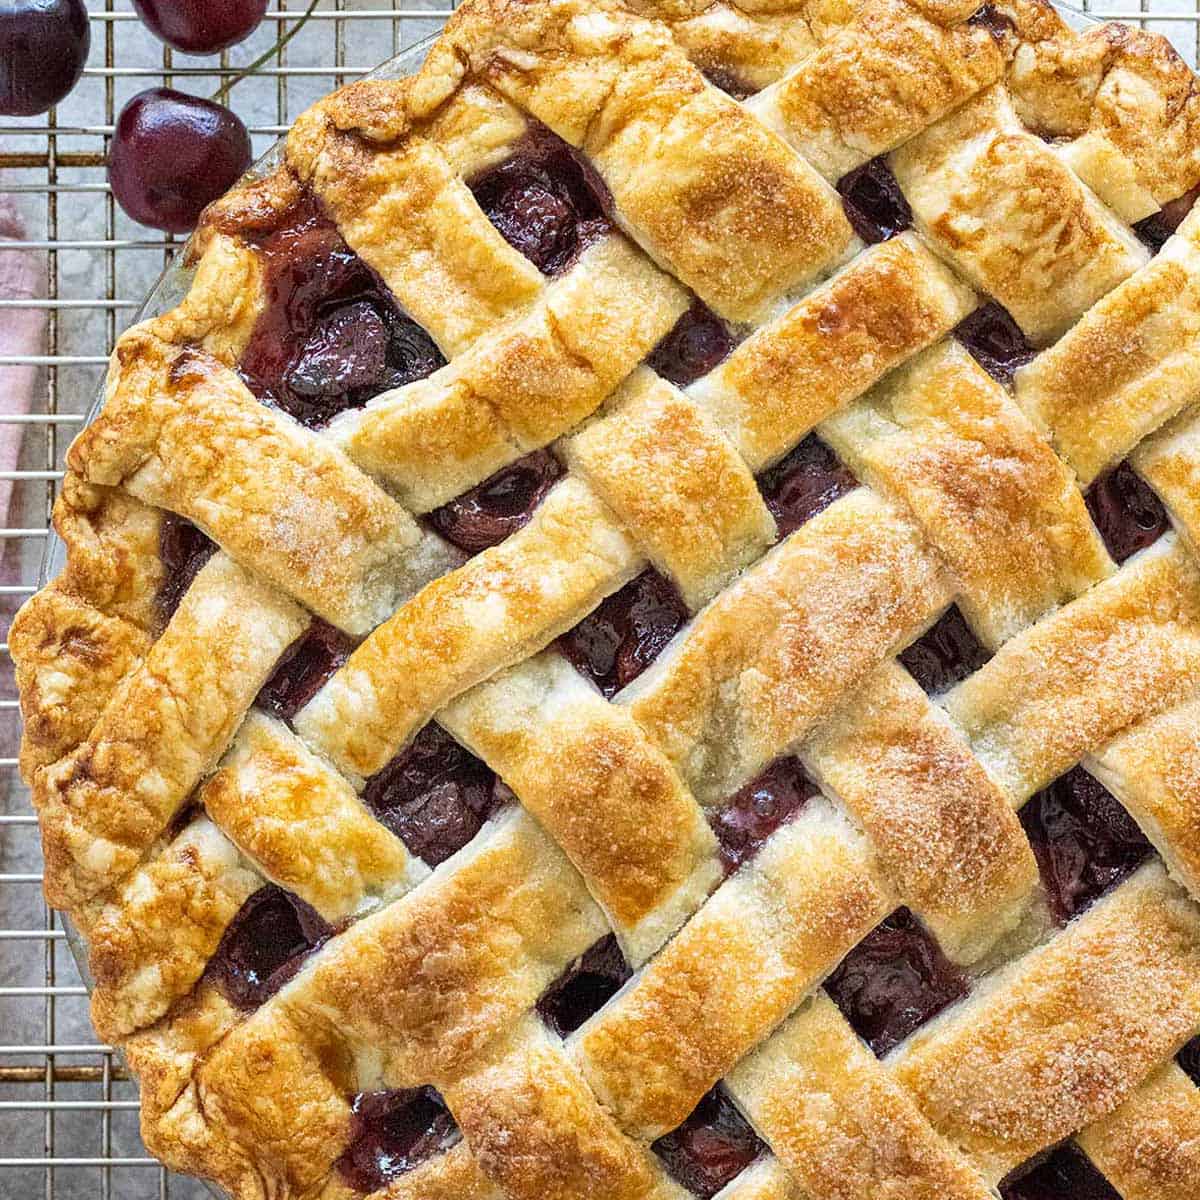
Step 8: Weave the Lattice
Creating a weave pattern on the top of the pie makes for a stunning presentation. Check out my step-by-step tutorial for how to lattice pie crust. I use 1-inch strips, but you can make them thinner for more intricate patterns. Chill the strips to make it easier to weave and hold their shape.
Tips for Perfect Execution: The extra open spaces are pretty and create a vent to release steam. The openings help concentrate the flavor and thicken the filling. If you like a less thick filling consistency, use a traditional double-crust pie like my apple pie. Just poke a hole in the center to reduce the moisture that evaporates.

Step 9: Preheat the Oven and Add Egg Wash
Position the oven rack in the center and preheat the oven to 400°F (204°C). Line a half-sheet pan with aluminum foil to catch any drips.
While the oven heats up, apply the egg wash. This creates a crust that is golden brown on the surface. The yolk bumps up the yellow sheen. Due to the Maillard browning reaction, the milk solids darken and develop more intense and delicious baked notes.

Step 10: Bake the Pie
I use two temperatures for baking the pie and adding color to the crust. First, I kickstart the steam release and cook the dough at 400°F (204°C) for 30 minutes. After this time, the surface should start to turn golden. Second, reduce to 350ºF (177ºC). After about 40 to 50 minutes, the fruit juices should bubble consistently for at least 5 minutes.
Ingredient Chemistry: The very center of the filling should be around 203ºF (95ºC). At this temperature, the cornstarch gelatinizes. A soft gel with some loose cherry juice ensures sliceable pieces but are not so thick that it’s a solid jam consistency. If the top crust or edges get too dark during baking, loosely tent the pie with foil to shield it from the heat.
Step 11: Cool After Baking
Resist the temptation to cut open the hot pie. The juices will run out, making a soggy bottom crust. Cool completely before slicing at room temperature for about 4 hours, which makes a considerable texture difference. The butter firms up, making it easier to slice.
The filling also cools and allows the starches in the cornstarch to create a more rigid gel-like matrix. The consistency should be soft, like pudding, but not soupy. Cool it overnight on a wire rack to serve the next day. It’s hard waiting, I know! Serve a slice with vanilla ice cream.


Frequently Asked Questions
Yes! However, they should not be completely defrosted. Just thaw until soft enough to cut in half. You don’t wait to drain off the juice and lose the great flavor in the pie. Any extra liquid will thicken up when mixed with the cornstarch and baked. The pie may need some additional time to bubble and heat up.
You can use the pre-cooked canned filling for the pie since it is already sweetened, often with high fructose corn syrup and thickened with starch. It’s redder due to the addition of red 40 food dye. I recommend stirring in ½ teaspoons of almond extract to enhance the cherry flavor. Add about 2 42-ounce cans for about 5 cups of filling. Less is needed since it’s already cooked down and concentrated.
Cornstarch is a potent thickening agent that creates a translucent and glossy appearance. Tapioca starch/flour is the best swap, as it’s 1:1 and has a similar sheen. Arrowroot powder requires 1 ½ times the amount of cornstarch. You can use flour. However, it needs double the amount, and the filling will be more opaque.
One of the leading flavor compounds that create the flavor profile of cherries is benzaldehyde. It also has characteristics in the taste profile of almonds, which is why the fruit and the nut have similar nuances. Adding concentrated almond extract to the cherry filling enhances the natural taste, resulting in a more intense cherry note. A little goes a long way!
Serve This With


If you tried this Cherry Pie Recipe, please leave a 🌟 star rating and let me know how it went in the 📝 comments below!
Cherry Pie

Ingredients
Pie Crust
- 3 cups all-purpose flour, plus more for dusting
- ½ teaspoon kosher salt
- 1 ¾ cups unsalted butter, cut into ½" cubes, chilled
- ¾ cup ice-cold water, chilled
Cherry Filling
- 2 pounds unpitted cherries, (5 ½ cups pitted)
- ⅔ cup granulated sugar
- 5 tablespoons cornstarch
- 1 teaspoon lemon zest
- ¼ teaspoon ground cinnamon
- ⅛ teaspoon kosher salt
- 1 ½ tablespoons lemon juice
- ½ teaspoon pure vanilla extract
- ½ teaspoon almond extract
- 1 tablespoon unsalted butter, cut into ⅛" cubes
Topping
- 2 teaspoons granulated sugar, or coarse sugar
- 1 large egg, beaten for egg wash
- 1 tablespoon whole milk, or cream
Instructions
- Prepare the Ingredients – Add ice cubes and water to a measuring cup. Cut the butter into 1/2" cubes. Place both items in the refrigerator until ready to use.
- Break Down the Butter – In a stand mixer bowl, add the flour and salt. Combine using the paddle attachment on the lowest speed (Stir) for about 10 seconds. Add the chilled cubed butter to the bowl. On the lowest speed, turn the mixer on and off quickly for a few seconds to coat the butter with the flour and prevent the flour from spilling.Mix at low speed until the flour and butter resemble wet sand with coarse crumbles and pea-sized pieces remaining, about 60 to 75 seconds. Use your fingers to break up any large pieces. Do not over-mix. The dough should not bind together before adding the water.
- Hydrate the Dough – Gradually add 1 tablespoon of ice-cold water to the bowl. After each addition, turn the mixer on for 1 to 2 seconds. Add enough water until the dough looks lumpy and hydrated but not wet or sticky. It should just begin to clump together with small crumbles on the bottom of the bowl.Not all the water may be needed, about 8 to 10 tablespoons is typical. When the dough is pinched, it should compress and hold, not be dry or crumbly. Do not over-mix. The dough will be pressed together before resting.
- Rest the Dough – Separate the dough into two even-sized portions, about 1 pound (454 grams) each. Press them into a 1" thick round disc and cover them separately in plastic wrap. Then, place both in a resealable plastic bag. Store in the refrigerator to rest for at least 4 hours, overnight, or up to 2 days.
- Roll the Dough – Remove both doughs from the refrigerator and allow them to sit at room temperature for 5 to 10 minutes or until pliable. Dust the counter and dough with flour. Rotate and dust with flour underneath and on top to prevent sticking.For the bottom crust, roll one of the wrapped doughs into a 12 to 13-inch circle, about 1/4" thick. Place it into a 9-inch pie dish and gently press against the sides and bottom. With a paring knife, trim the excess leaving a 1/2" overhang to fold over later. Place the prepared pie dish in the refrigerator to keep it cold.For the top lattice crust, roll the remaining wrapped dough into a 13 by 10-inch rectangle. Cut the dough into ten strips about 13" long and 1" wide. Transfer to a sheet pan and refrigerate to make it easier to weave.
- Cherry Filling – Remove the cherry pits, then halve 2 ½ cups of the pitted cherries and keep the remaining whole. In a medium bowl, whisk together the granulated sugar, cornstarch, lemon zest, cinnamon, and salt. Add the cherries, lemon juice, vanilla, and almond extract, and stir until evenly coated.
- Add the Filling – Take the bottom crust and lattice pieces out of the refrigerator. Place the cherry filling in the pie dish and spread evenly to fill any gaps. Dot the cherries with the cubed butter to prevent sticking to the crust.
- Weave the Lattice – Lay five parallel strips evenly over the filling, then weave the remaining pieces. Trim a 1/2" overhang on the edges to press with the bottom crust. Fold the excess dough over the edge and crimp by pinching the dough using the pointer and thumb fingers.
- Preheat the Oven – Place the oven rack in the center position. Preheat to 400°F (204°C). Line a half-sheet pan with aluminum foil. While the oven is heating, in a small bowl, whisk the egg and milk. Brush the egg wash on the top and edges of the crust. Sprinkle the surface with granulated sugar.
- Bake the Pie – Place the pie dish on the foil-lined baking sheet and bake until the crust begins to turn golden brown, about 30 minutes. Without removing the pie from the oven, reduce the temperature to 350ºF (177ºC). Bake until the top and sides of the crust are deep golden brown, and the cherries are bubbling, about 40 to 50 minutes.The filling center should be about 203ºF (95ºC) to ensure proper thickening of the cornstarch. If the edges or top get too dark, loosely tent the surface with foil. This may be needed after 25 to 35 minutes.
- Cool After Baking – Let the pie sit on the baking sheet for 5 minutes. Then, cool on a wire rack for at least 4 hours before serving to set the filling. If desired, serve with whipped cream or vanilla ice cream.
Recipe Video

Notes
- For a Double Crust: Roll out the top crust into a ¼-inch thick circle, about 12 inches in diameter. Lay the flat top crust over the cherry filling topped with the butter pieces. Trim the excess to about ¾-inch hanging over the pie plate. Press the dough against the fruit, fold the excess underneath the bottom crust edges, and crimp. Cut a hole in the top for venting using a small round cookie cutter, about 1 inch in size.
- No Stand Mixer: Use a dough/pastry blender or your fingers to break the butter into the dough.
- For a Sweeter Filling: Increase the granulated sugar to ¾ cup and lemon juice to 2 tablespoons to balance the flavor.
- Storing: The fully baked pie can be covered and left at room temperature for one day before eating or refrigerated. Wrap and store leftovers in the refrigerator for up to 5 days.
- To Reheat: Place the pie dish on a parchment-lined sheet pan and loosely cover it with foil. Bake at 225ºF (107ºC) until warmed through, about 20 to 25 minutes, depending on if it’s been at room temperature or cold from the refrigerator. Individual slices can be reheated on a foil-lined baking sheet until warmed through.
Nutrition Facts
Percent Daily Values are based on a 2000-calorie diet. All nutritional information is based on estimated third-party calculations. Each recipe and nutritional value will vary depending on the brands you use, measuring methods, and portion sizes per household.
Recipe Resources


Sheila Flores says
Hello Jessica,
Your cherry pie looks delicious. Do you think it would work as a galette?