This no churn raspberry ice cream is my ultimate go-to dessert, especially during hot summer days. No fancy equipment is needed! If you’re a fan of fresh fruit and ice cream, then you have to give this recipe a try.

Jessica’s Recipe Science
- Whipping the heavy cream to stiff peaks traps air in the mixture, creating a lighter texture that mimics traditional churned ice cream.
- Sweetened condensed milk adds sugar and milk solids that lower the freezing point, for a creamy and easy-to-scoop texture.
- Folding in the raspberry sauce at the end creates vibrant fruit swirls while preserving the whipped cream’s airy structure.
Featured Comment 14
“I made this yesterday. It was the first time I attempted homemade ice cream, so I was apprehensive. But it did not disappoint!! The instructions are clear and easy to follow. My ice cream came out so amazingly smooth and creamy.”—Fatima
Why It Works
Just because you don’t own an ice cream maker doesn’t mean you can’t make your own frozen sweet treat! I’ll show you how to make no-churn raspberry ice cream using simple tools and equipment you already have in your kitchen. To make the base, you only need sweetened condensed milk and heavy whipping cream.
For a delicious homemade raspberry ice cream, make a fresh berry sauce. It’s simple to prepare. Just simmer and strain. It only takes 10 minutes! Swirl the sweet and tangy sauce into the creamy vanilla ice cream base for stunning scoops. Everyone will be impressed and won’t believe it’s made from scratch!
Jump To a Section
Ingredients You’ll Need

- Raspberries: Use fresh raspberries, or frozen when they are not in season. You’ll need 12 ounces.
- Lemon: Zest and juice enhance the berries’ flavor.
- Sugar: Granulated sugar balances the fruit’s tart flavor. Other types of sweeteners can be used, like honey, agave, maple syrup, or brown sugar.
- Thickener: A cornstarch slurry is added to slightly thicken the sauce and prevent it from tasting too icy when frozen, as it binds the juices.
- Heavy Whipping Cream: Contains 36% milk fat. It adds a rich texture and holds the air when whipped.
- Sweetened Condensed Milk: The milk has 60% of its moisture removed, increasing the milk solids for a thicker consistency. The sugar has already been added, about 1 cup of granulated sugar.
- Vanilla: Use two teaspoons of vanilla bean paste for flecks of seeds for a gourmet appearance. Vanilla extract or a whole bean that has been scraped can be used.
See the recipe card below for all ingredients and measurements (US and metric).
Ingredient Substitutions
Now that you know how to make no-churn vanilla ice cream, it’s easy to customize the raspberry flavor! Try these yummy ideas:
- Chocolate: Add chocolate syrup or chocolate chips to the ice cream for a cocoa flavor.
- Cookies: Crush up your favorite cookies, like vanilla wafers, shortbread, Oreos, or chocolate chip cookies, and top or mix them in. Graham crackers, waffle cones, or sugar cookie cones work well, too.
- Jam or Jelly: For a shortcut, add raspberry jam or jelly to make the swirls. Other flavors like strawberry, boysenberry, blackberry, or blueberry are also delicious!
- Caramel: Drizzle caramel sauce between the layers for a sweet-and-salty flavor.
How to Make Raspberry Ice Cream
Step 1: Cook the Raspberries
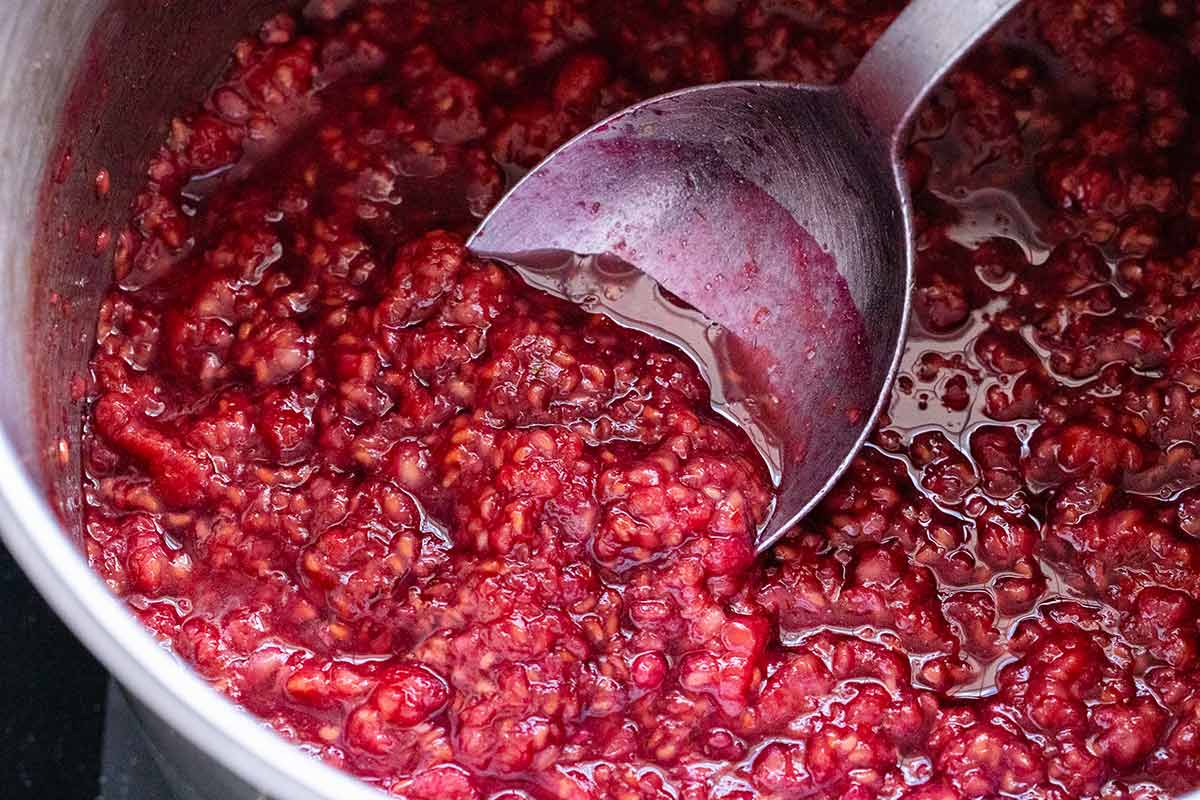
To make a fresh raspberry sauce for the ice cream, you only need a handful of ingredients. Cook the raspberries over medium-high heat with sugar, lemon zest, and lemon juice. The berries will break down and release their juices. The process takes about 5 minutes.
Step 2: Thicken the Sauce
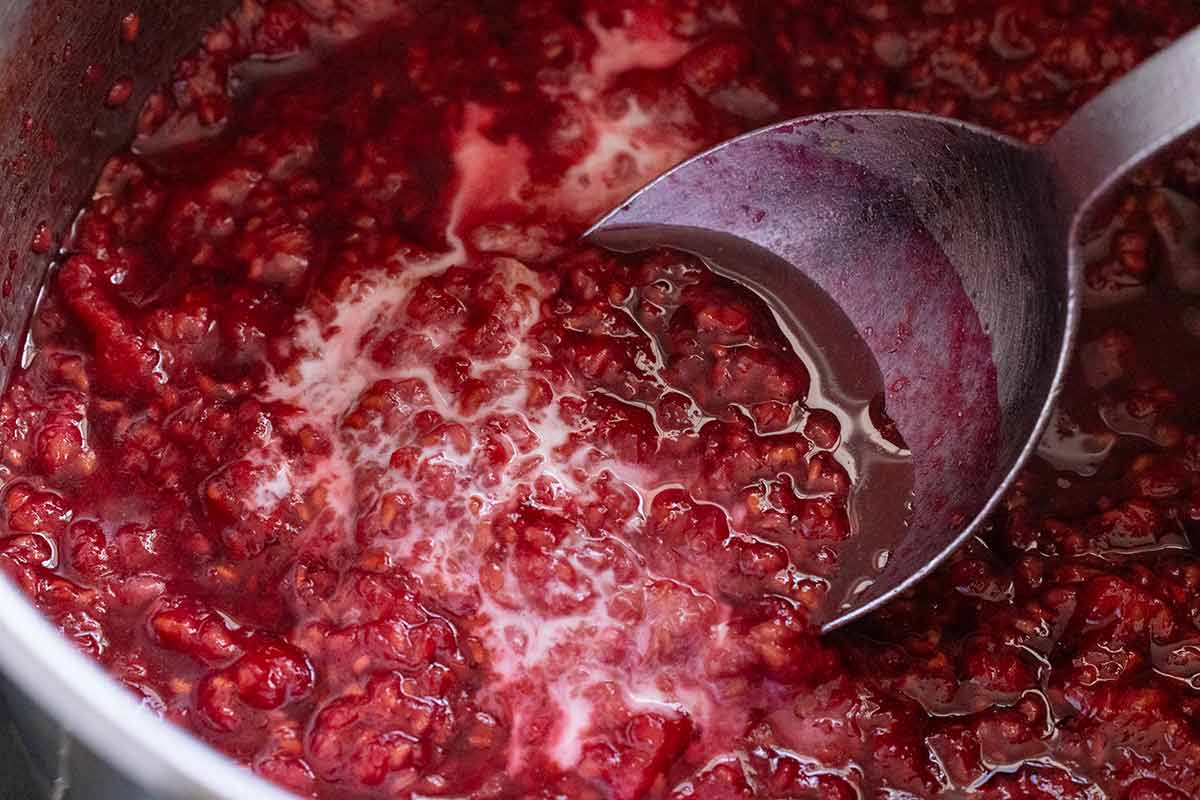
Add a small amount of cornstarch slurry to thicken the sauce. It will take about 1 minute to thicken over medium heat.
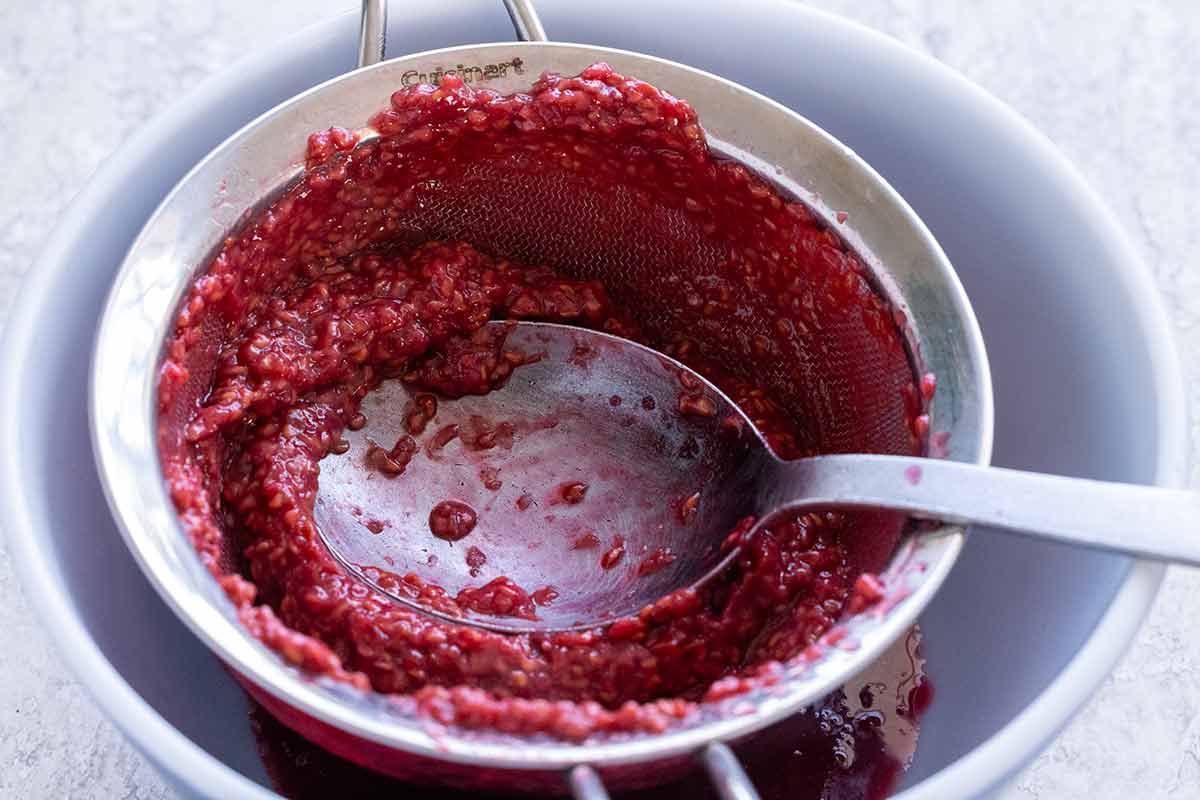
Step 3: Strain the Sauce
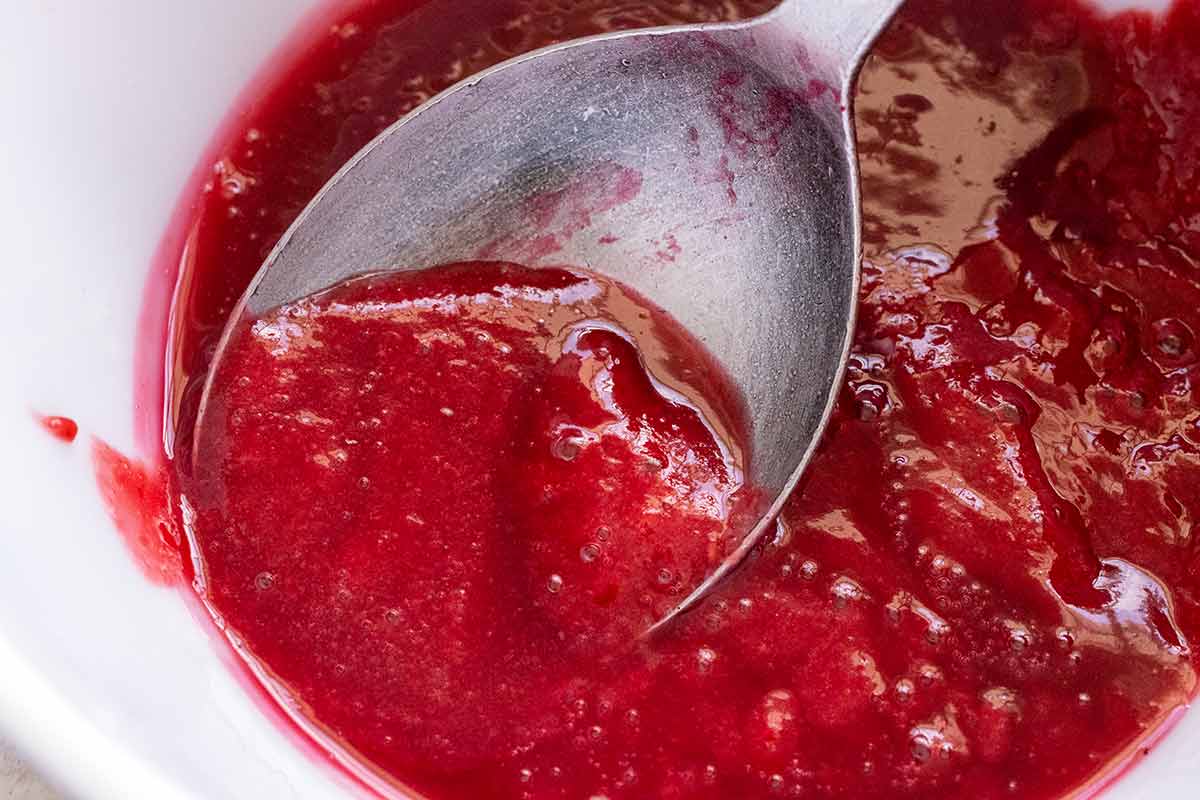
Strain the raspberry sauce through a fine-mesh sieve to separate the seeds. You should have a very smooth and lightly thickened sauce.
Step 4: Cool the Raspberry Sauce
Chill the raspberry sauce before adding it to the ice cream so it doesn’t deflate the whipped cream. This should yield about ¾ cups of raspberry sauce.
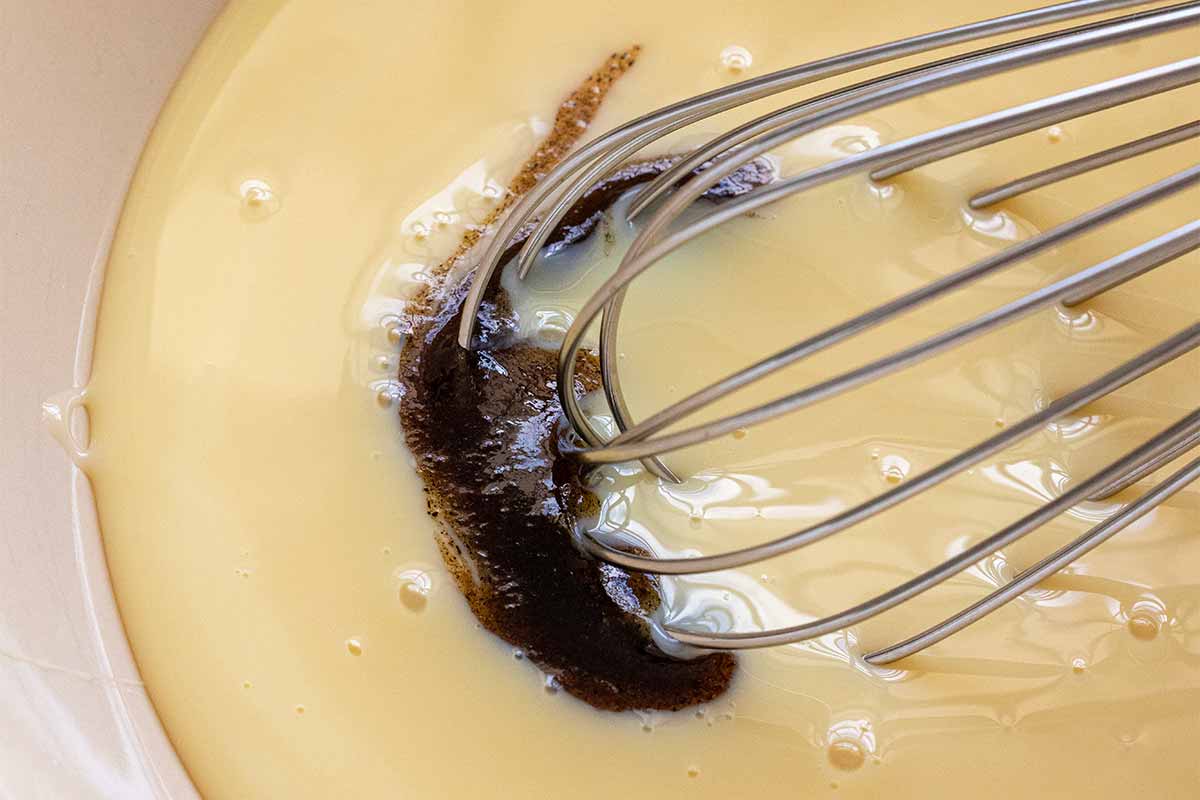
Step 5: Flavor the Condensed Milk
Whisk together the sweetened condensed milk with vanilla bean extract. I love how you can see the tiny seeds from the pod, like French vanilla ice cream! Vanilla extract will add a strong, baked, sweet taste if you don’t have a paste. Another good flavor extract to use is almond.
Step 6: Whip the Cream
To mimic the overrun created in commercially made ice cream, make some homemade whipped cream. The simplest way is to use a hand whisk in a large chilled metal bowl. The process takes only about 4 minutes to produce stiff peaks. The whipped cream should be smooth; don’t overwhip, or it will develop an undesirable curdled consistency.
Quick Substitution: Use a stand mixer, blender, immersion blender, or food processor for quicker methods that take about half the time.
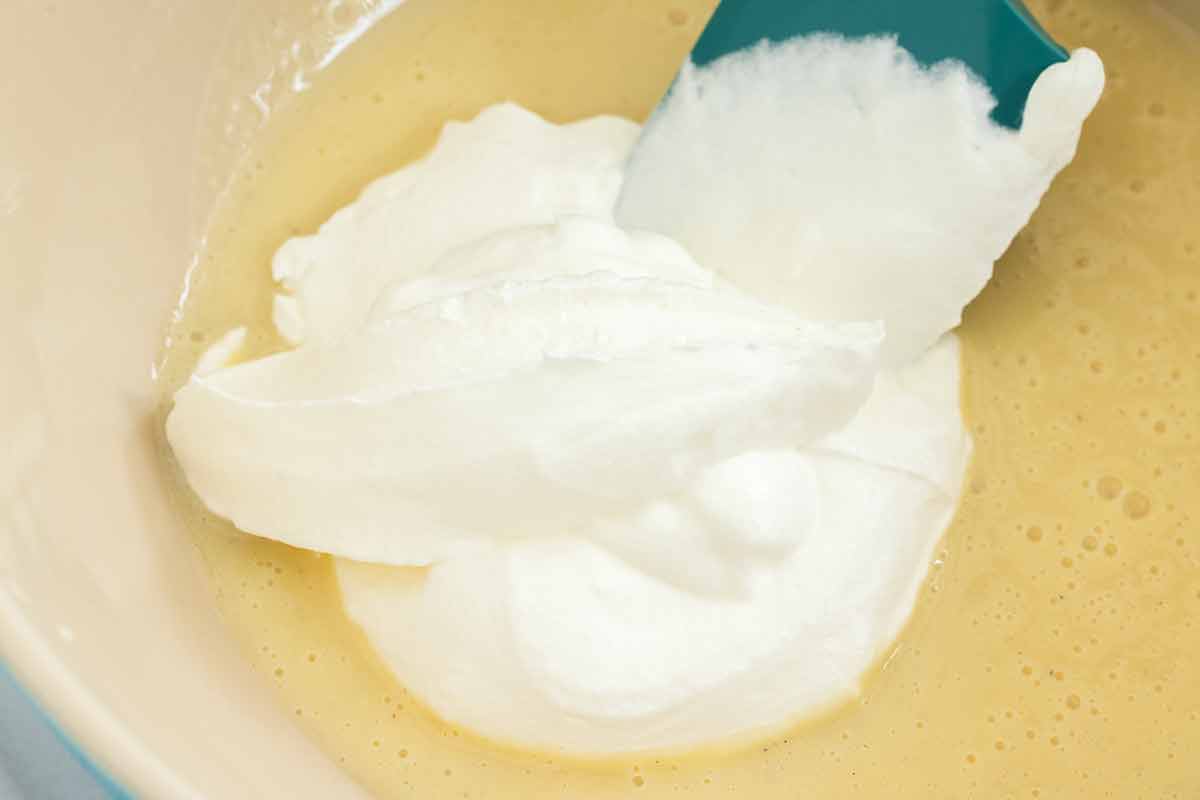
Step 7: Make the Ice Cream Base
To retain as many air pockets as possible in the whipped cream, gently incorporate the sweetened condensed milk. Fold in ⅓ of the whipped cream, making it much easier to distribute the flavor. It’s okay if there are still a few clumps. Now add the remaining cream, folding until a creamy texture and fluffy consistency is reached. It’s time to layer and swirl!
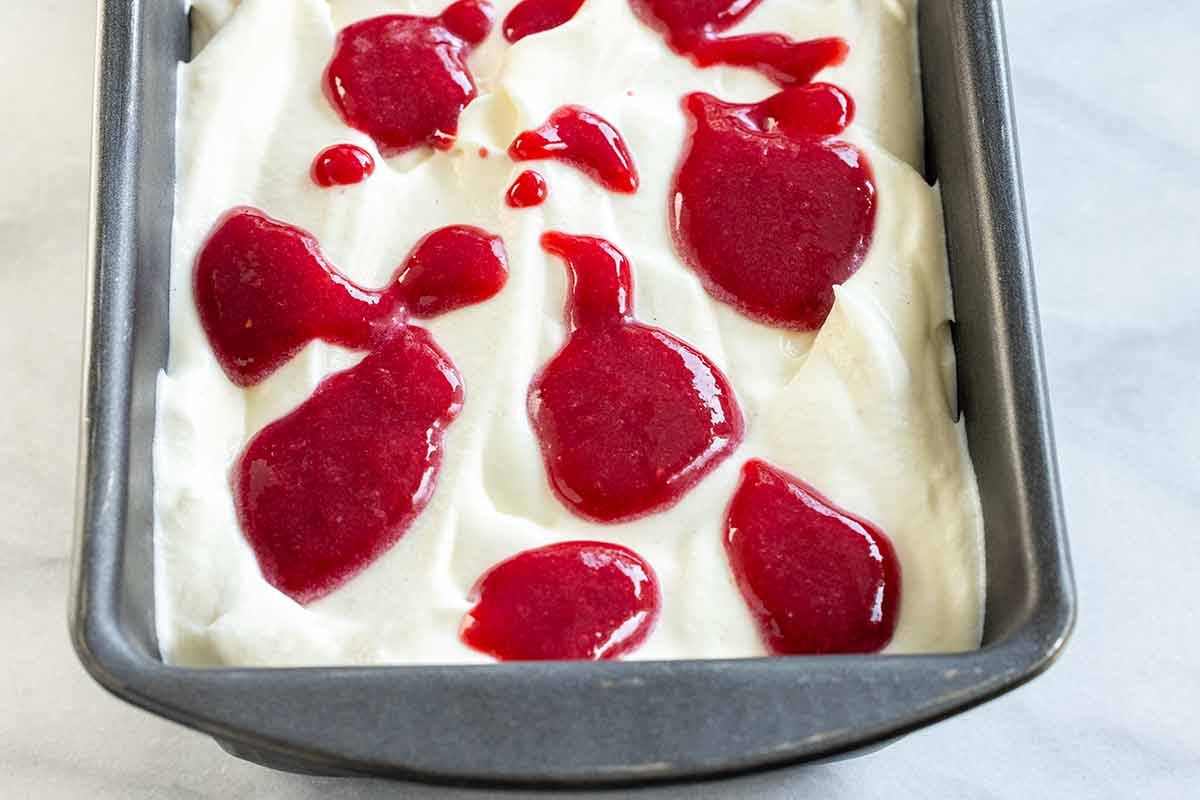
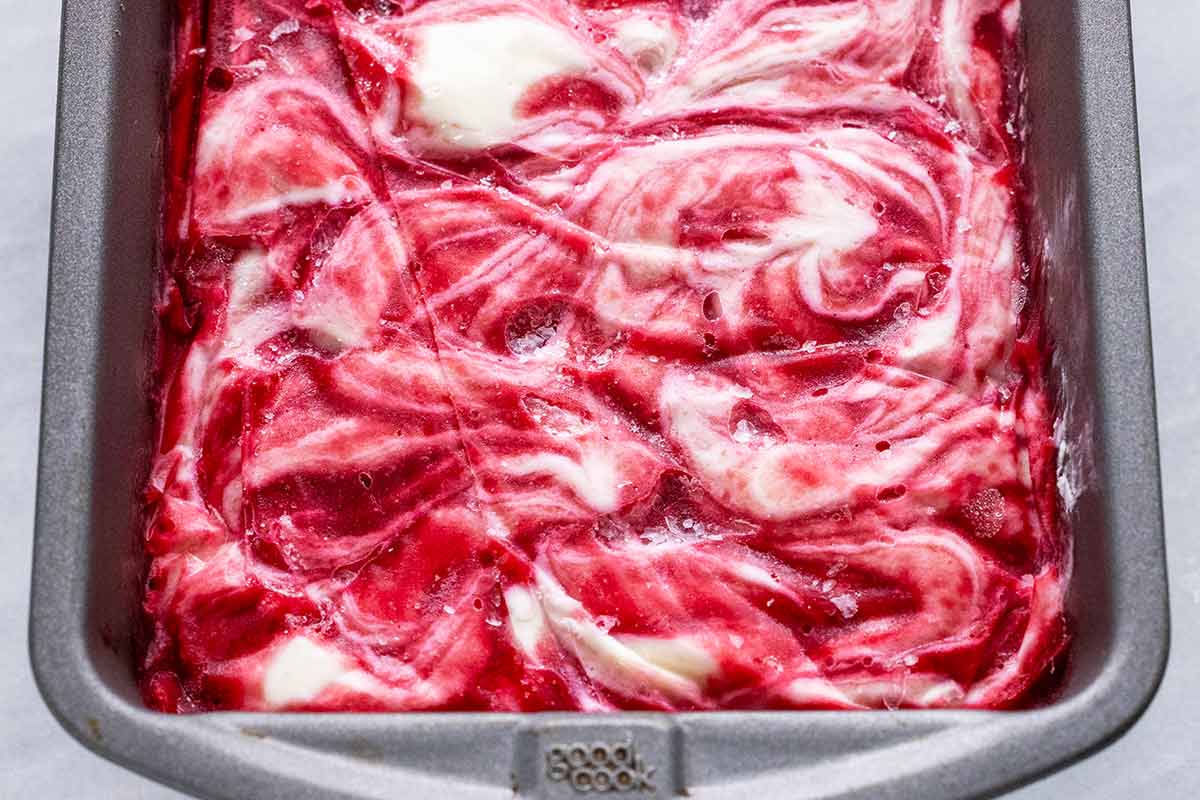
Use a container that holds about 1 quart of ice cream, or 2 pints for a smaller size. I use a 9-by-5-inch metal loaf pan. To create raspberry swirls throughout the vanilla ice cream base, add it in layers. Add half of the ice cream base, then add about one tablespoon of the raspberry sauce in different areas on top.
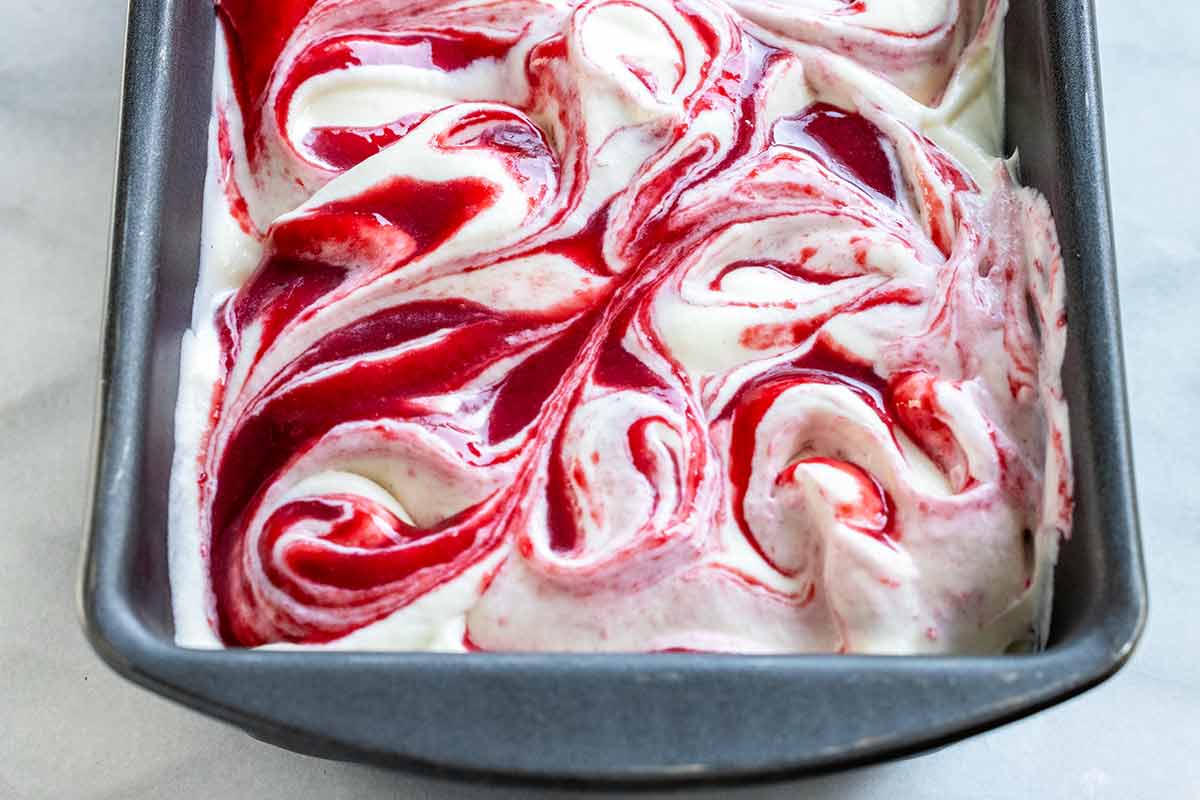
Tips for Perfect Execution: Using a knife, swirl the sauce around the ice cream surface. Add the remaining ice cream and sauce, repeating the spoon-and-swirl process. It’s best to get as much sauce swirled into the base as possible. The juices in the berries create a slightly icy texture on top.
Step 8: Freeze the Ice Cream
To reduce ice crystal formation on the top of the raspberry ice cream, cover it. I use a layer of plastic wrap to press against the surface, then a sheet of parchment paper, and finally foil for a tight seal. Freeze for at least 6 hours before serving.
You may see tiny crystals on the raspberry swirl because the sauce contains moisture, but they shouldn’t affect the texture much. The texture reminds me of Breyer’s all-natural ice cream because it doesn’t have the emulsifiers and stabilizers to make it overly pliable when scooped.
Pro Tip: It’s best to take it out of the freezer and let the ice cream sit for a few minutes at room temperature before scooping (the hardest part is waiting!)—the ice cream will keep for 2 weeks or up to 1 month.
Serving Suggestions

Serve this super smooth raspberry swirl ice cream in a crunchy waffle cone, or try these tasty pairings.
- Make ice cream sandwiches with chocolate chip vanilla shortbread cookies or Ted Lasso biscuits on the side.
- Add a scoop on top of a fudgy brownie.
- It’s perfect for summer, served with warm peach cobbler or grilled peaches.
- Raspberry ice cream pairs well a la mode with a slice of blueberry pie or cherry pie.
Frequently Asked Questions
Make a raspberry flavor if you don’t want to swirl the sauce and ice cream together. Whisk the raspberry sauce into the sweetened condensed milk mixture, then combine with the whipped cream until smooth and creamy.
Yes! You will need ¾ cups of sauce to make the ice cream. You can add up to 1 cup for a stronger berry taste. If needed, slightly warm the sauce to make it pourable but not hot. Strain any seeds before adding.
The raspberry juice contains water, so it will naturally be harder than the ice cream base. Honey or corn syrup can be used to make the sauce instead of granulated sugar. These ingredients help prevent the recrystallization of sugars, so it will be slightly softer and less hard when frozen.
Ice cream machines make a sweet liquid base using whole milk, cream, sugar, egg yolks, and thickening agents like carrageenan, guar gum, or cornstarch. Churning solidifies the custard base when exposed to a continuous cold environment. Air is incorporated, called overrun. For no-churn ice cream, sweetened condensed milk is the thick and sweet base. Whipping cream adds air to lighten the texture. When combined, they create a creamy and smooth dessert with a taste and scoopability similar to traditional ice cream.
More Dessert Recipes


If you tried this Raspberry Ice Cream, please leave a 🌟 star rating and let me know how it went in the 📝 comments below!
No-Churn Raspberry Swirl Ice Cream

Ingredients
Raspberry Sauce
- 12 ounces raspberries
- 3 tablespoons granulated sugar
- 1 teaspoon lemon zest
- 1 tablespoon lemon juice
- 1 teaspoon cornstarch
- 1 teaspoon water
Vanilla Ice Cream
- 14 ounces sweetened condensed milk
- 2 teaspoons vanilla bean paste, or extract
- 2 cups heavy whipping cream
Instructions
- Cook the Raspberries – In a medium saucepan, combine raspberries, sugar, lemon zest, and lemon juice. Stir and cook over medium-high heat until the raspberries break down, about 5 minutes.
- Thicken the Sauce – Combine cornstarch and water in a small bowl. Add to the raspberry mixture. Stir and cook over medium heat until the sauce has thickened slightly, about 1 minute.
- Strain – Pour the sauce through a fine mesh strainer into another bowl. Use the back of a spoon to push and separate the sauce from the seeds. Scrape the bottom of the strainer to collect more sauce. It will yield about ¾ cups.
- Let it Cool – Transfer the raspberry sauce to the refrigerator to cool completely. Meanwhile, make the ice cream base.
- Flavor the Condensed Milk – In a large bowl, whisk together the sweetened condensed milk with the vanilla and set aside.
- Whip the Cream – In a stand mixer fitted with the whisk attachment, add the heavy cream. Whisk on medium-high (setting 8) until a fluffy and smooth consistency is reached and stiff peaks form, about 1 ½ to 2 minutes. It should hold its shape when lifted from the bowl. Do not over-whip!Alternatively, hand whisk by adding the heavy cream to a chilled large metal bowl. Slightly tilt the bowl and vigorously whisk until stiff peaks form, about 3 ½ to 4 minutes.
- Make the Ice Cream Base – Gently fold in ⅓ of the whipped cream into the sweetened condensed milk mixture. Add the remaining whipped cream and gently fold in until the mixture is smooth with just a few small lumps left. Do not deflate the mixture by over-mixing!Transfer half of the ice cream base to a 9 by 5-inch loaf pan or container large enough to hold a 1-quart mixture. Dot half of the raspberry sauce onto the ice cream, and use a knife to create swirls. Add the remaining base on the top, dot with the rest of the sauce, and create swirls again.
- Freeze the Ice Cream – Place a piece of plastic wrap directly on top of the ice cream. Cover with a piece of parchment paper that fits just the surface. Cover the pan tightly with foil or a lid. Freeze until hardened, about 6 hours. Allow to sit at room temperature for a few minutes to soften before scooping.
Recipe Video

Notes
- Recipe Yield: About 5 cups
- Serving Size: About ½ cup
- Storing: Freeze for 2 to 4 weeks.
- Using Frozen Raspberries: Add to the saucepan frozen and cook according to recipe instructions.
- Using Jam or Jelly: Warm in the microwave until it’s easy to stir and pour. Strain if there are seeds. Add to the ice cream base when cool.
Nutrition Facts
Percent Daily Values are based on a 2000-calorie diet. All nutritional information is based on estimated third-party calculations. Each recipe and nutritional value will vary depending on the brands you use, measuring methods, and portion sizes per household.


Judy says
I cannot wait to try this recipe Jessica. I know it will be fabulous. Look at those wonderful photos you took.
Jessica Gavin says
Aww, thanks Judy! It was a fun photoshoot!
Fatima says
I made this yesterday. It was the first time I attempted home made ice cream, so I was apprehensive. But it did not disappoint!! The instructions are clear and easy to follow. My ice cream came out so amazingly smooth and creamy. The zesty raspberry swirl helps cut through the sweetness. Will definitely be making again.
Anuki Dissanayake says
Jessica is obsessed with cooking.
Jessica Gavin says
Agreed, haha!
Laura says
Just found this recipe. Sounds kinda of scary for a novice, but I’d like to give it a shot. You said to “Gently fold in about ⅓ of the whipped cream into the sweetened condensed milk. Transfer the rest of the whipped cream into the bowl…” and it confuses me. Am I folding a portion of the cream into the condensed milk to just get it started and then putting the rest in? And, what does it mean to let the lumps “let”? One last question – does the plastic wrap need to fit just the surface like the parchment? Like I said – I’m a novice 🙂
Jessica Gavin says
Hi Laura- Great questions! You first fold together the sweet and condensed milk with 1/3 of the whipped cream so that it’s easier to mix together with the rest of the cream and you don’t loose too much air. Once you mix the condensed milk and whipped cream, then you can add the rest of the whipped cream to the same bowl, and gently fold the rest together. I updated “let” to “left”, great catch! The first layer of plastic wrap can just be the surface, then add the parchment paper, then tightly wrap the entire pan with more plastic wrap to prevent as much ice crystal formation as possible when it’s freezing. Please let me know if you have any more questions, I’m here to help! So proud of you for trying something new 🙂
Laura says
Thank you Jessica. I’m excited to see how it goes.
Anna says
It didn’t work out for me 🙁 The whipping cream was runny even after I beat it on high for 3 min., and the condensed milk was showing up in streaks when I poured it into my bowl, which means it didn’t mix well. 🙁
Jessica Gavin says
Hi Anna- Oh no! Definitely getting the heavy whipping cream to “stiff peaks” is key for the ice cream. Let’s see what we do to troubleshoot 🙂 I have a couple of questions; 1) Did you use heavy whipping cream and was it chilled? The amount of fat and temperature can affect the ability to whip the cream. 2) What kind of mixer did you use? Stand, immersion, or by hand? The 3 minute timing is a guideline for a stand mixer, but it may take more time depending on your method. Use your best instinct to gauge when the whipped cream is ready. If all else fails I’ve always been able to whip cream by hand with a large bowl and whisk, it takes a little more time but works! 3) Did you whisk together the sweetened condensed milk with the vanilla until combine before you added the whipped cream? This will definitely help with the streak.I would also add the whipped cream to the condensed milk in phases, instead of the other way around for easier mixing.
Here is my step by step guide for how to make no-churn ice cream:
https://www.jessicagavin.com/how-to-make-no-churn-ice-cream/
Let me know if any of the steps are confusing and I can help clarify, I want to help find a solution for you! 🙂
Anna Pelonis-Mills says
Hi! I actually did follow the recipe exactly as the recipe mentioned, but when my sister in law read the recipe, she told me that I should’ve beat the whipping cream for at least 10 minutes and not 3 as the recipe stated. The flavor was definitely there, however, and we used it to make our children milkshakes! 🙂
Jessica Gavin says
I’m so happy you found a solution with the help of your sister Anna 🙂 Milkshakes sound amazing too!
linda68 says
I will definitely try this.We love Ice cream even in the Winter.
Jessica Gavin says
I am with you on that Linda! no time is a bad time for ice cream, i think I just like the more fall inspired flavors like pumpkin and eggnog during the winter 🙂