
Get ready to spin into the holiday spirit with these festive Christmas pinwheel cookies! These pinwheel cookies are perfect for holiday parties, cookie exchanges, or simply enjoying with a warm cup of cocoa by the fire.
Here are more tasty treats that readers love: monster cookies, cheesecake brownies, and lemon bars.

Jessica’s Recipe Science
- Rolling and layering different colored doughs together creates the pinwheel effect, as the doughs hold their distinct shapes and colors during baking due to their fat and sugar content.
- Chilling the dough before slicing helps the cookies maintain their shape while baking by solidifying the fats, preventing the dough from spreading too much.
- The sugar in the dough caramelizes slightly during baking, enhancing the flavor and creating a crisp, yet tender texture in the finished cookies.
Featured Comment 4
“Brought these to a Christmas family gathering. There were many desserts, pastries and cookies available but everyone wanted to try these first. They were a hit!”—John R.
Why It Works
I love baking cookies during the holidays! Ever since I mastered the dough for no-spread sugar cookies, I’ve been on a roll experimenting with pinwheel cookies. They’re easy to make and customize without requiring intense skills in the art of icing.
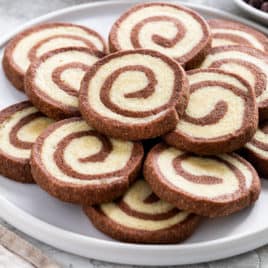
All three colored layers on these pinwheel Christmas cookies come from one base. The vanilla dough gets its red and green tint from concentrated gel food coloring. And you don’t love a touch of festive sprinkles? If you make one cookie to share this year, I promise these will be a hit!
Jump To a Section
Ingredients You’ll Need

- Butter: It’s important to use softened butter so the cookie dough is pliable enough to mix and incorporate air. It should be just below room temperature, about 64 to 67ºF (17 to 19ºC).
- Sugar: I use two types of sugar. Granulated sugar adds a clean sweetness and crispness to the cookie. Powdered sugar has a small amount of cornstarch, which prevents the dough from spreading. You want to retain the round shape and sloped sides.
- Eggs: Using two egg yolks will create a shortbread-like texture. They add richness, help bind the dough, and create a shorter crumb.
- Flavoring: Vanilla extract and salt help enhance the cookies’ baked notes without being overpowering.
- Color: I highly recommend using gel food coloring. The pigment is concentrated and adds a vibrant hue. I use the ones sold in small bottles, making them easy to work with. They also have small jars that you scoop out the color. I use the Wilton brand for the red food coloring and green food coloring.
- Sprinkles: Fun and festive sprinkles coat the outside of the cookie. I used red, green, and white nonpareils. Other cookie decorations like jimmies, coarse sanding sugar, or sparkling sugar can be used.
See the recipe card below for all ingredients and measurements (US and metric).
Ingredient Substitutions
Now that you know how to make Christmas pinwheel cookies, they are easy to customize! Try some of these fun ideas:
- Spices: Flavor the dough with cinnamon, cloves, ginger, or nutmeg. I like to use my homemade pumpkin pie spice.
- Flavoring: Instead of just vanilla extract, try mint, peppermint, anise, or almond extract. Add a citrus flavor with orange or lemon zest.
- Color: Instead of three colors, you can divide the dough in half and choose two colors.
- Nuts: Add chopped nuts like almonds, peanuts, or pecans on the outside.
- Sprinkles: Instead of round nonpareils, try coarse sanding sugar or sparkling sugar with red or green colors. Add festive jimmies or a mix of different types of sprinkles.
How to Make Christmas Pinwheel Cookies

Step 1: Cream the Butter and Sugar
A stand mixer fitted with the paddle attachment makes the process efficient. A hand mixer can also be used, but it may take longer. Creaming the butter and sugars together adds air to the dough. Scrape down the sides of the bowl as needed.
No additional leavening agents, like baking powder or baking soda, are added because we don’t want the cookies to puff up or spread. Instead, creaming lightens the dough so the cookies hold their shape but aren’t dense or hard.

Step 2: Add the Eggs
Add only egg yolks to the butter and sugar. This provides richness, and when the yolks cook, they have a shortbread consistency. Mix in the vanilla extract at this time. It’s the primary flavoring agent in the recipe; it adds a pleasant, delicate taste.

Step 3: Add the Flour
It’s essential to add the flour to the butter mixture gradually. If you dump it all at one time, it will take longer to mix in and yield a tough cookie texture. The dough will be mixed more when the food coloring is incorporated. It should feel like clumpy clay or Play-Doh.

Step 4: Color the Dough
Divide the dough into three portions, about 9 ounces each. You can use the stand mixer on low speed to mix in the color or knead each portion by hand. Because I use Wilton gel food coloring, I had to play around with how many drops I used.

For a Christmasy red, this took about 11 to 12 drops. For a traditional green, I needed much more, about 35 drops. Too little and it looked like my Grinch cookies. I noticed the color darkened after mixing as it had more time to diffuse.
Pro Tip: Depending on the exact color and brand, you will need more or less food coloring.

Step 5: Roll out the Dough
Once the dough has been colored, it is time to roll them out. The easiest way to do this is on a lightly floured sheet of parchment paper. Use a floured rolling pin to flatten each piece separately into a 12 by 8-inch rectangle; they will be pretty thin. Use your hands or a bench scraper to keep the sides straight.

Step 6: Stack and Roll
Carefully stack the dough on top of each other. I had the green on the bottom, then vanilla, then red. You can layer it however you prefer. Lightly press them together.

From the longest side, carefully roll the layers into a tight log; you want them pressing together. I use the parchment paper to help light and roll. Reshape as needed so the dough becomes 12 inches long and just over 2-inches wide.

Step 7: Roll in Sprinkles
I prefer to roll the log in the sprinkles immediately because the dough is tacky and softer than after chilling. Very lightly brush water on the surface. Pour the sprinkles into a small rimmed baking sheet or plate. Press and roll the dough into the sprinkles so that they stick.

Step 8: Chill the Dough
Since the dough has been at room temperature for a little while, it’s best to chill it before slicing and baking. This lets the butter firm up so the cookies don’t significantly spread in the oven. Wrap the logs tightly in plastic wrap, then refrigerate for 1 hour or freeze for 30 minutes.
Step 9: Preheat the Oven
Set the oven to 325ºF (163ºC) and the oven racks to the upper-middle and lower-middle positions. The moderate temperature will gently bake the cookies with a light coloring. You don’t want them overly browned since they have red and green coloring. Meanwhile, slice the chilled cookies.
Step 10: Slice the Cookies
Now that the cookies are firm enough to cut, slice them into 1/4-inch thick rounds with a sharp knife. They won’t expand much after baking, so place them 1 inch apart on the parchment paper lined sheet pans. I was able to fit 15 cookies on a large half-sheet pan.

Step 11: Bake the Cookies
Bake two trays at a time, one in the upper and one in the lower position. Bake for 7 minutes, then swap the position and rotate. Bake for another 8 to 10 minutes to set the cookies. They should not develop a golden brown hue, or the color will not be as vibrant.

Step 12: Let them Cool
Allow the cookies to sit on the warm baking sheet for 10 minutes. This will gently finish the cooking process, then transfer to a wire rack and cool completely before serving.
Frequently Asked Questions
Use a gluten-free baking flour like Bob’s Red Mill or King Arthur. They may be slightly thicker but should work well with this minimal-spread butter cookie recipe.
Each layer should be slightly more than ⅛ inch thick. There are three layers, so it will get thicker as you stack them. The final dough log will be just over 2-inches wide.
Lightly press the layers together when stacking the different colored dough. They should be rolled tightly enough together so they make contact with no gaps in between.
If you’re not baking the cookies within a day or two, when storing them in the refrigerator, it’s best to wait to add the sprinkles so they don’t bleed from the humidity in the fridge. The cookie dough can be wrapped well and frozen for up to 1 month—Defrost before using.
Store them in an airtight container at room temperature for up to 1 week. They freeze well for up to 2 months because they are a buttery shortbread cookie.
Liquid food coloring is the pigment suspended in water and propylene glycol. You’ll need much more liquid dye to achieve a similar hue, and it won’t be as vibrant. The liquid will also make the dough more wet. You may need to add a little flour if it’s sticky. Gel food coloring is concentrated, meaning you won’t need as much, and the color will be more intense. I also like that it doesn’t leave a dye aftertaste on the cookies.
More Cookie Recipes


If you tried this Christmas Pinwheel Cookies recipe, please leave a 🌟 star rating and let me know how it went in the 📝 comments below!
Christmas Pinwheel Cookies

Ingredients
- 1 cup unsalted butter, softened to 64 to 67ºF (17 to 19ºC)
- ¾ cup granulated sugar
- ½ cup powdered sugar
- ½ teaspoon kosher salt
- 2 large egg yolks
- 2 teaspoons vanilla extract
- 2 ¼ cups all-purpose flour
- red gel food coloring
- green gel food coloring
- ½ cup nonpareils sprinkles, optional
Instructions
- Cream the Butter and Sugar – In a stand mixer or hand mixer fitted with the paddle attachment, add the softened butter, granulated sugar, powdered sugar, and salt. Gradually increase to medium-high speed (setting 6) and beat for 1 minute. Scrape down the bowl's sides and paddle with a spatula. Beat until fluffy and pale in color, 30 seconds. Scrape down the bowl.
- Add the Eggs – Add egg yolks and vanilla extract, and beat on medium-high speed (setting 6) until combined, about 30 seconds. Scrape down the bowl.
- Add the Flour – Turn the mixer to the lowest speed setting (stir) and gradually add flour. Mix until combined and clumpy, about 45 seconds.
- Color the Dough – Divide the dough into three even portions, about 9 ounces (456 grams) each. Add one portion to the mixer. Add 10 drops of red food coloring. Mix on low speed until evenly colored. Add more coloring as needed; this will vary depending on the brand used.Clean the bowl and paddle, and repeat with a second portion. Add 30 drops of green food coloring. Mix on low speed until evenly colored. Add more coloring as needed.
- Roll Out the Dough – Transfer the red dough to a piece of lightly floured parchment paper. Shape into a 1" thick rectangle. Dust the rolling pin and dough with flour, using more as needed to prevent sticking. Roll into a 12" x 8" rectangle. Set aside. Use your hands or bench scraper to straighten the edges.Repeat the process with the green and vanilla dough using a new piece of parchment paper for each.
- Stack and Roll – Stack the dough on top of each other. Place the green layer down first, followed by vanilla, then red. Straighten the edges. Lightly roll over the layers to press them together.Starting on the long side, roll it into a tight cigar-like shape. Use the parchment paper to help roll the dough over itself. The log should be about 12" long and 2 ¼" wide, reshape as needed. Cut the log in half crosswise to make two pieces.
- Roll in Sprinkles (Optional) – Place the sprinkles on a small rimmed baking sheet. Very lightly brush the log with water. Roll it in the sprinkles, pressing so that they adhere.
- Chill the Dough – Wrap each one tightly in plastic wrap and refrigerate until firm, about 1 hour, or freeze for 30 minutes.
- Preheat the Oven – Set the oven rack to the lower-middle and upper-middle positions. Heat oven to 325ºF (163ºC). Line two baking sheets with parchment paper. If you are only baking one tray or want crisper cookies, place them in the middle of the oven.
- Slice the Cookies – Slice each log into ¼" thick pieces, and place them 1" apart on the baking sheets.
- Bake – Place the pans in the oven and bake for 7 minutes, then switch the positions and rotate. Continue to bake until the edges set, and the vanilla turns light golden, about 8 to 10 minutes.
- Cool – Leave the cookies on the baking sheet for 10 minutes, then transfer them to a wire rack to cool completely.
Recipe Video

Notes
- Food Coloring: I use red and green Wilton gel food colors that come in small squeeze bottles. The amount needed will be dependent on the brand and type used. Add more or less until the desired hue is achieved.
- Two Colors: Divide the dough in half and add the desired colors.
- Make ahead: The cookie dough can be wrapped and stored in a resealable plastic bag in the refrigerator for up to 1 week or the freezer for up to 2 months. Defrost, and bring to a sliceable temperature before using.
- Storing: Store in an airtight container for up to 1 week at room temperature or freezer for up to one month.
Nutrition Facts
Percent Daily Values are based on a 2000-calorie diet. All nutritional information is based on estimated third-party calculations. Each recipe and nutritional value will vary depending on the brands you use, measuring methods, and portion sizes per household.


Tina Sain says
My grandkids loved these cookies. They even left several for Santa! I found the recipe easy to follow and I had to make a second batch because they were gone so quickly. I will be making these again soon.❤️
Jessica Gavin says
I love that your grandkids and santa go to enjoy the pinwheel cookies!
John Ric says
Brought these to a Christmas family gathering. They might be a bit more work than a regular cookie recipe, but well worth the extra effort. There were many desserts, pastries and cookies available but everyone wanted to try these first. They were a hit!
Jessica Gavin says
Yay! That makes me so happy to hear that your family enjoyed the Christmas cookies. I love how eye catching they are!