
Crème brûlée is a simple yet elegant dessert that you can prepare ahead. The creamy custard is baked in a water bath until smooth and spoonable. Top it with sugar and use a torch to create a crisp caramelized surface.

Jessica’s Recipe Science
- Whole vanilla bean pods are concentrated with vanillin compounds, enhancing the custard’s sweet flavor and aroma.
- Egg yolks coagulate at 150 to 160ºF (66 to 71ºC), so tempering is key to prevent curdling before baking.
- Use a bain-marie (hot water bath) to gently cook crème brûlée, preventing rubbery edges while the center sets.
Jump To a Section
Featured Comment 4
“Excellent technique and demonstration. I was always a little intimidated by Crème Brulée, but after watching this video I feel ready to make it. I am so grateful for Jessica’s culinary knowledge, skills and abilities.”—Diane
Why It Works
The hallmark of a stunning crème brûlée is the thin layer of caramelized sugar crust, with an extraordinarily silky and creamy vanilla custard hidden beneath. Breaking through the crackling surface makes the dessert experience fun and exciting. Although it looks fancy, it’s straightforward to prepare!
Crème brûlée, also known as burnt cream, wouldn’t be the same without its hardened sugar topping. It only takes a few minutes to caramelize, and I have a few tricks to share so that you can heat the surface with or without a handheld torch. This recipe’s beauty is that you can make the custard a few days ahead of time for a quick and easy dessert.
Ingredients You’ll Need

- Vanilla: Vanilla is a classic flavor used to enhance the sweet taste and aroma of the custard. I use whole vanilla bean pods containing incredibly flavorful seeds with concentrated vanillin flavor compounds.
- Cream: I use heavy cream to create a luxurious custard texture. It contains 36% fat, adding a silky mouthfeel without feeling too dense.
- Eggs: The eggs thicken the custard as it bakes in the oven. Use only egg yolks to create a softer, pudding-like texture that doesn’t firm up. They contain 16% protein, which will coagulate just enough to thicken the consistency. The 34% of lipids will add a silky richness and shiny appearance.
- Sugar: Granulated sugar is ideal for creme brûlée because its fine crystals melt evenly under high heat, creating a smooth, caramelized top. The sugar’s neutral flavor allows the vanilla and custard notes to shine through.
See the recipe card below for all ingredients and measurements (US and metric).
Ingredient Substitutions
This creme brulee recipe is easy to customize! Try these tasty options:
- Vanilla Bean Substitute: You can substitute 2 teaspoons of vanilla extract or vanilla bean paste, although the taste won’t be as strong.
- Sugar Swap: Alternatively, Demerara and Turbinado sugars are also popular choices. They’re coarse and dry brown sugars but a bit harder to find at the grocery store.
- Flavoring: Add lavender or anise extract. Try adding instant espresso or coffee, steeping some chai or Earl Grey tea, or whisking in some matcha green tea powder with the scalding milk for a caffeinated version.
- Chocolate: Add cocoa powder or homemade Nutella for a chocolaty taste.
- Citrus: Add lemon, orange, or key lime and zest juice for a more tart flavor.
- Liqueurs: Try Irish Cream, Grand Marnier, of Kalua add a nice boozy note.
How to Make Creme Brulee

Step 1: Extract the Vanilla Seeds
Split the vanilla bean down the middle lengthwise and scrape out as many seeds as possible, about ⅛ teaspoon. The specks add an attractive gourmet appearance. Don’t discard the pod! Add it to the cream to infuse the flavor into the egg base.
Step 2: Preheat the Oven
Position the oven rack in the center to ensure even heat distribution during baking. Preheat the oven to 325ºF (163ºC), allowing the custards to cook gently.

Step 3: Scald the Heavy Cream
The cream is heated to just below a simmer to 180ºF (82ºC). Don’t go any higher, or it will start getting clumpy. This helps infuse the vanilla bean’s flavor and dissolve the sugar in the egg mixture so it doesn’t taste granular.

Steep the vanilla bean for at least 5 minutes off the heat, allowing the milk to cool slightly to prevent curdling.

Step 4: Combine the Yolks and Sugar
Whisk granulated sugar into the egg yolks. This process helps slow coagulation down when the warm cream is added to prevent curdling.
Tips for Perfect Execution: Don’t let the egg and sugar mixture sit too long! The sugar will absorb the water in the yolks and cause the uncooked egg proteins to clump together.
Step 5: Strain the Cream
Strain the cream through a fine-mesh sieve. This technique gives the ingredients another chance to become more homogeneous. It removes any remaining big particles or lumps and helps disperse the seeds.

Step 6: Temper the Eggs
To prevent the egg yolk’s proteins from hardening in the hot cream, it must be heated gradually by tempering. The scalded cream, which has slightly cooled down, is added in two smaller ⅓ cup additions.

Whisk constantly to prevent hot spots in the egg mixture.

Ingredient Chemistry: Adding warm milk to a larger volume of colder eggs quickly reduces the temperature so it can be smoothly incorporated. The liquid also dilutes the uncooked egg proteins, making it more challenging to solidify to safely add the remaining liquid.
Step 7: Prepare the Water
Boil some water for the bain marie. This hot water will ensure a gentle and even cooking environment when creating the water bath, preventing the custards from overheating or curdling.

Step 8: Fill the Ramekins
I use four 4-ounce ramekins for this recipe, which can hold about ½ cups of custard. Place the cups into a 9×13 metal baking pan. You don’t want to add hot water to glass cookware, or the quick heat expansion could cause it to shatter. I like to stir the custard to disperse the vanilla seeds right before filling, then once poured into the ramekins to reduce settling.
Pro Tip: You can strain the mixture through a fine mesh strainer for an even smoother custard, but this is optional.
Experimentation Encouraged: You can use different-sized containers, such as shallow ramekins. However, the wider surface area makes them cook faster, so adjust the bake time. This dessert is very decadent, so you don’t want to go much larger than 4—or 6-ounce ramekins.

Step 9: Make a Hot Water Bath
A classic crème brulee recipe calls for the custard to cook using a bain-marie, also called a hot water bath. This method prevents the custard from overcooking the edges and turning rubbery while the center is gradually setting.
Ensure that the ramekins don’t touch the sides of the dish or each other. Fill the large baking dish with boiling water to reach halfway up the ramekins’ sides.
Step 10: Bake
Bake the custard for about 30 to 40 minutes. The most accurate way to check for doneness is to insert an instant-read thermometer in the center. It’s done once it reaches between 175 and 178ºF (79 to 81ºC). Otherwise, gently shake the ramekin. There should be a very slight wiggle in the center. The custard will be set on the edges but not feel firm.

Step 11: Cool
Cool the custards to room temperature to allow for carryover cooking. This prevents steaming and condensation when placed in the refrigerator. For the best consistency, you need at least 3 hours of chilling before serving.

Step 12: Add the Sugar
Granulated sugar spreads easily over the surface and browns the crust nicely. One teaspoon is just the right amount for a delicate crunch, although you might need more for a larger surface area.
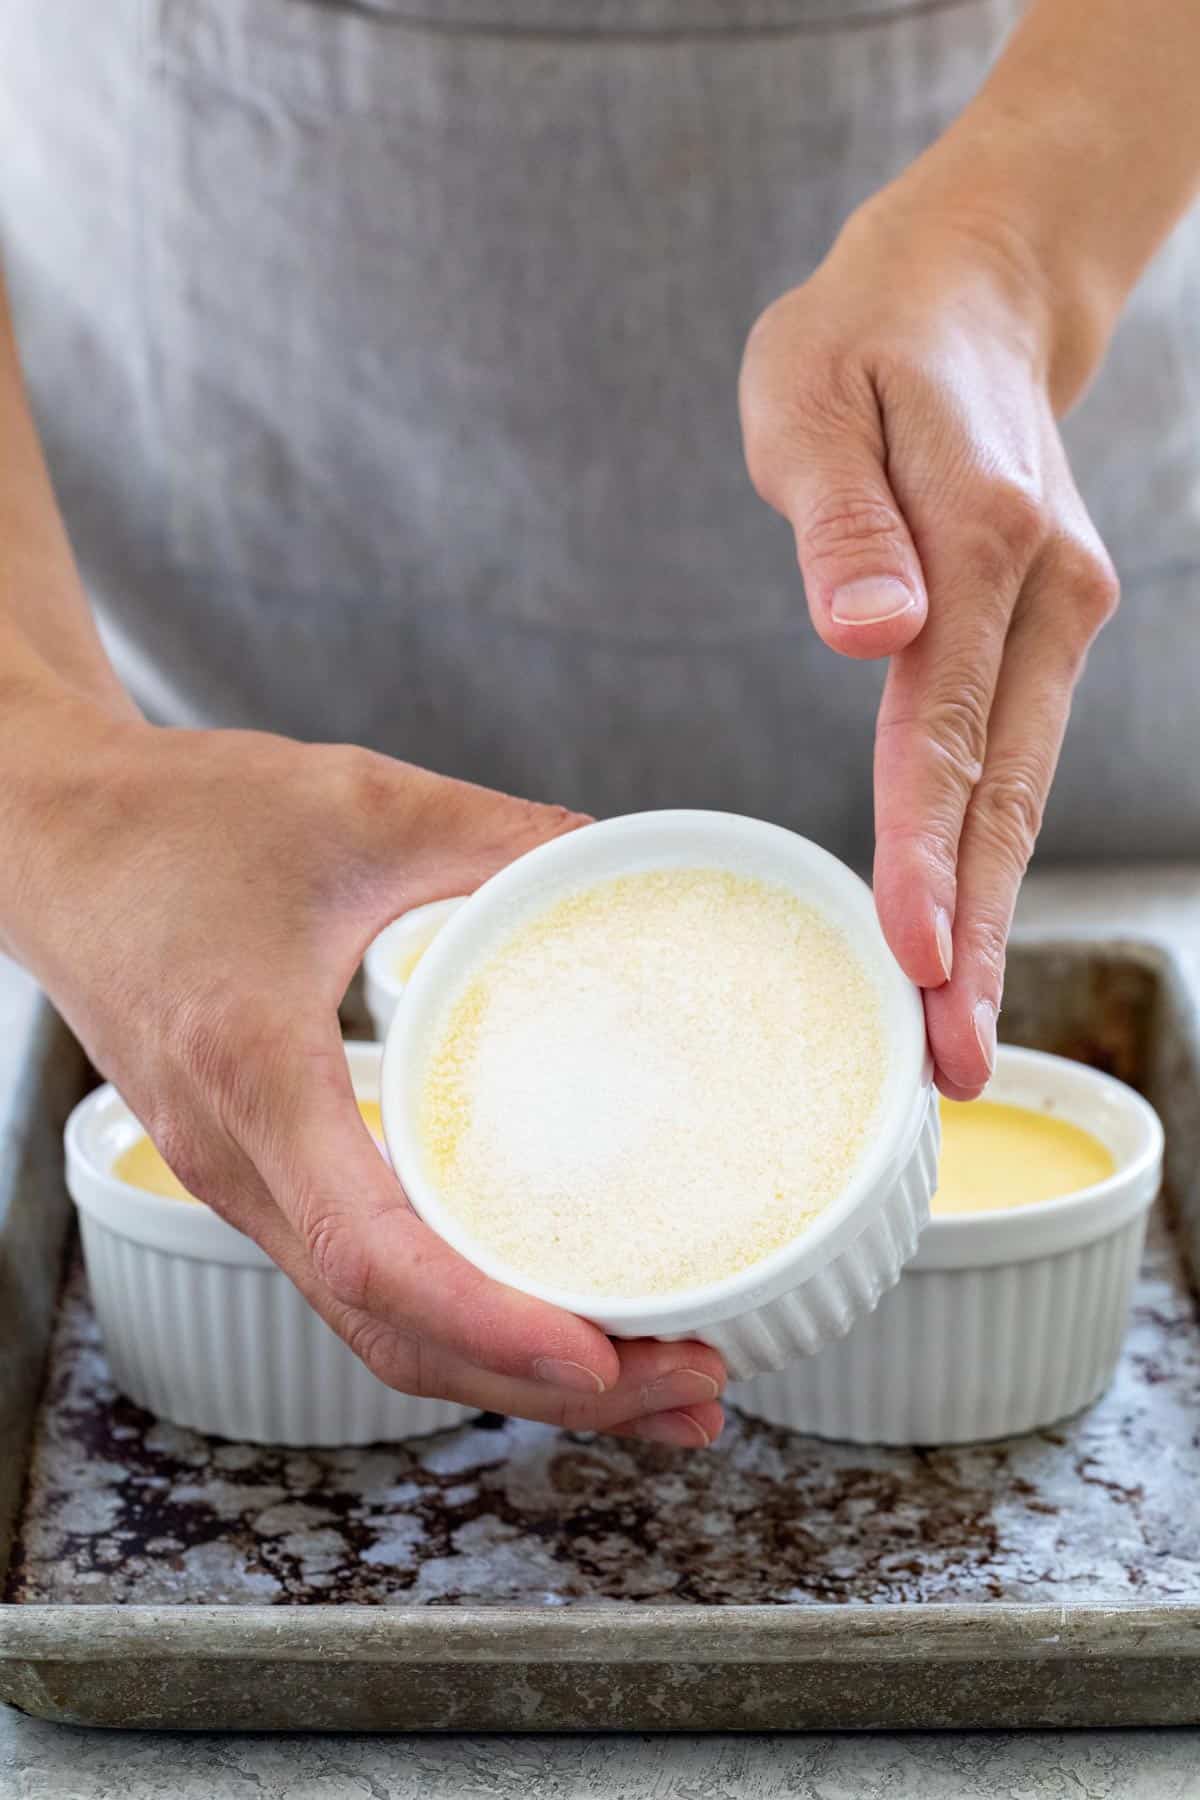
To disperse the granules, hold the cup at an angle and tap the sides of the ramekin. You don’t want any exposed custard spots, or the kitchen torch will melt them.
Pro Tip: Before torching, use paper towels to dry the surface of any excess moisture from storing in the refrigerator. Extra water will prevent the sugar from hardening.

Step 13: Caramelize the Sugar
The torch is the best method for making the caramelized sugar topping, giving the most control and even browning. Start about 3 to 4 inches away, using a circular motion.

Step 14: To Serve
The burnt sugar topping will harden as it cools down at room temperature in about 5 minutes. Serve it shortly after, or chill for 5 minutes so that the custard beneath can cool down.
Frequently Asked Questions
Crème brûlée is a classic French dessert with a rich, creamy custard base topped with a thin, caramelized sugar crust. The custard is made by combining egg yolks, sugar, cream, and flavorings, such as vanilla, and gently baking it in a water bath to create a smooth, velvety texture. The signature caramelized topping is achieved by sprinkling granulated sugar over the set custard and melting it with a kitchen torch or broiler.
A bain marie is a cooking technique in which a container holding hot water is used to slowly and gently cook items. Since water cannot get hotter than 212ºF (100ºC), it allows for steady and gentle cooking. This is the ideal environment for baking the crème brûlée custards, reducing the risk of overcooking the outer edges and becoming dense and firm.
The oven broiler is another option, allowing multiple custards to brown at once. However, the color change can be uneven and takes more monitoring time. It also heats the custard, losing the cool contrast. I would chill them for about 15 to 30 minutes before serving. Alternatively, heat the bottom of a spoon over a hot stovetop flame for about 5 minutes, then touch it to the sugar. You’ll see the sugar steam as the moisture evaporates. It’s a neat trick, but use a spoon you don’t care about. This method does work, but not very evenly, and it does take a long time to heat several custards.
More Dessert Recipes


If you tried this Creme Brulee Recipe, please leave a 🌟 star rating and let me know how it went in the 📝 comments below!
Easy Crème Brûlée

Ingredients
- 1 vanilla bean
- 1 ¾ cups heavy cream
- 5 large egg yolks, wait to separate
- ½ cup granulated sugar
- 4 cups water
- 4 teaspoons granulated sugar, for topping
Instructions
- Extract the Vanilla Seeds – Cut the vanilla bean pod in half lengthwise. Run the back a paring knife along the inside to scrape out the seeds.
- Preheat the Oven – Set the oven rack to the middle position. Preheat the oven to 325ºF (163ºC).
- Scald the Heavy Cream – In a medium saucepan, add the heavy cream, vanilla bean seeds, and the pod. Heat on medium-low until the mixture reaches 180ºF (82ºC), about 10 to 12 minutes. Stir occasionally and make sure not to boil. Remove from the heat and allow the vanilla bean to infuse, approximately 5 minutes.
- Combine the Yolks and Sugar – Separate the egg yolks from the egg whites. In a medium bowl, add the egg yolks and sugar, gently whisk to incorporate.
- Strain the Cream – Set a fine-mesh sieve over a medium bowl. Slowly pour the cream through, scrape the bottom of the sieve against the edge of the bowl to incorporate any vanilla seeds.
- Temper the Eggs – Gradually add ⅓ cup of cream mixture into the egg mixture while whisking slowly to incorporate. Repeat with another ⅓ cup. Add the remaining cream into the egg mixture, making sure to scrape any vanilla seeds left in the bowl.
- Prepare the Water – In a medium saucepan or kettle, add the water and bring it to a boil. Turn off the heat, cover to keep hot. This will be used to make the water bath.
- Fill the Ramekins – Place four (4-ounce) ramekins inside a 9X13-inch metal pan. Slowly stir the egg mixture before adding. Fill each ramekin with ½ cup custard, or until almost full. Gently stir each one to distribute any vanilla seeds that may have sunk to the bottom. Pop any bubbles on the surface.
- Make a Hot Water Bath – Pour enough of the boiling water into the baking dish to come halfway up the sides of the ramekins. Be careful not to pour any water into the cups.
- Bake – Bake until the crème brulee sets, but still has a slight wiggle in the center, approximately 30 to 40 minutes. After 30 minutes, open the oven and gently tap the sides of the ramekins to check for doness. Bake longer as needed, checking every 5 minutes. The temperature should be between 175 to 178ºF (79 to 81ºC) in the center.
- Cool – Use an oven mitt to carefully remove each ramekin from the pan and transfer it to a wire rack. Let them cool to room temperature, about 45 to 60 minutes. Individually wrap each ramekin with plastic and place in the refrigerator for a minimum of 3 hours to set the custard, or refrigerate for up to 3 days.
- Add the Sugar – When ready to serve, remove the crème brulee's from the refrigerator. Gently blot any moisture on the surface with a paper towel. Evenly sprinkle 1 teaspoon of granulated sugar over the top of each ramekin. Hold at a slight angle, and gently tap the side so the sugar evenly covers the surface.
- Caramelize the Sugar – Using a culinary torch, ignite and hold it 3 to 4 inches from the ramekin. Start along the edges, moving in small circles, until you reach the middle of the custard. Continue this movement until the surface is browned and caramelized, being careful not to overburn the sugar. Repeat with each ramekin.
- To Serve – Once caramelized, let the sugar cool for five minutes at room temperature to harden. Alternatively, refrigerate for 5 minutes to cool the warmed custard beneath. The custards can be chilled uncovered for up to 1 hour and still have a hard crust. If desired, the surface can be torched for a few seconds to make the surface crisper.
Recipe Video

Notes
- Vanilla Bean Substitutes: 2 teaspoons (10 ml) of vanilla extract or paste
- Straining: For an even smoother texture, strain the egg mixture before adding it to the ramekins. Skim the surface of any film or bubbles.
- Storing: Wrap baked custards in plastic and store in a resealable plastic bag for up to 3 days.
- Freezing: Cool the custard to room temperature, cover tightly with plastic wrap, and place in a resealable bag. Freeze for up to one month. To thaw, leave it in the fridge overnight. Once thawed, add the sugar and caramelize the topping.
- Caramelizing in the Broiler: Set the oven rack about 6 inches away from the upper heating element. The creme brulee will be about 4-inches away. Place the ramekins on a sheet pan, broil on high until the surface is golden brown, about 4 to 6 minutes. Check every minute, rotating the ramekins if needed for even caramelization.
- Caramelizing with a Spoon: Place a stainless steel spoon (that you don’t mind changing color) over the flame of a gas stove set on high. Let it heat for about 5 to 6 minutes. Be careful! Only touch the handle with your fingers. Press the bottom of the spoon onto the sugar. Slowly drag it in a circular motion until the surface is golden brown. Carefully wash off any residual sugar and repeat with the remaining custards.
Nutrition Facts
Percent Daily Values are based on a 2000-calorie diet. All nutritional information is based on estimated third-party calculations. Each recipe and nutritional value will vary depending on the brands you use, measuring methods, and portion sizes per household.
Recipe Resources


Diane Fleischman says
Excellent technique and demonstration. I was always a little intimidated by Crème Brulée, but after watching this video I feel ready to make it. I am so grateful for Jessica’s culinary knowledge, skills and abilities.
Jessica Gavin says
Thank you so much, Diane! I can’t wait to hear how the creme brulee turns out for you!
Ivan Somers says
I like to use Grand Marnier as well as a finely grated orange zest in the custard – adding the Grand Marnier before pouring the mixture in the ramekins.
Jessica Gavin says
Wow, I need to try the grand marnier! How much do you use?