
Here’s a great idea! How about celebrating St Patrick’s Day with festive treats made from sugar cookie dough? They are easy to cut into fun shapes and decorate with colorful royal icing.
Get in the spirit and enjoy these sweet treats with Irish coffee, Irish cream, and Baileys brownies.

Table of Contents
- Recipe ingredients
- Cream the butter
- Incorporate the egg
- Mix in the flour
- Roll out the dough
- Cut Irish-themed shapes
- Baking tips
- Make royal icing
- Make the colors
- Make border icing
- Make flood icing
- Add decorations
- Alternative icings
- Frequently asked questions
- Chill the dough before rolling
- St. Patrick’s Day Cookies Recipe
This year, learn how to make St. Patrick’s Day cookies! They will put a big smile on the lucky friends and family that get their hands on one. This Irish holiday is not all about corned beef and cabbage. Why not bake up some special treats to enjoy before or after your big feast?
I’ve been using my trusty sugar cookie recipe to roll and cut out shapes for a long time. It’s perfect for making ahead of time. There are various ways to decorate them, but I use royal icing to give a sturdy matte finish. This recipe is also a fun edible design project to do with kids.
Recipe ingredients
- Butter: Use unsalted softened butter to create the tender crumb of the cookie.
- Flour: The all-purpose flour’s 10 to 13% protein level provides just enough structure to hold the cookie shape and thickness, making it easy to decorate and delicious to eat.
- Sugar: Adds sweetness and crisp texture on the edges. Granulated sugar helps to prevent the cookies from spreading.
- Eggs: Adds richness and flavor, and it binds the cookie dough together.
- Baking Powder: Baking powder and eggs help the cookies slightly rise without too much spread.
- Flavoring: A little bit of salt and vanilla extract enhances the flavor of the base.
- Royal Icing: A mixture of meringue powder, powdered sugar, vanilla, and warm water. It’s whipped until thick and pipable.
- Food Coloring: Gel food coloring gives vibrant colors without diluting the icing. I use Wilton icing colors: red, golden yellow, copper, kelly green, royal blue, violet, and black. I combine yellow and a small amount of red to make the orange on the rainbow.
See the recipe card below for all ingredients and measurements (US and metric).
Cream the butter

Step 1: I use a stand mixer fitted with a paddle attachment to make the dough efficiently. Alternatively, a hand mixer can be used. Softened butter, around 65ºF (18ºC), is creamed with sugar to create air pockets for a light and crisp texture.
Incorporate the egg

Step 2: Using room-temperature eggs makes it easier to mix with the ingredients for a cohesive dough. Mix in the vanilla at the same time.
Mix in the flour


Step 3: Sift the flour and baking powder, then whisk with the salt. This lightens the dough and ensures even disbursement of the fine particles. Add the dry ingredients to the wet ingredients and stir until just combined. Do not overmix, or the cookies will be tough!
Step 4: Split the dough in half so it’s easier to roll. Wrap in plastic wrap and form into a 1/2-inch disc. Refrigerate for at least an hour or freeze for 30 minutes.
Roll out the dough
Step 5: Before rolling out the dough, this is the perfect time to preheat the oven. Center the oven rack and heat the oven to 350ºF (177ºC). Line two baking sheets with parchment paper, then set aside.
Step 6: Chilled dough is a little sticky, so make sure to have some flour nearby for dusting as needed. To get a thick cookie with crisp edges and tender centers, roll it to ¼-inch thickness. I use an adjustable rolling pin with removable rings. This tool takes out the guesswork of measurement and yields a consistently even thickness.
Cut Irish-themed shapes


Step 7: I use a St. Patrick’s Day cookie cutter set that includes a shamrock cookie cutter (a symbol of Ireland and the holy trinity), pots of gold, rainbows, and coins. The cut-outs range in size from about 2 ½ to 3 ½ inches. When using them, it helps to dip the cutter in flour to prevent sticking.
A small offset spatula can help lift the cookie and gently release the dough if it sticks to the work surface. Baking similar-sized cookies on the same baking sheet is best to ensure even cooking. The cookies will slightly expand in size, so keep them at least 1 inch apart.
Baking tips

Step 8: These cookies bake fast, about 10 minutes. Rotate the pan halfway through to give even exposure to the heat. Adjust the bake time as needed for smaller or larger shapes. The tops should be set, with the bottoms lightly golden brown.
Step 9: Letting the cookies sit on the warm baking sheet for a few minutes before transferring to a wire rack gently completes the baking process. Cool completely before decorating.
Step 10: With the remaining piece of refrigerated dough, roll it out, cut, and bake using the instructions above. Make sure the baking sheets are cooled down between each batch. Otherwise, the cookies will spread and not hold their shape as well.
Make royal icing

Step 11: My royal icing recipe uses meringue powder instead of raw eggs. The dry mixture of powdered sugar, meringue powder, and vanilla rehydrates with warm water. For the smoothest consistency, whisk it together in a stand mixer. The base consistency will be like pipeable peanut butter, which I use for the border icing.
Make the colors


Step 12: Now for the fun part! Divide the royal icing into separate bowls based on the desired colors you will use for piping on the St. Patrick’s Day sugar cookies. I always make sure to have green food coloring for shamrocks and various other festive hues. The consistency still needs to be adjusted for decorating.
Make border icing


Step 13: The border icing must be thick enough to create an outline to hold the thinner fill icing. It should be similar to creamy peanut butter but pipeable. Adjust the royal icing consistency with ½ teaspoon of water at a time. Add the amount you think you will need to a piping bag or squeeze bottle. The rest will be used for flood icing.
Baker’s Tip: I use 12-inch disposable piping bags and silicone ties to keep the icing from coming out. Cut the tips based on the size gauge you need for decorating.
Make flood icing
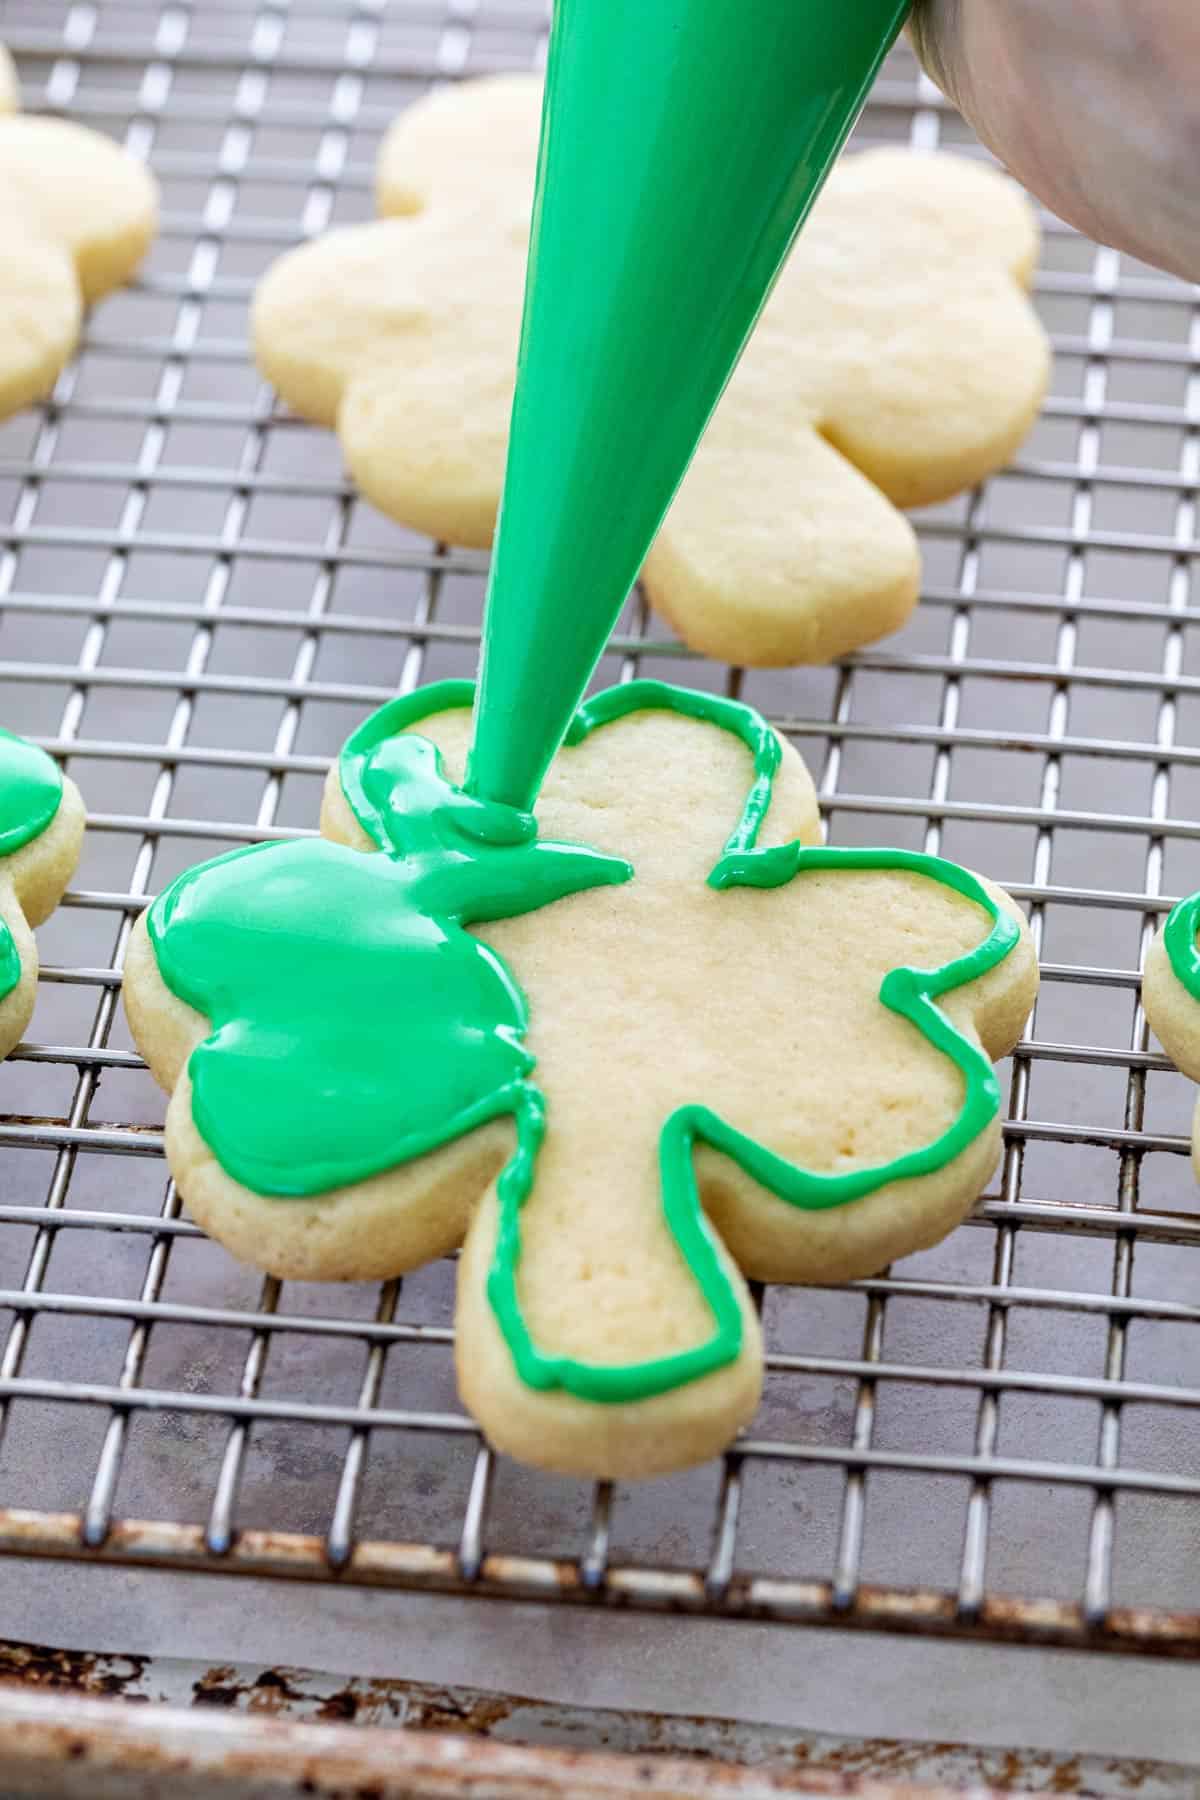
Step 14: Flood icing fills the border icing design with color. Gradually dilute a portion of the royal icing with ¼ teaspoon of water. The texture should be a more school glue-like consistency that sinks back together and gives a smooth surface as it dries.
Add decorations
Step 15: Let it dry once you’ve piped on the royal icing. However, if you plan to add any extra decoration like sprinkles or icing designs, do it while the icing is still wet and tacky. To add eye-catching sparkle to small surface areas, white and green sparkling sugar sprinkles work nicely. I use gold sugar pearl nonpareils on the horseshoes for dimension.
Step 16: Let the decorated cookies dry completely. Resist touching the surface; it takes at least 6 hours to dry. I dry them uncovered on a parchment paper lined sheet and or on top of a wire rack. Store in an airtight container until ready to share.
Alternative icings
- Sugar cookie icing for a shiny glaze (very simple!)
- Sugar cookie frosting for a thicker, pipeable topping
- Cream cheese frosting for a sweet and tangy flavor
Frequently asked questions
Find an image you like, then draw it on cardboard or paper. Cut out the shamrock shape, then gently place it on the rolled cookie dough. Use a paring knife to cut around the shape like a stencil.
You can melt chocolate (milk, dark or white chocolate chips, or candy-coating chocolate wafers). White chocolate is great for coloring. Transfer to a piping bag and work quickly to add the designs and additional decorations. Chocolate wafers dries quickly, so work fast!
Food coloring is much more diluted and requires more to achieve the desired hue. Wait to add water to thin the royal icing since food coloring is dissolved in liquid. I’ve noticed that once the icing dries, ones made with food coloring instead of concentrated gel fade faster.

Jessica’s Recipe Science
Chill the dough before rolling
My recipe requires chilling the cookie dough in the refrigerator for at least 1 hour, ideally 3 hours, or 30 to 90 minutes in the freezer. This process gives the ingredients time to relax the gluten bonds formed during mixing, so the cookie texture isn’t tough. To save time, I often make the dough the day before.
St. Patrick’s Day Cookies

Ingredients
Sugar Cookies
- ¾ cup unsalted butter, softened to 65 to 67ºF (18 to 19ºC)
- 1 cup granulated sugar
- 1 large egg, room temperature
- ½ teaspoon vanilla extract
- 2 ⅓ cups all-purpose flour
- 1 teaspoon baking powder
- ½ teaspoon kosher salt
Royal Icing
- 4 cups powdered sugar
- 3 tablespoons meringue powder
- 9 tablespoons warm water, 100 to 110°F (38 to 43°C)
- ½ teaspoon vanilla extract
Instructions
- Cream the Butter – In a stand mixer fitted with the paddle attachment, add the softened butter and sugar. Mix on medium-low speed (setting 4) until light and fluffy, 2 minutes. Scrape down the sides of the bowl with a spatula.
- Incorporate the Egg – Add the room-temperature egg and vanilla extract. Mix on medium-high speed (setting 6) until combined, 20 to 30 seconds. Scrape down the paddle, side, and bottom of the bowl.
- Add the Dry Ingredients – In a separate bowl, sift flour and baking powder, then add salt and whisk to combine. Add the dry mixture to the stand mixer. Pulse on and off 8 times. Scrape down the sides as needed. Mix on low speed (setting 2) until the dough just comes together, 10 to 15 seconds. Do not overmix. Use a spatula to give the final mix. The dough will have a sticky consistency.
- Refrigerate the Dough – Transfer half of the dough to a piece of plastic wrap, cover, and press it into a ½" thick disc. Repeat with the remaining dough. Refrigerate for at least 1 hour, 3 hours is ideal. Alternatively, freeze for 30 to 90 minutes.
- Preheat the Oven – Set the oven rack to the middle position. Heat to 350ºF (177ºC). Line two baking sheets with parchment paper, then set aside.
- Roll Out the Dough (1st Dough) – Work one piece of dough at a time to keep the other cool. Allow the dough to sit on the counter for 5 to 10 minutes to to slightly soften. Lightly dust the work surface, the top of the dough, and the adjustable rolling pin with flour, using more as needed. Roll, rotate, and dust with flour until ¼" thick.
- Cut Out Shapes – Immediately use desired cookie cutters to cut out shapes, cutting them as close together as possible. Transfer the pieces to the sheet pans, about 1" apart. Any extra dough scraps can be rerolled out 1 more time. If needed, chill before rolling.
- Bake – Bake the cookies while still cool, one tray at a time. If not baking immediately after cutting, keep them chilled in the refrigerator. Bake for 6 minutes, rotate, and bake for an additional 4 to 5 minutes or until the surface is dry and the bottoms are lightly golden brown.
- Cool – Cool on the baking sheet for 3 to 5 minutes, then transfer cookies to a wire rack. Alternatively, for a softer cookie with less crisp edges, immediately transfer to the wire rack. Completely cool before decorating, about 30 minutes.
- Repeat the Process (2nd Dough) – With the remaining piece of refrigerated dough, repeat steps 6 to 9 above. If reusing the parchment paper lined sheet pans, make sure the pan is cooled down before using.
- Make the Royal Icing – In a stand mixer fitted with the whisk attachment, add the powdered sugar, meringue powder, 9 tablespoons warm water, and vanilla extract. Mix on low speed (setting 2) for 7 minutes.Increase the speed to medium-low (setting 4) and mix until a thick glue-like consistency is reached, about 2 to 3 minutes. Scrape down the sides of the bowl as needed.
- Create Icing Colors – Divide the royal icing into small bowls. Place a piece of plastic wrap directly on top to prevent them from drying out. Add the gel or liquid colors to each bowl, mix well with a spoon. Cover with plastic wrap.
- Make Border Icing (for outlining cookies) – The consistency should be similar to peanut butter but pipeable. If you drizzle a little from your spoon, the ribbon should hold for a few seconds before combining back together. Add ½ teaspoon of water to the royal icing and mix. Gradually add more as needed.Add the border icing to a small squeeze bottle or piping bag fitted with a round tip (optional). Pipe an outline around the edge of the cookies. Allow it to dry until just beginning to set. Once done, if you have leftover, add it back to the bowl with the corresponding color. Keep the bag or bottle for the flood icing.
- Make Flood Icing (for filling cookies) – The consistency should be similar to glue and not too runny. When drizzled from a spoon, it should sink immediately back into itself. If it gets too runny, add more powdered sugar, 1 teaspoon at a time. Add ¼ teaspoon of water to the icing and mix. Gradually add more as needed.Add the flood icing to the piping bag or bottle used to make the border icing or a new bag or bottle. Fill in the cookie's interior with flood icing, pushing into the corners and against the edges. If needed, use a small offset spatula or toothpick to spread it closer to the outline.
- Add Decorations – Add sprinkles, nonpareils, or other decorations while the icing is still wet. Use border icing or edible writing pens to write messages on the dried cookies if desired.
- Dry the Cookies – Place iced cookies on a parchment paper-lined sheet pan or on top of a wire rack until completely dried before stacking or eating, at least 6 to 8 hours. Depending on the thickness of your icing, it may take longer. When the cookies are dry, the surface should be smooth and resistant to nicks or smudges.
Notes
- Weigh the Flour: Use a digital scale for the most accurate results. Alternatively, dip the measuring cup into the flour, then sweep off the excess. This makes for a denser measurement, but don’t pack the flour in the cup.
- Bake Time: About 10 minutes for 2-inch cookies, 11 minutes for 3-inch cookies, or 12 minutes for 4-inch cookies. A visual check is the best guide.
- Baking a Smaller Batch: If baking only about 6 cookies on a tray, check for doneness sooner. After baking for 6 minutes and rotating, check every 1 minute. They brown much faster due to less moisture in the environment.
- Make-Ahead Dough: The dough can be mixed and stored refrigerated for up to 5 days, or 1 month frozen. Unbaked cut-out cookies can be covered and refrigerated for up to 5 days or frozen for 2 weeks.
- Storing Cookies: Store baked cookies in an airtight container at room temperature for up to 5 to 7 days. Store in the freezer.
- Storing the Icing: Transfer any unused icing into an airtight container. Place a piece of plastic wrap directly on top. Store in the refrigerator for up to 3 days. Allow it to come to room temperature before using. Mix on low speed in a stand mixer or by hand with a spoon before using it to smooth out the consistency.
- Storing Iced Cookies: Store in an airtight container for up to one week.
Nutrition Facts
Percent Daily Values are based on a 2000-calorie diet. All nutritional information is based on estimated third-party calculations. Each recipe and nutritional value will vary depending on the brands you use, measuring methods, and portion sizes per household.


Leave a Comment