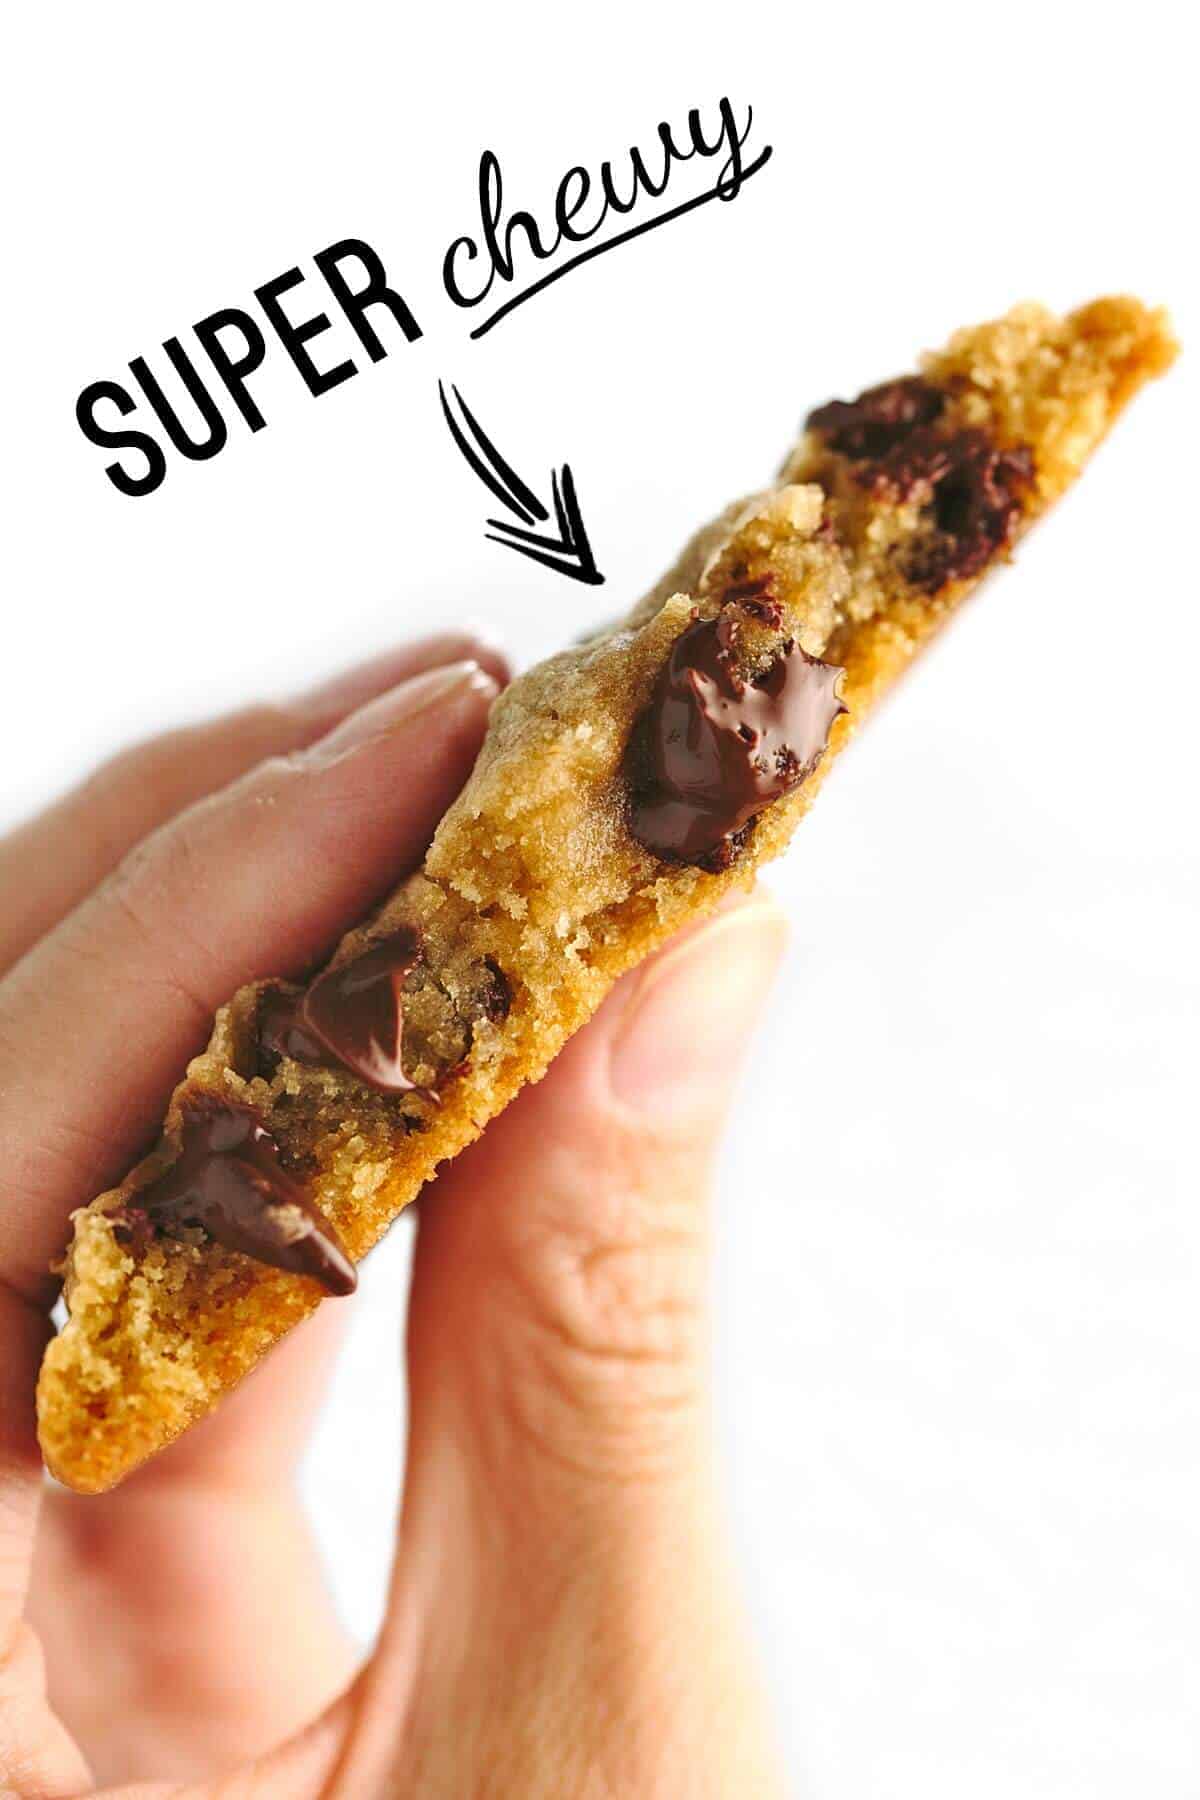
The best soft and chewy chocolate chip cookie recipe! These handheld treats are crisp on the edges with soft centers. When eaten fresh, burnt fingertips and chocolate-streaked hands are worth every bite!
Looking for more classic treats? You can’t go wrong with peanut butter cookies or oatmeal raisin cookies.

Table of Contents
- Mixing in the dry ingredients
- Use melted butter
- Dissolve the sugar for better flavor and color
- How sugar affects the texture
- Chocolate selection
- Briefly chill the dough before shaping
- For a rustic cookie appearance
- Best temperature for baking
- Baking time affects texture and flavor
- Cool on the baking sheet
- Storing and freezing
- To bump up the flavor
- The Best Chewy Chocolate Chip Cookies Recipe
Nothing is more alluring than a tray of freshly baked chocolate chip cookies, but creating the ultimate chewy texture requires patience and culinary science. The selection of ingredients and the method for making the dough are critical.
To tackle this iconic recipe, I use a combination of ingredients that attract and hold onto moisture, such as granulated and brown sugar. This ensures the texture stays soft days after you bake them. For those with sensitivities to certain ingredients, I have a gluten-free chocolate chip cookie recipe you can try.
Mixing in the dry ingredients

First, mix the all-purpose flour and baking soda to disperse the leavening agent evenly. It’s then added to the whipped butter mixture by hand. This process prevents overmixing of the dough. Mix it enough to hydrate the flour and encourage gluten formation for a chewy texture.
Use melted butter

Most traditional recipes cream softened butter and sugar together to create structure and rise. This process works well for a cakier cookie, but it is best to melt the butter first. Butter is a water-in-oil emulsion. Once melted, the water is more available to bind with the protein in the flour.
The liquid increases the gluten formation, providing the sought-out chew when mixed. I melt about 70% of the butter on the stovetop, then mix the remaining to quickly cool it down so it doesn’t curdle the eggs.
Dissolve the sugar for better flavor and color

Dissolving the sucrose (granulated and brown sugar) with moisture and heat breaks it down faster into monosaccharides, glucose and fructose. These simple molecules caramelize at a lower temperature than crystalline sucrose. The result is improved caramelization and new flavor compounds. In addition, when the caramelized sugar cools, it creates a golden-brown crackly surface with brittle edges.
This recipe has a unique step for effectively dissolving sugar into the dough. It’s a simple process of whisking the melted butter, sugars, and eggs together for a short period and then letting it rest for a few minutes. This process is repeated a total of four times. The mixture changes from an oily goop to a thick and shiny frosting-like appearance.
How sugar affects the texture
A balance between flavor, sweetness, and texture is essential when selecting sweeteners. There are two types of sugar in this recipe:
- Granulated white sugar has free-flowing crystals that don’t stick together. Combined with the dough, it adds nice crispiness and structure, so the cookie doesn’t crumble and fall apart. It also gives that pure sweet taste.
- Brown sugar has residual molasses, giving the color and deeper flavor. It has a higher ratio of brown sugar because it’s hygroscopic, attracting moisture from the air. Dark brown sugar will give a richer flavor than light brown sugar.


Chocolate selection
Semi-sweet, bittersweet, milk, there are so many types of chocolate. How do you choose? For me, I like a simple semi-sweet chip. I find it has the right balance of creamy cocoa butter, sugar, and bitter cacao flavor.
Milk chocolate yields a sweeter experience and if desired, use the darker variety with 60% cacao or more for a richer taste. If you’re still on the fence, grab a fistful of different types, melt them on your tongue, and be the judge. Chocolate chunks, morsel chips, and chopped pieces can be used to switch things up!
Briefly chill the dough before shaping


The warm butter and heat generated during whipping increase the dough’s temperature to around 74 degrees, making it difficult to portion and shape. To firm up the butter slightly, chill the dough in the refrigerator or the freezer to make it less sticky and easier to roll. Target between 65 to 70ºF (18 to 21ºC) before shaping.
For a rustic cookie appearance


I use this neat trick to create a rustic appearance on the surface that exposes more shiny chocolate chips on the top. After shaping the dough into a ball, simply break it in half with your fingers. Then gently press the two pieces back together with both uneven portions facing up.
Best temperature for baking
Between 65 to 70ºF (18 to 21ºC), room temperature dough ensures even cooking from the edge to center. Too warm, the butter melts and loses its air pockets, yielding a flatter, less thick texture. Too cold, 40 degrees or lower, the edges melt and darken too quickly, becoming prone to burning, while the middle is still raw and grainy.
If you make the cookie dough ahead of time, let it sit at room temperature before baking. This process could take about 45 to 60 minutes for refrigerated dough. Defrosting frozen dough will take longer. The dough should indent when touched and feel malleable but not sticky.
Baking time affects texture and flavor
These cookies bake quickly, around 10 minutes, which means every second in the oven affects the final texture. I recommend slightly underbaking them. You’ll see the middle puffing up as the edges cook and brown. At around the 10 to 11-minute mark, I take the cookies out and let them cool on a sheet tray set on a wire rack.
The cookie will level off, and you’ll get crunchy edges with a soft middle. Bake a few minutes longer for a crispier cookie with slightly increased caramel flavor. This is best for those who plan to eat them warm right away.
Cool on the baking sheet

Allowing the cookies to cool until room temperature on the parchment paper-lined baking sheet allows for carryover cooking. This 20-minute process gently cooks the crumb through heat transfer from the pan without the risk of burning them.
Storing and freezing
- You can make the dough ahead of time and refrigerate it for up to 1 week or freeze it for up to 2 months.
- Bring the dough to room temperature before baking.
- Store baked cookies for up to 5 days in an airtight container.
- For single servings, individually wrap and store in a plastic bag in the freezer for up to 1 month. Defrost before eating.

Jessica’s Recipe Science
To bump up the flavor
Make browned butter if you’re interested in bumping up the caramel, butterscotch, and nutty notes. Unsalted butter is already being melted for this recipe, so just heat and swirl it for a few minutes until it’s darker brown, about 1 to 3 additional minutes. The color of the cookies will also be a deeper brown hue.
The Best Chewy Chocolate Chip Cookies

Ingredients
- 1 ¾ cups all-purpose flour
- ½ teaspoon baking soda
- 14 tablespoons unsalted butter, divided
- ½ cup granulated sugar
- ¾ cup dark brown sugar, packed
- 1 teaspoon kosher salt
- 2 teaspoons pure vanilla extract
- 1 large egg
- 1 large egg yolk
- 1 ½ cups semi-sweet chocolate chips, divided
Instructions
- Mix the Dry Ingredients – In a medium bowl, whisk together the flour and baking soda, and set aside.
- Melt the Butter – Cut the butter into 14 even-sized pieces. In a medium skillet, melt 10 tablespoons of butter over medium heat, about 2 minutes. Don't let the butter get too hot, just melted. Then stir in the remaining 4 tablespoons of butter until completely melted.
- Mix the Butter and Sugars – In a stand mixer fitted with the whisk attachment, add the melted butter to the mixing bowl. Add the granulated sugar, brown sugar, salt, and vanilla. Whisk on medium speed (setting 5) until combined, 30 seconds.
- Whisk and Rest – Add the whole egg and yolk to the mixing bowl. Whisk on medium-high speed (setting 8) until smooth with no sugar lumps remaining, about 30 seconds. Let the mixture stand for 3 minutes. Repeat the whisking and resting process 3 more times: 30 seconds mixing at medium-high speed and 3 minutes of rest. After four total times, the mixture should be thick, smooth, and shiny.
- Add the Chocolate Chips – Using a rubber spatula or wooden spoon, stir in the flour mixture until just combined, about 1 minute. Stir in 1 ¼ cups of chocolate chips, giving the dough a final stir to ensure no flour pockets remain.
- Chill the Dough – Transfer the mixing bowl to the refrigerator or freezer. Chill until the dough firms up, around 65 to 70ºF (18 to 21ºC), about 15 to 30 minutes. The dough should not feel overly sticky.
- Preheat the Oven – Adjust the oven rack to the middle position. Heat to 375°F (191ºC).
- Roll Out Dough Balls – Divide the dough into 16 portions, each about 3 tablespoons (about 60 grams, 2 ounces), and roll into a ball. If the dough starts to warm and get sticky, place it on a sheet tray and refrigerate for 15 minutes.For a rustic appearance, tear the dough balls in half, then press the two halves together again with the lumpy torn sides facing upward to expose the chips. Shape the sides of the dough back into a circle. If desired, use the remaining ¼ cup of chocolate chips and press some on top.Arrange dough balls at least 2" apart on lined baking sheets, 8 portions per tray. Smaller baking sheets can be used but will require baking in 3 batches. The dough should be room temperature or just below for even cooking, around 65 to 70ºF (18 to 21ºC).
- Bake the Cookies – Bake one tray at a time in the center position. Bake for 5 minutes, then rotate the baking sheet. Continue to bake until the cookie edges are golden brown and the centers look slightly underdone, about 5 to 7 minutes. The color will continue to darken during cooling. Place the baking sheet on a wire rack and let the cookies cool until they reach room temperature, 20 to 30 minutes. The chips should still be melty. Make sure the oven returns to 375°F (191ºC) before baking the remaining tray.
Recipe Video

Notes
- Salt Substitution: Table salt can be substituted for kosher salt.
- Make Ahead: Cookie dough can be shaped into balls and refrigerated in a resealable plastic bag for up to 1 week or frozen for up to 2 months before baking. Break the dough apart and combine right before baking for a rustic surface.
- Recipe Adapted From: Cook’s Illustrated.
Nutrition Facts
Percent Daily Values are based on a 2000-calorie diet. All nutritional information is based on estimated third-party calculations. Each recipe and nutritional value will vary depending on the brands you use, measuring methods, and portion sizes per household.


Linda Ward says
These are the BEST chocolate Chip Cookies hands down!! My family devours them every time I make them & everyone wants the recipe! I have forwarded it to 3 people just over Christmas!! Thank you Jessica! I have gotten so many recipes from you over the past few years that I have been following you! All of them are excellent!
Jessica Gavin says
Whoo-hoo! I’m so happy to hear that you are enjoying the chocolate chip cookie recipe and sharing the recipe with loved one. Thank you for the support and trying new recipes. I can’t wait to hear what you make next, Linda!
Kim says
These were very good and the edges were crisp and the middle chewy as promised. However, I just didn’t think they were better than the old standard and a little more work.
Jessica Gavin says
I appreciate your feedback Kim! Glad to hear that the texture of the chocolate chip cookies came out as expected.
Anthony V says
My wife made these cookies this morning. They are some of the most amazing cookies I have had. They are chewy in the inside and crispy on the outside. I think we are going to make these for Christmas gifts this year. The recipe is technical but the outcome is worth it.
Eva M. says
Reread the steps.
I’m actually pretty cookie savvy and have a favorite recipe (very similar to yours I just add a bit more flour and a TBSP of cornstarch) so I was able to make sense of it, but it might throw a begginer off (u go straight from adding the eggs to mixing in the chips; it’s unclear whether the multiple whisks is before, during or after u add the dry ingredients. I split the difference (which is still more mixing than I usually do once the gluten is part of the action) and I think that’s why they turned out more caky than chewy.
Pikake says
Any tips when using a hand mixer? I don’t own a stand mixer.
Jessica Gavin says
I would use the same suggested settings for mixing in the recipe. You may have to increase the speed of the hand mixer isn’t as strong. I would use th whisk attachment. Let me know how it goes!
Jackie says
Hi
If using brown butter instead of melted butter, Is the butter amount the same or do I need more butter.
Jessica Gavin says
Do not increase the amount of butter; just the amount of time cooking it until it browns.
Tiffany says
These were delicious! Took a bit more time to mix so much but definitely worth it. Thanks for sharing!
Jessica Gavin says
You’re welcome, Tiffany!
Michelle A Ryan says
Hats off to you!
Perfect, no substitutions not one.
Simply perfect
Jessica Gavin says
Thank you so much, Michelle!
Fatemeh says
This is the best recipe for chocolate chip cookies I have ever tried after trying lots of different recipes. Thank you very much!
If you are reading this go bake it and give it a try!
Jessica Gavin says
Thank you so much, that’s a huge compliment. Happy baking!
Emily Goddard says
I love making cookies and bake them often, but these chewy once are the best!!
Jessica Gavin says
Thank you, Emily! That means a lot coming from an avid cookie baker like yourself.
Gaelen says
I’m eager to try this recipe, and I really appreciate your detailed explanations with the science behind each step! Plus all the rave reviews… Which brings me to my dilemma: I only have a hand mixer, not a stand mixer. (Big city, small apartment living!) Usually, I readily reach for the hand mixer whenever a recipe calls for a stand mixer – but with the careful timing in the recipe plus my understanding from years of baking, I’m not confident the hand mixer will do the job. Would you recommend I give it a try? Any tips or suggestions? Thanks!
Jessica Gavin says
I think you can definitely give it a try! It sounds like you have good experience with your equipment, so it won’t be difficult to adjust the speed settings. I would use the paddle-like attachments vs. the whisk/beaters. Check out the video so you can see the consistency of the dough during the creaming steps. If needed, just add a little more time. Let me know how it goes!
Gaelen says
Thanks Jessica! With that feedback, I’m willing to give it a try! The potential results are well worth it – and if I have to try a few times to get it right, who am I to complain about eating more cookies?? 🙂
Jessica Gavin says
The more cookies, the better! Cookies for science!
Jackie says
Hi Jessica
What brand of semi-sweet chocolate chips did you use in this recipe.
Jessica Gavin says
I use Ghirardelli semi-sweet chocolate chips but I also like Guittard.
Laurel says
Just made these cookies and they are EXCELLENT! Definitely worth the extra effort compared to other chocolate chip cookie recipes. Great texture and the browned butter added a nice nutty flavor. Best my dad ever had!
Jessica Gavin says
Whoo-hoo! I’m thrilled to hear that everyone enjoyed the cookies and that you made the browned butter. Yum!
Ginny says
I can finally make the BEST chocolate chip cookie! I always “thought” I hated chocolate chip cookies. I never ate them, rarely baked them for my family. Now? I found that I love them! Just needed the right recipe, good quality ingredients, especially the chocolate, and help in understanding the science. Thank you for sharing.
Jessica Gavin says
You rock Ginny! I’m so glad that you found a recipe and method that works for you. More smiles to come I’m sure!
Twinkle says
Hi!! Im glad I came across your page upon searching for the best chewy chocolate chip cookies. This is the 1st time I tried baking cookies and it turned out fantastic. I used coco sugar instead of brown sugar, I skip the vanilla extract because I only use what is available at home and yet it still tastes delicious. I love the crispy edges like you mention in your video. Thank you Ms. Jessica! I would love to learn more recipes from you. I hope you have recipes thats vegetarian.
Jessica Gavin says
You’re so welcome! Thank you for sharing your cookie substitutions!
Sonja says
Best recipe I’ve ever used for cookies! I didn’t have dark brown sugar so used palm sugar instead and I was worried they wouldn’t turn out well because I ALWAYS mess up when baking but the detailed instructions made this foolproof, thank you for this!
Jessica Gavin says
Great to hear that palm sugar works too!
Loren says
These take a little extra time, but are so worth it…amazing!!!
Jessica Gavin says
Thank you for your feedback, Loren! I agree that the cookies are worth the extra time. So good!
Jenny Page says
You know what I love about your recipes Jessica? I feel like some people try to put out ‘unique’ recipes by adding unnecessary steps or ingredients that don’t make sense. You add cool ideas like melting and browning the butter and breaking the dough in half that actually make a nice difference. Very good cookie.
Jessica Gavin says
Thank you so much, Jenny! Enjoy those cookies!
Jessica Gavin says
Thank you, Jenny! I appreciate your feedback, it made my day!
Nicole says
These cookies are AMAZING!!!
Thank you for sharing your recipe and technique – soft centers, crispy edges, packed with delicious flavor – YUM!
Jessica Gavin says
Thank you for your feedback, enjoy!
Emily says
This is such a great recipe. I live in the UK so am happy to have the weights in grams and not just cups. I don’t use any white sugar in mine just light brown soft sugar, gives a lovely caramel flavour. I love the gooey, chewy, chrispy edged texture of this cookie. I also only use about 200g of milk chocolate, as I don’t like it to be overpowered by chocolate chips. I love the beating the egg butter and sugar mixture it’s seems to really make a big difference. My husband basically just wants to eat the raw cookie dough. We have our own hens so I’m not worried about the raw eggs. I also use it to make my own cookie dough icecream!! Thanks so much this is the best cookie recipe ever. I make the cookies using 75g of cookie dough per cookie and it seems about right, for a decent sized cookie (if there is any less to bake after my husband finds it in the fridge!!)
Jackie says
Hi
What brand of semi-sweet chocolate chips do you use in your cookie recipe.
Jessica Gavin says
I like nestle tollhouse or Ghirardelli semi-sweet chocolate chips.
Josh says
Jessica, I understand all the science behind your cookie. Makes total sense.
Can I ask you to put on your science hat to shift this recipe from a chocolate chip cookie to an all-chocolate cookie??
Van de Kamps, a commerical bakery in southern california (closed down years ago) made an outstanding chocolate cookie. Really chewy center, crispy edge with a surface like aligator skin (cracked). No solid chips, just a solid chocolate cookie. They were so good and not super sweet.
So, how much cocoa would you add to your flour and would it be dutched or plain? Keep the baking soda (alkaline) with the plain cocoa (slightly acid)? Otherwise, I think all your recipe would work. This was a commercial bakery so the process of making the dough would have to be relatively easy and straight forward for mass production. Your melted butter/available water totally makes sense.
Thanks for your thoughts as a baking scientist!!
Jessica Gavin says
Thanks for your challenge Josh! I haven’t tried this but if I would start an experiment I would try 1/4 cup of cocoa powder to 1 1/2 cups of flour. I would also brown the butter (there is a link in the article on how to do this) for more toffee notes to complement the chocolate. I would use dutch processed so it’s less bitter. Brown sugar is acidic so it will help the baking soda to react. Let me know if you give it a try!
Matthew says
wow, nice!
Veronica says
Hi.
I’ve tried to make the cookies using salted softened butter (instead of stick butter, cause I don’t have it) and light brown sugar. But the mixture wasn’t really frosty or shiny. Is it because of the sugar and butter?
Jessica Gavin says
If you took out the granulated sugar and used only brown sugar, that is most likely why the cookies arent shiny.
Jess says
Hi jessica,
Just wanted to say thank you so much for putting the weight of the ingredients into grams and ounces!
I live in the UK where we typically don’t use the cups method of measuring and almost always use weight. Super excited to try your version! I’m still on the hunt for the perfect crispy edge gooey centre cookies. Will let you know how I get on and how it works with UK ingredients!
Jessica Gavin says
I can’t wait to hear your feedback with UK ingredients Jess!
vanessa says
I used 1 cup of mini semi sweet chocolate chips and 1/2 of regular size, and when I tell you they were sooo much better than the first time I made them!!! OML THIS RECIPE DID NOT NEED ANY CHANGE, but this one change is life changing!?
Jessica Gavin says
I can’t wait to try the mini chips and smaller cookie size! Did you change the baking time?
Wendy Camp says
How much cocoa powder would you use, if you wanted to make chocolate cookie dough? Would you sub it for a certain amount of flour?
Jessica Gavin says
I would try 1/4 cup of cocoa powder to 1 1/2 cups of flour.
Jayda says
Hello! I was just wondering if I could bake these cookies at the size when you split them in half. So there would be 32 cookies instead of 16 large cookies. And about how long do you think they would take?
Jessica Gavin says
The texture is not as chewy is you split them in half, but they can be baked into the smaller size. I would rotate after 4 minutes or baking, then check every minute after that for doneness.
Gloriana says
Love these cookies, by far my favorite recipe– I like to add chocolate wafers and shards, as well as incorporate the ‘pan-banging’ method by Sarah Kieffer to really enhance the crispy ridges!
Jessica Gavin says
I’m intrigued about the pan banging method, what is that? 🙂
Nicole Gallo says
Decided to make these Christmas Eve and am SO happy with the results. Thank goodness I really read the recipe and whipped the butter/sugar mixture and let it rest, I think that was the key to getting the recipe to come out correctly.
Also, tried baking the cookies in batches because I literally couldn’t wait to have them chill and decided to test the chill time as an experiment. They really do need an hour in the fridge after being portioned on the sheet before going into the oven, otherwise they spread too much while also being too pale (because leaving them in longer makes them spread more).
Officially my go to chocolate chip cookie recipe and can’t wait to experiment with add-ins
Jessica Gavin says
I love your scientific approach Nicole! I really appreciate you testing out the times (I get antsy too) and seeing how it changes the texture. You rock!
Mary says
Chilled dough for longer than 30 minutes but still got flat cookies with chocolate chip mountains. Good flavor but will need to try chilling longer. Sounds like the option to chill overnight is needed.
Jessica Gavin says
Thank you for your feedback Mary! Please let me know how it goes with chilly overnight 🙂
Chelsea says
OMG!! Ive finally found the perfect recipe!!! These are DEF crunchy on the outside and chewy guey on the inside! I did make a couple variations. I like my sweets a little savory so I doubled the salt plus I used salted butter, added a half tspn of baking powder, 2 extra tblspns of browned butter, and 1/4 cups of extra brown sugar.
I would say the 3 keys to making these not puddle when you bake is to make sure your oven is fully pre-heated, the dough is freezing cold when balling them (not frozen,) and that you triple whip your wet ingredients.
Only complaint Id have us we doubled the batch and only got 28 large 2.5″ cookies, so a little less than expected but thats fine because we’ll make a triple batch next time!
Jessica Gavin says
Thank you for your feedback, Chelsea! I love hearing about your modifications and recommendations. Great job!
Amanda says
This looks like the recipe from Cook’s Illustrated. Please give credit where credit is due.
Annabel says
Hello, would brown butter make the cookies taste nice or will they change the whole recipe completely? And would the cookies still turn out chewy?
Jessica Gavin says
Brown butter would be a great addition! Just substitute the amount of melted butter for brown, but make sure to still add the solid butter to the browned butter.
Isabelle says
Hello when I make this and put it into the oven it immediately become a a flat round circle. I did 14tbsp of butter as 196 grams, 100g white sugar, 150g brown sugar, one egg, one yolk, followed the exact directions…yet the cookies turn out like puddles. Why do they melt into circles straightaway?
Thanks,
Is
Jessica Gavin says
A cookie conundrum! Let’s seem things that could cause cookies to spread too quickly: 1) If the oven is too cold. Do you happen to have an oven thermometer to check before adding in the tray? Sometimes my oven “beeps” when it hits the programmed temperature, but I’ve found it always to be lower than expected, so I check the oven thermometer before adding the cookies; 2) Sometimes over whipping the butter and sugar during the creaming process can cause it to spread. What level are you using on your mixer?; 3) Do you chill the cookies in between shaping? 4) Amounts, I calculated the grams and you are spot on. Good job! Let me know your thoughts and we can troubleshoot!
Joey says
Can I use unbleached all purpose wheat flour instead?
Jessica Gavin says
Hi Joey- Yes, unbleached all purpose wheat flour can be used for the chocolate chip cookie recipe.
Lisette says
I didn’t let it get cold enough but I think the dough was the same. I’m not going to risk it this time, so I’ll just do separate batches. I’ll experiment another time! —-Thanks again for All your help. Ps. I’m on the Keto diet for the next few months so it’s a bit of torture to make them and not be able to taste them. Although I feel amazing and happy to please others with your Ridiculously delicious recipe!
Jessica Gavin says
You’re welcome Lisette! Please let me know how the party goes, I want to see a picture of all the desserts you make 🙂 You are a strong and kind woman for making all those tempting recipes, I know how that feels when I was on whole 30 and recipe developing. It’s certainly a challenge!
Lisette says
Thanks for the quick response. So, Can I mix all together or should I do the separate batches? And if I do the two or theee batches all together, do I do that first step of 30 seconds best and 3 minutes rest, more than 4 times? Since it will have double or triple the amount of ingredients?
Jessica Gavin says
Hi Lisette! How did the dough turn out at your in-laws house when you doubled it in terms or appearance before baking? I don’t think to triple the batch would work due to volume in the mixer. If you can I would do separate batches and perhaps make them the night before and chill them so you can just bake them off the next day.
Lisette says
Shoot, I wish I would have read this comment last week!! I made a double batch and although delicious tasting, it was a bit of a disaster. It was my in laws restaurant style oven so 375 was way too hot and they flattened out. Again, delicious! but awful presentation.
On to my question: I have a party for my 2 year old on Saturday and want to make about 40 ish cookies. If I make them smaller and do two batches, how do you suggest the cooking time will differ? What’s the best way to go? I can keep them large and make three batches. I’ll have 48. If that’s the only way to ensure they are perfect like that last time I commented then I will do it!!! Even if I’ll be in the kitchen for two full days… I’m also making two tiramisu and a watermelon cake (that’s for the birthday girl cuz she doesn’t do sugar yet). Please advise! Thank you
Jessica Gavin says
Oh shoot, it’s so tricky on someone else’s oven. I have a check oven thermometer to make sure the oven is just the right temperature because I don’t trust the “beep”, haha. I would suggest doing the full size to get the right texture balance of crispy edges and chewy centers. Maybe 32 is enough because you have the other desserts? I’ve never heard of kids complaining that cookies too big 🙂
tess says
Hi Jessica,
I can’t wait to try these cookies, and am wondering if you can double the recipe and achieve the same crispy chewy results. I realize I can just make two batches, but with two little boys running around, it would be great if I could just mix up one large batch – as I imagine one batch will disappear quickly.
Jessica Gavin says
Hi Tess! I totally understand about the cookies disappearing too fast 🙂 The recipe was designed for a single batch in a 6-quart sized mixer. I worry a little bit that doubling the batch won’t provide proper mixing of the butter, sugar, and egg together since that is the most crucial step. Unless you have a larger mixer, I would stick to keeping it a single batch. Great question!
Lisette says
Absolutely Amazing. I’ve never in my life commented on a recipe. And I’m an avid online recipe fiend. I can’t wait to make more stuff from your website.
Jessica Gavin says
Wow, what a HUGE compliment Lisette! Thank you for making the recipe 🙂 I can’t wait to hear what other recipes you try!
Scott says
Jessica,
I absolutely love your cookies! This is the recipe I have always been looking for. Slightly crispy on the outer edges, yet gooey/slightly underdone in the middle. I discovered your recipe a year ago in Michigan and made them pretty much perfectly. Then I moved to Nova Scotia and for whatever reason, they haven’t really turned out since.
When I say haven’t turned out, I just mean that the cookies don’t spread as much. I made the cookies about four times in Michigan and they all spread out and resembled the cookies in your pictures. I really like a thinner/flatter cookie
There are only two things that I can account for that might be throwing things off. Being by the ocean might make things more humid, so I was wondering if there might be anything to account for with that? Also what if I were to make these cookies in the high altitude/drier climate? (just curious). And the second thing is that when I made them the first times in Michigan, I was using just regular bleached white sugar, the kind that is finely granulated. Whereas now I have been using organic, unbleached cane sugar that has granules which are definitely larger.
Also, just to note…the cookies that I am making in Nova Scotia, still taste great and the dough tastes great. They are just raised and don’t ever really spread as thin. I read your comment on an earlier post, where you said that if you refrigerate less, they will spread more. Do you think that’s a good option if there’s no other answer?
Jessica Gavin says
Hi Scott- Thank you for making the cookies, multiple times! I think you should first try using the granulated white sugar. As you are creaming the butter and sugar that helps the cookie dough soften and create more spread. I wonder if the larger granules aren’t dissolving as much, creating a more puffy and thicker texture. If that doesn’t work you can try allowing the cookies to come to room temperature before baking to make it spread more, or flatten the dough slightly for thinner and crispier cookies. Also, you can shape and allow the cookies to refrigerate for 24 hours, giving the ingredients more time to meld for a flatter and crispier cookie. As for weather, I’ve read those extremely humid rainy days won’t make cookies rise as much and have a more crisp exterior, but that’s what you like. Lots of things can happen at a higher altitude which has lower altitude. Are you at a higher altitude? Sometimes leavening agents rise quicker, so you may have to adjust your input. Start with changing back to white sugar, and let’s go from there. Let me know how it turns out!
Scott says
Don’t know why it’s taken so long to respond, but yes I think it was just the sugar. I switched back to white sugar and it did the trick. Also as you suggested, I put the dough in the oven immediately after pulling it apart and putting it back together. Having the dough a little closer to room temp instead of putting it in the fridge one more time made them spread more! Thanks so much
Jessica Gavin says
Thank you for responding back Scott, so happy that the tweaks worked for the cookie.
Christine says
Thanks so much Jessica for creating the perfect yummy chocolate chip cookie recipe! My 14 year old daughter wanted to make cookies and so I told her to try your recipe…she had so much fun making it and loved your food video. I told her your are a food scientist so I especially told her to read the food science tips too. Loved the crunchy edges and chewy insides!
Bella says
Hi,
I have made your delicious cookies no joke, four times now, and I am going to make them again soon ;)) Right now I do not have regular chocolate chips, only the mini ones. How many cups of chocolate chips should I put in? And while I am writing this, I am SERIOUSLY craving them so bad ???????????? Gooey, fudgy, chewy cookies… and also, will the regular-sized cookie look weird with mini chips?
Thanks,
Bella
Jessica Gavin says
Whoo hoo Bella! Love hearing that you are a fan of the recipe 🙂 I would start with 1 cup and gently mix that in, and then see if you want to add more. The smaller chips will disperse more throughout the dough, so you may not need as much. The chocolate won’t be as gooey but you will have more chocolate flavor in each bite! It won’t look weird, but you won’t be able to see the chips on top unless you press some in before baking. Let me know how it goes!
Ana says
hi! I was wondering if I could freeze the dough? Should I defrost the cookies overnight in the fridge or how so?
Jessica Gavin says
Hi Ana- Yes you can freeze the dough. Just portion them out and freeze on a sheet try, then place in to a resealable plastic bag. You can bake them straight from the freezer, which make require a few more minutes of bake time. You can also defrost the night before in the fridge on a plate, then transfer to a baking sheet.
Krystal Chavez says
Would it be ok to use light brown sugar?
Jessica Gavin says
Hi Krystal- Yes you can use light brown sugar, it will just have less of a molasses flavor.
Isabelle says
Hi Jessica!
I made your cookies a while ago, and they were absolutely A M A Z I N G! But I made them today again, and they turned out slightly cakey, and did not crackle on the top like last time. The last time I made these, the butter, sugar mixture was very golden, but this time very pale. Instead of spreading out, they stayed as they were and resembled a scone-like top. Any suggestions on what might have gone wrong?
Regards,
Isabelle
Jessica Gavin says
Sound like a cookie conundrum Isabelle! If the cookies were cakier with little spread, I wonder if the measurement of flour was correct? Could you have possibly added more than last time? When you mixed the butter and sugar, did you use the same procedure and time? When the butter looks paler, it’s due to the incorporation of air. Maybe you used a higher speed? Did you allow the mixture to rest in between mixings to allow the sugar to dissolve? This gives the nice crackly top. How does your oven temperature look? Sometimes if it’s too hot the proteins in the cookies with set and not allow for as much spread. Also, could you have possibly used baking powder instead of baking soda? The baking soda helps with spread and a crackly top. Let me know what you find!
Inge says
Hi Jessica,
Thanks for sharing the recipe! I’ve tried many recipes and this one is the best! My family loves it.
Did you ever try to make the cookie a bit smaller, if yes, can you advise the baking time?
Thanks!
Jessica Gavin says
You’re welcome! Yes! I would make 1 1/2 tablespoon sized cookies. Add a couple chips on top for a prettier surface right before baking. Bake for about 9-10 minutes (bake 5 minutes, then rotate the pan. Bake 4 minutes additional for a softer cookie, 5 minutes for more crisp. Cool on pan for 3 minutes then transfer to a cooling rack). The edges should be golden brown but the centers may look slightly under baked. The cookies solidify more as it cools. If you bake the cookies until the entire cookie looks golden on the surface, it will get too crispy and burn on the bottom. Let me know how it goes!
Sam says
These have become my go to cookies! Thank you! 🙂
Always perfect. They do turn out a little underdone in the center, but I like them that way. It keeps them super chewy and fresh tasting.
Jessica Gavin says
Thank you Sam! I like it a little underdone too 🙂
Darcy says
These are exactly what I was looking for a hint of crisp with a gooey center. Perfection
Jessica Gavin says
Yay Darcy! I hope there are no cookies left 🙂
Ren says
Seriously. THE BEST I have ever made. Friends and family said the same.
Thank you so much!
– Ren
Jessica Gavin says
Yay Ren! So happy to hear that the recipe was a hit 🙂
Annette says
I have to say I made these cookies and they are fabulous. I have been looking for a cookie recipe that doesn’t come out like a hockey puck lol. My husband absolute loved these cookies. I had to hide them from him and my childern. I was wondering if you have a oatmeal raisin cookie recipe just as yummy.
Jessica Gavin says
Thank you for your feedback Annette! I don’t have an oatmeal raisin cookie, but it sounds like I should make one!
Jessica Peña says
Hi Jessica,
I have to tell you that I am OBSESSED with these cookies! I always make cookies for my family for Christmas and they all agreed that these are the the most delicious cookies! I doubled the recipe, used all organic ingredients and the cookies came out perfectly. I’m cooling a batch now to take to a New Year’s party tomorrow. Keep up the phenomenal job and have a blessed 2017!
Thanks,
Jess
Jessica Gavin says
Yay Jessica! I’m so happy to hear that your family are enjoying the cookies 🙂 Keep sharing the love! Happy new year!
Judy Caywood says
Hey Jessica,
I printed to make this week to take with us to Pismo Beach. I wanted two types of cookies and I have been wanting to find time to bake and use your cookie recipes. These look wonderful. Also making the peanut butter and jelly recipe.
Thank you for a wonderful 2016 of recipes. Wishing you and your family many blessings in 2017.
Judy
Jessica Gavin says
I can’t wait to hear what you think Judy! Your family is going to LOVE all of the cookies and goodies you make for them. I used to go to school in San Luis Obispo so I know where you are headed, such a pretty beach town! Thank you for your positive support, looking forward to sharing more recipes with you in 2017!
Amy says
I’m always on the hunt for chocolate chip cookies. And I cant wait to try your version! Thanks Jessica!
Jessica Gavin says
I can’t wait for you to try it Amy! Perfect to share this holiday season 🙂
Carlos says
This my third time baking cookies, and I finally got the result I wanted. Delicious and soft cookies 🙂
Recipe is great and easy to follow.
My cookies might be a little bit underdone in the center, next time I will give them an extra minute ;).
Thank you for sharing this wonderful recipe
Carlos
Jessica Gavin says
Yay Carlos! I’m so happy to hear that you enjoyed the recipe. It took me a few times too to figure out just the right time to remove from oven. I always over bake, but these cookies a perfect with just a slight under bake in the center 🙂
Cyndi says
I had a little bit of a problem making these last night. The dough was very greasy and wet when I took them out of the fridge. The dough looked exactly like yours until the flour mixture. I had the dough at 65 when I took them out of the fridge and 68 by the time I finished rolling them. They ended up way more flat then the pic. Did you scoop your flour or do you spoon it into the measuring cup? I spooned it and was wondering if that was my problem. Do you have the gram weight of the flour? Did you use 219 grams? They tasted good but had to take them out of the oven at 7 minutes because they were so flat.
Jessica Gavin says
Hi Cyndi- Thanks for the feedback! There is a metric tab in the recipe card that provides the gram amount. Typically I up the “dip and sweep”, aka the scoop and level method. This gives slightly more flour. I add 248g of flour, which sounds like could be the problem of why your cookies were a little flat and greasy. Let me know how to next batch goes!
Melanie says
I put these cookies in a mini cupcake tin, with caramel and hersey’s kiss centers. Other recipes I’ve used come out a little cakey, but this one was perfectly moist and chewy! Though the caramels sank to the bottom, no worries. Still pretty good.
Jessica Gavin says
Wow what a great idea! Maybe you could add the candy halfway through cooking so the cookie sets a little and doesn’t sink?
Kathy Valdes says
Delicious! I slightly cut the granulated sugar and the quantity of chocolate chips to reduce sweetness but the results were wonderful. Thanks for sharing!
Jessica Gavin says
Yay Kathy! How much sugar and chocolate did you reduce? Would love to hear a slightly healthier yet still yummy version 🙂
Jan. H. says
Your recipe called for dark brown sugar, and I used organic because that’s what I generally use – the dough was sticky and it was impossible to form those 16 portions and tear them apart. I had to settle for approximate and then putting them in the refrigerator. I hope I will be able to form them better in an hour when I take them out.
Also, could you possibly give weights? I didn’t know what you meant by a cup and a half of chocolate chips – as measured, or as weighed? It will be different based on which chocolate chips you use.
Bittersweet chocolate chips can be 46 percent cocoa to fifty or even sixty something. I went with a mix of two kinds.
I’ll pause here and finish this note when the cookies are done.
* Okay they’re done.
They seem to have come out well. They are a touch on the not sweet side, could this be due to organic dark brown sugar? I refrigerated them for almost two hours. It’s interesting, the first tray ended up thin and the second tray more like your cookies – the difference was time in the refrigerator.
I wonder why they were as sticky and hard to form? The only other difference was vanilla paste instead of extract on a 1 for 1 basis, as directed by every resource I could find. Vanilla paste has a richer vanilla taste in my limited experience, but it’s still the same amount of liquid.
Any ideas?
Also it took considerably longer, but that may be because I’m not fast in the kitchen 🙂
Jessica Gavin says
Hi Jan- Thank you so much for sharing your experience! I find it really fascinating what happens in different people’s kitchen, and what you are experiencing is food science in action! I don’t think that organic vs. not organic sugar will affect the sweetness. How much did you pack the brown sugar? What kind of chocolate chips did you use? I recommended semi-sweet which will be sweeter than bittersweet chocolate. I think that the spread you are seeing in the first tray is due to spread affected by time in the refrigerator. Chilling the cookie dough controls spread, because it solidifies the butter in the cookies. Cooler butter causes it to take longer to melt than warmer batter. More chilling equals less spread. Also the longer the dough is allowed to chill, the more liquid can be absorbed by the sugar, binding up any free moisture to reduce the amount of spread. I’ve added a note to the recipe to refrigerate of freeze the dough for 15 to 30 minutes, if you are having trouble with sticky batter. I’ve found this tip has helped me because the batter gets really warm after mixing making the dough more sticky from the warm sugar. Don’t let it completely harden, just enough so it’s easy to scoop and shape. These cookies need a little more TLC, but the results are so yummy! I appreciate your time for making this recipe!
Brian Leister says
You altered the recipe!!!! Baking is science. If you don’t follow the exact recipe- you will not get the correct results!!!! So you messed it up.
Courtney says
Has anyone tried doubling or tripling the recipe? Just wondering if it changes the texture of the cookies. Thanks!
Jessica Gavin says
Hi Courtney! I’ve tried doubling the recipe once for my son’s birthday. If you have a large mixer I think it will work. Just make sure to chill the cookies, or even better to let them chill over night.
Joy says
Can I add pecans to this recipe without adversely affecting the chewiness? Also, I want to send some to my daughter, who’s away at college. How well do you think they would mail?
Jessica Gavin says
Hi Joy! Yes, you can absolutely add pecan. I would add 3/4 cup roughly chopped pecans and stir them in with the chocolate chips. I would package them in a tupperware container or tin box and add in tissue paper so the cookies don’t move around when shipping, then tape the lid down. Try to overnight if you can, then she can enjoy them sooner 🙂
Joy says
Hi, Jessica! Just wanted to let you know my daughter came home from college and I made these cookies (with nuts) for her. We absolutely loved them! I made her two batches to take back with her and her apartment roomies loved them too. This is my new go-to chocolate chip cookie recipe…thank you for sharing!
Jessica Gavin says
Yay Joy! I’m so happy to hear that your daughter loved the cookies and she gets to take some back and share 🙂 I remember when my roomies would bring back home cooked meals and shared them, it was the best! I’m sure there will be more cookies in the works for you around the holidays! Happy baking 🙂
Jess says
Just wanted to let you know these are hands down the BEST chocolate chip cookies I have ever made, and I’ve tried lots of different recipes! Thank you much – this recipe will be bookmarked for many yummy future uses!
Jessica Gavin says
Wow Jess! That is so awesome, you made my day 🙂 I’m so happy to hear that you enjoyed the cookies!
Leslie | Bessie Bakes says
Just wanted to pop in a say I made these cookies last night for my husband and two of our friends and the consensus was….SUCCESS! We all loved the chewy, gooey texture and crispy edges. I added a little Maldon sea salt on top of the cookies which was SO good too. I actually made the Cook’s Illustrated cookies using this same technique a few years ago, but I liked yours better! The mixing technique definitely makes the cookies taste more “caramelized” which is really lovely. We will definitely make these again. Have a great day 🙂
Jessica Gavin says
Yay Bessie! Thank you SO much for trying the recipe. I’m thrilled to hear it was a success! I made a video today for the recipe and should be published soon to spread the cookie joy. Yes that mixing step is pretty intensive but it really make a difference in the taste and texture. I had to share mine with my neighbors so I didn’t eat them all by myself 🙂
gracie Marlowe says
These cookies are bae. I been looking for chewy cookies forever
Jessica Gavin says
Thank you Gracie! I made some today a I totally agree that they are super tasty 🙂
Tiann says
Hi would it make much of a difference if I a added maybe a half cup of peanut butter?
Jessica Gavin says
Hi Tiann! I have not tried adding peanut to this recipe. I would add it during the step where you cream the sugar and butter together. I would guess that it would have a nice peanut flavor and a little more dense. Let me know how it turns out!
Kai says
Note on those suggestions! 🙂 How do I replace the white sugar with xylitol/splenda? Like for 1/2 cup white sugar, how much xylitol/splenda so I replace? Thank you! 🙂
Jessica Gavin says
Hi Kai- Great question! Typically you can replace 1:1, but make sure to read the package instructions. I would not replace ALL of the sugar and brown sugar in the cookie for the xylitol, just the granulated sugar if you go that route. Let me know how it goes!
Kai says
Hi Jessica! I’m not much of a sweet tooth, would it be possible that I adjust the granulated sugar from 1/2cup to 1/4 cup? and the packed brown sugar from 3/4 cups to 1/2 cup? Would it change the texture of the cookie? 🙂
Jessica Gavin says
Hi Kai! I think reducing those sugars would greatly reduce the chewiness of the cookie. You could try it but the cookie will be very different, perhaps more cakey. Are you looking for it to just be less sweet or reduce calories?
Kai says
I see, I plan to opt for lesser sweetness and make it healthier 🙂 Thank you for that! Any suggestions? 🙂
Jessica Gavin says
Hi Kai- I was just thinking an option could be to make smaller cookies so you can have portion control and not change the texture as much? You could also experiment with the reductions you suggested, but I’m not sure how it will taste. I’ve recently been trying a xylitol sweetener called xylo sweet to replace sugar in cupcakes. You couldn’t even tell sugar was replaced! Perhaps you could try that to replace some or all of the granulated sugar. There are other products like truvia and some splenda baking sugars you could try to replace sugar. I would recommend leaving the brown sugar if possible to keep some of the chewiness. Nothing beats sugar, but it would be a fun experiment to play around and see what you discover 🙂
Heike says
I love to bake and do so usually sucessfully, have attempted 5 of the ‘best chocolate chip’ recipes I’ve found online and they have all turned out terrible and totally opposite of the description despite following directions 100%, I almost gave up and decided I’d give this one a try..they came out absolutely perfect! Crispy edges with a chewy gooey center, next time I’d like to try organic dark brown sugar, hopefully the coarseness works out well! Thank you so much for posting this recipe!
Jessica Gavin says
Wow Heike, this is an amazing compliment, especially since you’ve tested so many recipes! I’m so happy that the recipe gave you the textures you were looking for. Let me know how the organic dark brown sugar works for you! Comments like this keep me motivated 🙂
Raquel @ My California Roots says
These look absolutely perfect, Jessica!
Jessica Gavin says
Thank you so much Raquel! That means a lot coming from you 🙂
Brandon says
These are the best cookies ever. Every time I make them, people freak out and say it’s the best they’ve ever had. A couple years ago I started sprinkling a little kosher salt on the top right after they came out the oven. WOW! It takes them to another level.