
These homemade crepes are super thin and pliable, just like French restaurant-style pancakes. They are perfect for filling or topping with sweet or savory ingredients.

Jessica’s Recipe Science
- Mixing crepe batter until smooth ensures the flour particles are fully hydrated, creating a thin, uniform consistency that spreads evenly in the pan.
- Resting the batter for at least 30 minutes allows the gluten to relax and the starches to swell, resulting in tender, pliable crepes.
- Cooking crepes over medium heat ensures they cook quickly and evenly, developing a delicate, lightly browned surface through the Maillard reaction.
Featured Comment 4
“Those are very helpful tips for making crepes. Thanks Jessica.”—Bel C.
Why It Works
Crepes are a delicate and buttery French-style wrap that’s easy to prepare. They may seem reserved for fancy cafes, but you can make the batter from common kitchen staples you already have. The thin pancakes are ideal for customizing with your favorite toppings or fillings.
Learn how to make sweet or savory crepes with my simple step-by-step instructions. You can whip them up by hand, or I’ll show you a quick blender method. After practicing the technique, you’ll be a pro in no time!
Jump To a Section
Ingredients You’ll Need

- All-purpose flour: Provides the structure and base for the crepe batter. I use all-purpose flour for the base. It contains about 10 to 13% protein, depending on the brand. This type of flour has just the right amount of protein to create a flexible structure without being tough and rubbery.
- Granulated Sugar: Adds a touch of sweetness to the crepe batter.
- Kosher Salt or table salt: Enhances the flavors of the other ingredients.
- Eggs and Butter: The lipids coat the flour proteins, preventing the texture from becoming tough. They also make it easy to lift off the pan. The fat allows them to stack nicely, stay separate when making a batch, or store in the refrigerator.
- Whole Milk: This recipe uses whole milk and water to dilute the milk fat. The result is a light, tender, flavorful crepe—using all water lacks body, texture, and taste. You can use only milk, but the extra fat will make the texture heavier and denser. I recommended using 2% milkfat if going that route.
- Water: Helps to thin out the batter, ensuring the crepes are light and delicate.
- Vanilla Extract: Adds a subtle, sweet flavor and aroma to the crepes.
See the recipe card below for all ingredients and measurements (US and metric).
Ingredient Substitutions
- Unsalted Butter: Substitute with melted coconut oil or vegetable oil for a different flavor profile.
- All-Purpose Flour: Use whole wheat flour or a gluten-free flour blend to accommodate dietary preferences.
- Granulated Sugar: Replace with honey, maple syrup, or a sugar substitute like stevia for an alternative sweetener.
- Whole Milk: Use almond milk, soy milk, or oat milk for a dairy-free option.
- Vanilla Extract: Substitute with almond extract or a dash of cinnamon for a different flavor twist.
How to Make Crepes
Step 1: Melt the Butter
Microwave 2 tablespoons of butter on high power in 30-second intervals until just melted, stirring to dissolve any pieces. It should not exceed 140ºF (60ºC) when added to the batter, or the eggs will curdle.

Step 2: Make the Batter in a Blender
First, I add the liquid ingredients, eggs, milk, water, and vanilla extract, which prevents dry spots on the bottom of the cup. Next, add the dry ingredients.

Using the high shear movement of the blades in the blender cup creates a smooth consistency in a minute or less. Process at medium speed to hydrate the flour and activate the proteins to form gluten bonds.

Step 3: Strain the Batter
Straining helps to remove any flour clumps or big bubbles that form during processing. Large air pockets can weaken the batter, making it more susceptible to tearing.
Pro Tip: After straining the batter, chill and rest it for at least 1 hour before cooking to allow the gluten proteins to relax so the texture doesn’t become rubbery. The starches in the flour absorb the liquid to thicken the batter slightly, yielding a delicate texture. Resting also allows the sugar and salt to dissolve fully, which better seasons the crepe.
The hydrated flour thickens over time, so I add a small amount of water to the batter before cooking to thin out the consistency. The batter should be similar to whipping cream. The batter can be made one day in advance and stored in an airtight container in the refrigerator.
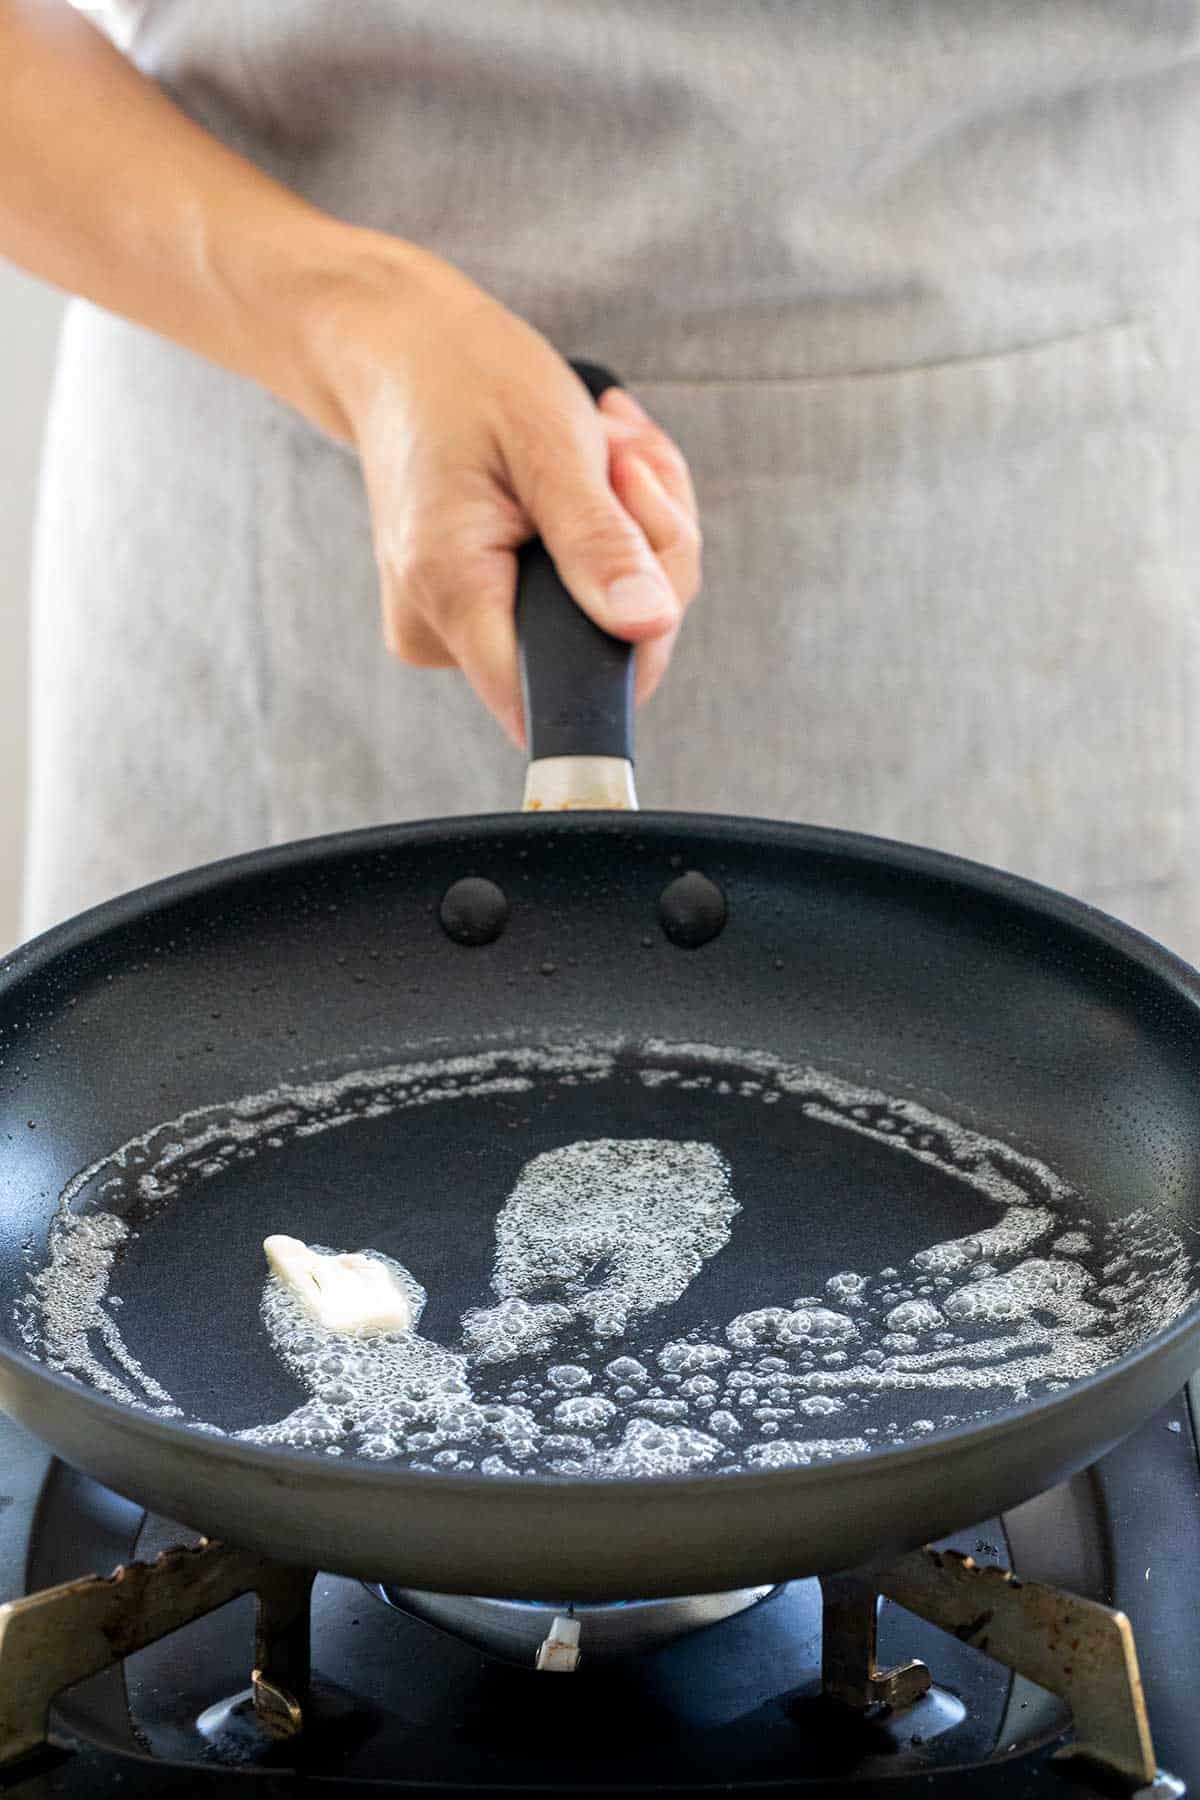
Step 4: Grease the Cooking Surface
I prefer to use unsalted butter to cook the batter. Add about ½ teaspoon and let it coat the pan, then wipe most of it off, leaving a thin film. The butter has milk solids that lightly brown, creating a nutty, toffee-like flavor on the surface of the crepes. It also helps the edges be slightly crisp for a nice contrast of textures.
Tips for Perfect Execution: Wipe down the pan between batches, adding more butter each time. If you reuse the butter, the solids will become burnt. You can brush clarified butter or ghee into the pan, free from milk solids. It won’t brown as quickly on the surface, but it will still add good flavor. Alternatively, use vegetable oil or another neutral-tasting oil like avocado or coconut.

Step 5: Add the Batter
For a 10-inch pan, use ¼ cup (60ml) of batter. The crepe-making technique is simple, but you must work quickly once the batter is in the pan. Heat over medium heat, grease, then pour the batter at the 6 o’clock position.

Tilt the pan downward to coat, swirl to the left or right, letting it stream across the surface to cover the bottom completely, then tilt back up. You can always pour a small amount of batter in any holes that don’t get filled.

Step 6: Cook the Crepes
The crepes will steam but should not smoke. Take the pan off the heat and adjust the temperature if needed. Cook until the edges start to pull away from the sides, about 1 minute. You’ll notice the batter puffing up a little. That’s the eggs naturally leavening the dough, so it stays light but flat.

Once flipped, the crepe will only need an additional 10 to 30 seconds to cook thoroughly. The final product should be thin, flexible, and lightly brown on each side. Do not overcook, or it will get harsh and brittle.
In between batches, don’t let the pan sit over the burner too long and smoke. It will brown the crepes too quickly. If needed, turn the heat down or off.

Step 7: Keeping Warm Between Batches
The heat from each cooked crepe being layered on a plate should keep them nice and warm. However, to rewarm, you can place a damp paper towel over the plate of crepes and microwave them for about 30 seconds before serving.
Alternatively, reheat in a skillet over medium heat for about 30 seconds per side. You can serve crepes warm or cool, depending on the toppings and fillings.
Savory Fillings
- Crepe batter whisked with mixed herbs like chives, parsley, basil, or thyme
- Melted brie topped with warmed cherry tomatoes and yogurt herb dressing
- Crab with cheddar bechamel sauce
- Fill with cream cheese
Dessert Crepes
- Peanut butter, caramel sauce, and banana
- Jam-filled, like boysenberry or apricot
- Freshly squeezed lemon juice and granulated sugar
- Top with whipped cream or powdered sugar
- Crepe Suzette

Frequently Asked Questions
Both use a pourable, flour-based batter cooked in a skillet to create a round shape. Crepes use only eggs as a leavening agent, producing light and tender flat cakes that can be flavored sweet or savory. Typical homemade pancakes use chemical leavening agents to help puff up the batter, creating taller, fluffier cakes that are lightly sweetened.
Crepes are so popular that special crepe pans have been constructed to make them. They typically consist of steel or aluminum, with shallow sloped sides. Some even come with a spreader for the batter. I find that you can use a 10-inch non-stick skillet and get round, thin crepes with even thickness. You can also use an 8 or 12-inch pan. I use 3 tablespoons for the smaller size and 5 tablespoons of batter for the larger one.
The high ratio of liquid-to-flour in the crepe recipe keeps the texture tender instead of tough—the water and milk help hydrate the flour proteins and then dilute the gluten formation. The egg yolk and butter fat prevent the gluten from binding together so tightly. These French pancakes are thin, tender, and flexible with some chew.
Add 1 tablespoon of granulated sugar and 1 teaspoon of vanilla extract to the batter for sweet crepes. For savory crepe fillings, omit the sugar and vanilla, and increase the salt to ¼ teaspoon. You can also add freshly chopped herbs like chives, tarragon, green onions, parsley, and chervil.
Yes. In a medium bowl, add the flour, sugar, and salt. In a separate medium bowl, whisk the eggs. Add the milk, ½ cup water, vanilla extract, and whisk to combine. Make a well in the flour mixture. Add the melted butter. Gradually add the wet mixture, stirring until a smooth batter forms.
More Crepe Recipes


If you tried these Homemade Crepes, please leave a 🌟 star rating and let me know how it went in the 📝 comments below!
Homemade Crepes

Ingredients
- 2 tablespoons unsalted butter, plus more for cooking
- 1 cup all-purpose flour
- 1 tablespoon granulated sugar
- ⅛ teaspoon kosher salt, or table salt
- 2 large eggs
- ¾ cup whole milk
- ¾ cup water, room temperature, divided
- 1 teaspoon vanilla extract
Instructions
- Melt the Butter – Microwave 2 tablespoons of butter on high power in 30-second intervals until just melted, stirring to dissolve any pieces. It should not exceed 140ºF (60ºC) when added to the batter, or the eggs will curdle.
- Make the Batter in a Blender – Add the eggs, milk, ½ cup water, vanilla extract, flour, sugar, salt, and melted butter to the blender. Mix on medium speed until smooth, about 40 to 45 seconds.
- Strain the Batter – Strain the batter into a medium bowl to remove any large bubbles and flour clumps. Cover and refrigerate for 1 hour. The batter should be like milk after chilling. If needed, whisk in 1 tablespoon of water at a time to thin out the consistency.
- Grease the Pan – Heat a 10-inch nonstick skillet over medium heat for 1 minute. Add ½ teaspoon butter, swirling to coat. When melted, wipe the excess off with a paper towel. A thin film of butter should be left in the pan, coating the bottom and sides. Alternatively, brush on a thin layer of melted butter with a silicone pastry brush.
- Add the Batter – Add ¼ cup (60ml) of the batter to the 6 o’clock position of the skillet. Moving quickly, lift the skillet, tilt it slightly to coat the pan, and then swirl it several times in a circular motion to create a thin layer that evenly covers the entire bottom. Fill in any holes with additional batter as needed.
- Cook the Crepes – Place the pan back over the heat. Cook until the edges of the crepe pull away from the skillet, lightly brown, and crisp, about 45 seconds to 1 minute. Adjust the heat as needed. Use a spatula to flip. Cook until the other side sets, about 10 to 15 seconds. Transfer onto a plate. Clean the pan and add a thin layer of butter between each batch.
- Keep Warm – Stack the crepes on each other to keep warm while making the next one. Loosely cover with foil if needed. Serve warm or cool with desired toppings.
Recipe Video

Notes
- For Savory Crepes: Omit the sugar and vanilla extract. Increase salt to ¼ teaspoon.
- Sweet Crepe Alternatives: Instead of granulated sugar, try brown sugar or pure maple syrup for a caramel flavor, honey, coconut sugar, date sugar, or agave syrup.
- Make the Batter by Hand: In a medium bowl, add the flour, sugar, and salt. In a separate medium bowl, whisk the eggs. Add the milk, ½ cup water, vanilla extract, and whisk to combine. Make a well in the flour mixture. Add the melted butter. Gradually add the wet mixture, stirring until a smooth batter forms.
- Measuring the Flour: If you don’t have a scale, use the dip and sweep method. Dip the measuring cup into the flour, then level the surface with the back of a knife.
- Pan Size: For an 8-inch nonstick pan, grease with ¼ teaspoon butter and 3 tablespoons of batter (about 13 crepes). For a 12-inch nonstick pan, grease with ¾ teaspoon butter and 5 tablespoons of batter (about 8 crepes).
- Greasing the Pan: Instead of butter, try vegetable oil, avocado oil, clarified butter, ghee, or coconut oil.
- Making Batter in Advance: Store in an airtight container for up to 1 day. It may separate as it sits—mix before using. Whisk in about ¼ cup of water to dilute.
- Storing: Cool the crepes entirely and stack them on a plate, cover tightly with plastic wrap, then foil. Alternatively, place it in a resealable plastic. Refrigerate for up to 3 days.
- Freezing: Place parchment paper between each crepe. Cover tightly and place on a plate in the freezer or a large resealable plastic bag for up to 1 month. Defrost in the refrigerator the day before using.
- Reheating: In the microwave, place a damp paper towel over the plate of crepes and microwave for 30 seconds. In a skillet, reheat over medium-low heat until warmed through. In the oven, place on a sheet pan covered with aluminum foil and warm at 275°F (135°C) for about 10 minutes.
Nutrition Facts
Percent Daily Values are based on a 2000-calorie diet. All nutritional information is based on estimated third-party calculations. Each recipe and nutritional value will vary depending on the brands you use, measuring methods, and portion sizes per household.


Marj says
I’ve often wondered about the difference between crepe and pancake recipes, and now I know, so thank you. Many years ago Mum always made what she called pancakes (in Australia) and they were great – small like a pancake but very flat like a crepe and with crispy edges, we kids loved them. Unfortunately I didn’t ask for her recipe, and she eventually forgot the list of ingredients. I followed the standard pancake recipes out there and wondered why mine didn’t turn out the same as hers, and now I think I know why, her recipe must have been more like a crepe recipe (no leavening). So now I can once again try to make Mum’s pancakes and hopefully get it right!
Jessica Gavin says
I’d love to hear if you try my crepe recipe and if it tastes similar to mums!
Bel Canosa says
Those are very helpful tips in making crepes. Thanks Jessica.
Jessica Gavin says
Great to hear from you, Bel! Glad to hear that the crepe tips were helpful. Enjoy!