
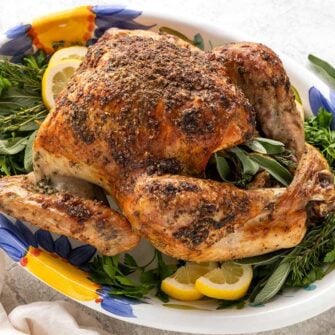
This step-by-step guide shows you how to spatchcock turkey like a pro! Butterflying the bird evenly cooks the meat while cutting roasting time significantly. Try this method if you like golden brown, crispy skin, and juicy slices!

Jessica’s Recipe Science
- Spatchcocking flattens the turkey, allowing even heat exposure to all parts. This prevents overcooking or underdone spots.
- Roast the turkey over root vegetables. The aromatics enhance flavor while the moisture prevents the drippings from burning.
- Roasting at 450ºF accelerates cooking by increasing surface area exposure, resulting in evenly crisp skin and moist breast meat.
Featured Comment 19
“I did this last year, dry brined the bird…was great. I always use the “veggie base” in my gravy…put it in the blender with the drippings ….puree and voila!!! Rich and tasty and with the veggies is “almost healthy” LOL”—Cathi
Why It Works
While a whole-roasted turkey is a Thanksgiving tradition, spatchcocking, or butterflying, offers a great alternative. This method ensures flavorful, tender, and juicy pieces with several benefits for the home cook.
Removing the backbone so the turkey lies flat in the pan allows even exposure to the oven’s heat. This eliminates the stress of ending up with dry pieces and constantly monitoring the doneness of the light and dark meat. The roasted turkey will be ready from start to finish in less than two hours.
Jump To a Section
What is spatchcocking?
Spatchcocking is simply cutting the long backbone out of the turkey, pressing down on the breastbone, and breaking it to help the bird lay flat. It takes a little effort upfront, but the right tools make the job easy.
The backbone can be cut out using a sharp chef’s knife. However, I recommend investing in poultry shears. The elongated serrated steel blades make it a lot easier to cut through the bone.
Ingredients You’ll Need

- Turkey: Spatchcocking works best with different types of turkey between 12 to 14 pounds in weight. This range is due to being able to fit the entire bird in the roasting pan or sheet pan once it’s flattened and splayed out. In case you buy a frozen bird, here’s how to thaw a turkey.
- Vegetables: The turkey is roasted over a bed of onions, carrots, celery, garlic cloves, and thyme. The aromatics in the vegetables add to the dish, and the moisture prevents the turkey drippings from burning.
- Seasoning: The turkey is seasoned with salt and pepper to enhance the flavor of the meat. Melted butter is brushed on the surface for flavor, color development, and as a fat protective layer from losing too much moisture as the bird cooks.
See the recipe card below for all ingredients and measurements (US and metric).
Ingredient Substitutions
This spatchcock turkey recipe is easy to customize! Try these delicious options:
- Seasoning Swaps: Dried herbs like Italian seasoning add concentrated flavor to the skin. For a spicy kick, try my cajun seasoning recipe. Add Mexican-inspired flavors with taco seasoning.
- Butter Substitutes: Try margarine, olive oil, avocado oil, or vegetable oil.
- Vegetables: Switch up the bed of vegetables with bell peppers, corn cobs, whole mushrooms, parsnips, turnips, brussel sprouts, baby potatoes, or beets.
- Herbs: Add sprigs of rosemary
How to Spatchcock Turkey
Step 1: Dry the Turkey
Use paper towels to dry the surface and cavity of the turkey. This prevents the bird from moving around as you cut. Drying the inside prevents as much mess once it’s opened up. Remove the neck and giblets. This can be used to make a stock or added to flavor turkey gravy.

Step 2: Remove the Backbone
Place the turkey on the cutting board, breast side down. Starting at the tail end, use poultry shears to cut along one side of the backbone through the rib bones, avoiding the thigh bone until you reach the neck.

Carefully repeat the cutting process along the other side of the backbone until it’s completely removed. Use your hands to open up the turkey. Trim off any excess skin.
Tips for Perfect Execution: Poultry shears make cutting through the bone quick and easy. A sharp chef’s knife is a good alternative, but take your time!

Step 3: Flatten the Turkey
Turn the butterflied turkey over with the breast side facing up. Grab the turkey legs and turn them so they are spread out. Place both hands on top of the ridge of the breastbone. Forcefully push down, and you’ll hear a crack or two.

This technique breaks the bone so that the turkey lays flatter. Now, tuck the wing tips back and flatten the legs. Congrats! You just spatchcocked a turkey. Easy right?
Experimentation Encouraged: If the turkey has not been basted, you can brine it for extra flavor. I like to dry brine a turkey on a sheet pan in the refrigerator for one day to make the surface more crispy before roasting. If not, move on to the next step.

Step 4: Prepare the Pan
I prefer to use a large-rimmed sheet pan to roast the turkey so it lays out the flattest. However, a large roasting pan works well too. Line it with foil, then scatter a mirepoix of onions, carrots, celery, smashed garlic, and thyme.
The moisture from the vegetables will prevent the drippings from scorching. The caramelized vegetables can also be served as a side dish or added to a soup! Place a wire rack on top of the vegetables.

Step 5: Season the Meat
Dry the surface with paper towels to wick up any moisture. Place it on the sheet pan with the underside facing up. Brush melted butter or olive oil over the interior, then season with kosher salt and pepper.

Flip the bird over, brush with butter, and season the skin. Ensure the turkey legs are splayed out and the bird fits as tightly within the pan as possible. It’s okay for the legs to go over slightly.


Step 6: Roast the Turkey
Roast the turkey in the center of the oven at 450ºF (232ºC). After 30 minutes, rotate the turkey for even cooking. Continue to cook until the internal temperature in the thickest part of the breast reaches 155 to 160 degrees and the thickest part of the thigh reaches 165 degrees to 170 degrees.

Pro Tip: Carve the turkey as you would for a whole bird. It’s easier to cut because the bones are lying flat!


Bonus: Save the Drippings!
In addition to the delicious roasted vegetables in this recipe, the turkey drippings can be used to make a fantastic homemade gravy in just 15 minutes.
Frequently Asked Questions
Spatchcocking a turkey by removing the backbone and flattening it saves time. Laying it flat ensures even browning, faster cooking, and juicy meat. Roasting at 450ºF crisps the skin and keeps the breast meat moist. This technique also works great for quick and delicious roasted chicken on weeknights. I often spatchcock chicken too, making cooking time quick!
You can spatchcock the turkey the night before. This can provide several taste advantages. Storing flat on a sheet pan on a wire rack, uncovered, in the refrigerator dries the surface, making the skin crispier. You could also dry-brine the butterflied turkey in the fridge for a more flavorful taste and crunchier skin.
If you’re doing a wet brine, brine the whole turkey first. For a dry brine, spatchcock first, then dry-brine in the refrigerator. This will also give the turkey a crispier skin.
At 450ºF (232ºC), a 12—to 14-pound spatchcocked turkey takes 70 to 80 minutes to cook.
If you plan on cooking a turkey larger than 14 pounds, it’s best to use a traditional roast turkey recipe for cooking it whole. It’s too big to fit the pan when butterflied. Alternatively, the method is quick enough to roast two smaller turkeys.
Serve This With


If you tried this Spatchcock Turkey, please leave a 🌟 star rating and let me know how it went in the 📝 comments below!
Spatchcock Turkey

Ingredients
- 12 pound turkey, up to 14 pounds
- 2 cups diced yellow onion, cut into 1" dice
- 2 cups carrots, peeled, cut into 1" pieces
- 2 cups celery, cut into 1" pieces
- 2 garlic cloves, peeled and smashed
- 5 sprigs of thyme
- ¼ cup melted unsalted butter, or olive oil
- 4 teaspoons kosher salt
- 1 teaspoon black pepper
Instructions
- Dry the Turkey – Use paper towels to dry the surface and cavity of the turkey. Remove the neck and giblets, and reserve if using for gravy.
- Remove the Backbone – Place the turkey on a cutting board, breast-side down. Starting at the tail end, firmly hold the turkey to secure it, and use poultry shears to cut along one side of the backbone through the rib bones, avoiding the thigh bone, until you reach the neck.Repeat the cutting process along the other side of the backbone until completely removed. Use your hands to open up the turkey. Trim off any excess skin.
- Flatten the Turkey – Turn the turkey over with the breast-side facing up. Grab the legs and turn them so they are splaying out. Place both hands on top of the ridge of the breastbone. Forcefully push down until you hear a crack or two. This breaks the bone so that the turkey lays flatter. Tuck the wing tips back.
- Prepare the Pan – Line a large-rimmed sheet pan with foil. Scatter the onions, carrots, celery, smashed garlic, and thyme on the pan. Place a wire rack on top of the vegetables. No rack is needed if using a roasting pan.
- Season the Meat – In a small bowl, combine the salt and pepper, and set aside. Dry the surface of the turkey with paper towels to wick up any moisture. Place the turkey on the wire rack with the underside facing up. Brush melted butter or olive oil over the surface, then season with kosher salt and pepper.Flip the turkey over. Make sure the legs are splayed out, and the bird fits within the pan. It's okay for the legs to go over slightly. Brush with butter, and season the skin with salt and pepper. You do not need to use all of the seasoning mixture.
- Roast the Turkey – Set the oven rack to the middle position. Heat to 450ºF (232ºC). Roast the turkey for 30 minutes, then rotate the pan for even cooking. Roast until the internal temperature in the thickest part of the breast reaches 155 to 160ºF (68 to 71ºC) on a meat thermometer, and the thickest part of the thigh reaches 165 to 170ºF (74 to 77ºC). This will take about 40 to 50 minutes, depending on the size.Rest uncovered for 20 minutes to allow carryover cooking in the meat. Transfer the vegetables to a serving bowl. The turkey drippings can be discarded or used to make gravy. Carve the turkey and serve.
Notes
- Using Diamond Crystal Kosher Salt: This recipe was developed with Morton Coarse Kosher salt. Increase the amount by 50% for Diamond Crystal kosher salt.
- For Crispier Skin: Lay the spatchcocked turkey on a sheet pan on top of a wire rack overnight, uncovered in the refrigerator.
- For More Seasoned Meat: Dry-brine the spatchcocked turkey overnight on top of a sheet pan on a wire rack uncovered in the refrigerator for 12 to 24 hours before roasting.
Nutrition Facts
Percent Daily Values are based on a 2000-calorie diet. All nutritional information is based on estimated third-party calculations. Each recipe and nutritional value will vary depending on the brands you use, measuring methods, and portion sizes per household.


Donna says
What seasoning do you use to dry brine?
Jessica Gavin says
I use my roast turkey recipe. Combine 3 tablespoons of kosher salt and 4 teaspoons of sugar. Lift the skin from the breast and leg area. Rub 1 tablespoon of the mixture underneath the skin of each breast. Rub 1 ½ teaspoon underneath each leg. Rub the remaining mixture on the cavity.
You can season the surface by combining 4 ½ teaspoons kosher salt, 2 teaspoons baking powder, and 1 teaspoon black pepper, or use your desired seasoning. Evenly rub the mixture on the surface of the breast, wings, legs, thighs, and back. Since you are spatchcocking the turkey, place breast-side up in on a wire rack set over a rimmed sheet pan. Refrigerate uncovered for at least 12 to 24 hours. If brining for up to 36 hours, loosely cover the turkey with plastic wrap after 24 hours.
Shaya says
Hi Jessica,
Can you inject the turkey with a marinade using the dry brining method or is that overkill?
Thanks in advance!!!
Jessica Gavin says
I think you can inject the turkey to flavor further into the meat. Just be careful with the additional salt added to the marinade so that it’s not too salty.
KS says
Hi Jessica, Quick question. What size wire rack and sheet pan did you use in your photos? My turkey will be 14-15lbs. Thank you!
Jessica Gavin says
Hi KS- I used half sheet pan and wire rack. That should fit your 14-15 pound turkey.
Julie says
Hi Jessica, I was wondering if you dry brine the turkey, would you reduce the amount of seasoning you add before roasting?
Jessica Gavin says
Hi Julie- I still add some seasoning to the surface before roasting after dry brining. You can reduce slightly if you usually add a lot more salt.
verna says
I only see 450* do you reduce temp at any point??? Seems high . Did I miss something?
Jessica Gavin says
Hi Verna- Roast at 450 the entire time, tenting the surface with foil if it starts to brown too quickly. Butterflying the turkey cooks it very quickly. You can reduce the temperature to 350ºF after 1 hour of roasting if you have a larger bird or want to roast it more slowly.
Norma says
I have a 15.75 lb. turkey that I want to spatchcock in a huge baking pan. How long would it have to roast at 450* before reducing the heat to 350*? Thank you, Jessica.
Jessica Gavin says
Hi Norma- Since it’s a larger bird, I would roast at 450 for 30 minutes, then reduce to 350 for the remaining cook time. If needed, loosely tent the surface with foil if the skin is getting too brown.
Frank says
Hi Jessica,
450 in a conventional oven, what would the temp be in a convection?
Thanks!
Happy Thanksgiving.
Jessica Gavin says
Hi Frank- Great question! Reduce the temperature to 425ºF for a convection oven. I would also check the turkey for doneness about 20 to 25 minutes sooner. Let me know how it goes!
Jill thomas says
Hi Jess. Can I use your dry brine and spatchcock on a free butterball I received? It may be too large to spatchcock but if it is I may just deconstruct it and cook on sheet that way. Concerned about the solution already in the butterball along with the dry brine. Suggestions. I don’t want to leave it as one whole turkey as it is too heavy and unwieldy for me. Thanks so much.. Jess mom Jill.
Cathi says
I did this last year, dry brined the bird…was great. I always use the “veggie base” in my gravy…put it in the blender with the drippings ….puree and voila!!! Rich and tasty and with the veggies is “almost healthy” LOL
Jessica Gavin says
That sounds delicious!
Stacey Devine says
Hi Jessica, I have already purchased my Turkey 21 pounds. Using the spatchcocked, Could I place the Turkey on two cookie sheets straddling the center, connected with a single piece of foil? I would also place a cookie sheet underneath the center as a drip catcher. Your thoughts would be appreciated!
Jessica Gavin says
You could add two sheet trays, but do a test first to see if they fit in the oven. If the skin starts getting too brown after the first hour, cover with foil so that the skin doesn’t burn. You’ll need to cook the turkey longer. I would recommend cooking for 1 hour at 450-degrees then reduce the heat to 350-degrees to complete cooking for that big of a bird. Cover the surface if needed!