
No need to make a campfire! You can make S’mores cookies with crisp edges and chewy centers anytime. Each bite packs crumbled graham crackers, gooey chocolate chips, and toasted marshmallows.

Jessica’s Recipe Science
- Brown and granulated sugar make the cookies both crisp and chewy by providing moisture and enhancing caramelization.
- Incorporating graham cracker crumbs into the dough adds a subtle, crunchy texture and the distinctive flavor of classic s’mores.
- Marshmallows and chocolate chips melt and caramelize during baking, creating gooey pockets of sweetness.
Jump To a Section
Featured Comment 22
“Good smores cookie recipe! The brown butter is a nice touch.”—Heather
Why It Works
Nothing is more fun than gathering around a fire to make S’mores, but it can turn into a messy and sticky experience. For this year-round campfire-inspired treat, I used my classic chocolate chip cookie and infused it with gooey marshmallows, chocolate, and graham cracker crumbs.
To complement the toasted marshmallows, I use brown butter to add toffee flavors to the cookie dough. It takes only a few extra minutes but completely transforms the taste. Right before baking, I also add extra bits of topping and a mini marshmallow on top. The surface gets lightly browned, just like roasting the pillowy puffs on a stick.
Ingredients You’ll Need

- Flour: All-purpose flour creates structure for the cookies but moderate levels of protein to keep the texture tender.
- Butter: Melted butter adds richness, enhances caramelization, and creates a chewy cookie.
- Graham Crackers: To add a more robust cinnamon cracker flavor to the cookie, crumble them up and stir them into the flour. I like to keep them chunky for a pronounced taste when bitten. However, you can crush the crackers more finely to infuse the flavor throughout the base.
- Chocolate: Hershey’s milk chocolate bars are traditionally broken up and used for S’mores. However, when melted in the oven, they lose their form and become blobs. Instead, I use semi-sweet chocolate chips, which are formulated to hold their teardrop appearance. They keep their shape while becoming melty in the center. You still get the s’mores effect with a stunning presentation.
- Marshmallows: Soft and fluffy mini marshmallows are best. When exposed to the cookie surface, the marshmallows melt as they bake, turning into a sugary liquid. As the sugars dissolve and caramelize, you may notice little toffee puddles on the edges. During cooling, the sugar turns brittle for a crispy texture.
- Sweeteners: I use two types of sugar to create the contrast of crispy edges and chewy centers, just like S’mores. Using crystalline granulated sugar preserves the crisp border and structure of the cookie. Dark brown sugar contains molasses for a caramel-like flavor. It also acts as a humectant, attracting moisture so that the centers stay soft after baking.
- Eggs: Adds moisture and leavening properties and helps to bind the cookie.
- Leavening Agent: Baking soda gives the cookies a lift while making the edges crisp.
- Flavor: Salt balances the sweetness of the cookies. Vanilla boosts the sweet baked aromas.
See the recipe card below for all ingredients and measurements (US and metric).
Ingredient Substitutions
Customize the s’mores cookie recipe with these delicious ideas:
- Chocolate Chips: Use different types of chocolate, like dark, semi-sweet, or milk chocolate chips, or try a mix.
- Chocolate Bars: If you prefer to use a chocolate bar instead of chips, chop it into small pieces to mix into the dough. Due to the extra cocoa butter and fewer emulsifiers and stabilizers, the bar will melt down instead of keeping its shape. Alternatively, press a small rectangular piece of chocolate on top after baking.
- Make it Gluten-Free: Use gluten-free baking flour and graham crackers.
- Flavoring: Instead of vanilla, use almond, caramel, mint, or coconut extract.
How to Make S’mores Cookies
Step 1: Preheat the Oven
Adjust the oven rack to the middle position. Heat to 375°F (191ºC).

Step 2: Mix the Dry Ingredients
Whisk together the all-purpose flour, some crushed graham crackers, and baking soda. This ensures even distribution of the finer ingredients.

Step 3: Brown the Butter
I add browned butter to the cookie batter base to complement the browned sugar’s toffee-like flavor. The process starts with melting unsalted butter and heating it until you smell a nutty butterscotch aroma and see it turn into a golden liquid. To prevent curdling, stir in a few tablespoons of cold butter to reduce the temperature before adding to the eggs.
Ingredient Chemistry: The milk solids toast and lactose caramelize, add a more complex flavor to the treats. You can also try this technique in my M&M cookies and brown butter chocolate chip cookies.

Step 4: Combine the Butter and Sugars
I use a unique mixing technique to enhance the toffee flavor of the cookie. The sugars and warm butter mix to break down the sucrose into glucose and fructose. These monosaccharides can caramelize at lower temperatures, producing a more delicious cookie in just 10 minutes.

Step 5: Mix the Eggs
The whole eggs and yolks add air and richness. It’s essential to mix for 30 seconds, then rest for 3 minutes to let the sugars break down.

This mixing and resting process takes place four times. The melted butter creates a decadent and dense cookie instead of a cakey one.

Step 6: Add the Dry Ingredients
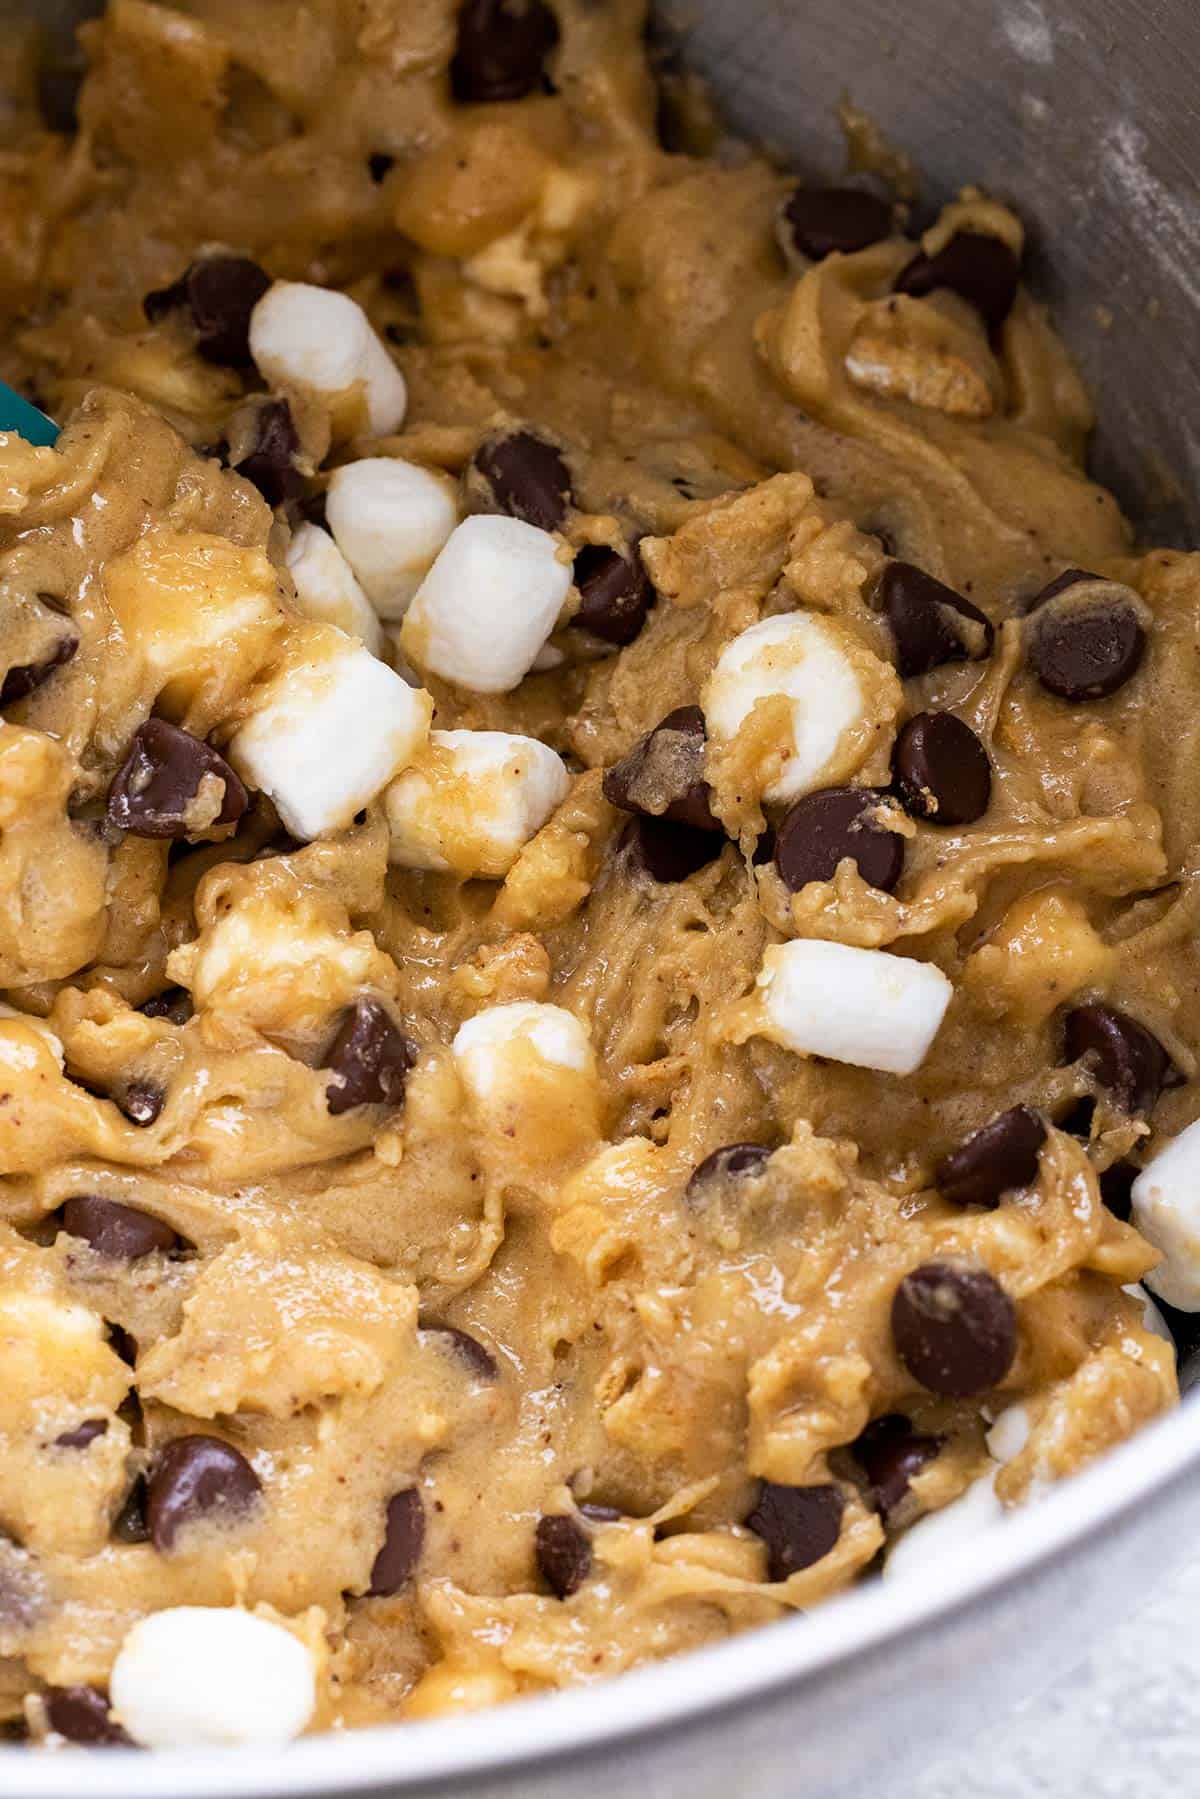
Gently stir the dry ingredients into the butter mixture just to hydrate. Overmixing will cause the gluten in the flour to overdevelop and make the cookies tough to eat. Stir in the chocolate chips and marshmallows.
Step 7: Chill the Dough
Before shaping, cover the cookie dough with plastic wrap and refrigerate for 30 minutes. This makes it easier to roll into dough balls and prevents spreading. The dough should be between 65 and 70ºF (18 to 21ºC) and feel firm.
Step 8: Make Dough Balls
Make dough balls of about 3 tablespoons for crisp edges and soft centers. This size gives a large enough cookie to have contrast from the middle to the sides.

Step 9: To Enhance the Look
For a rustic surface that exposes the chips, break them in half and press them back together.
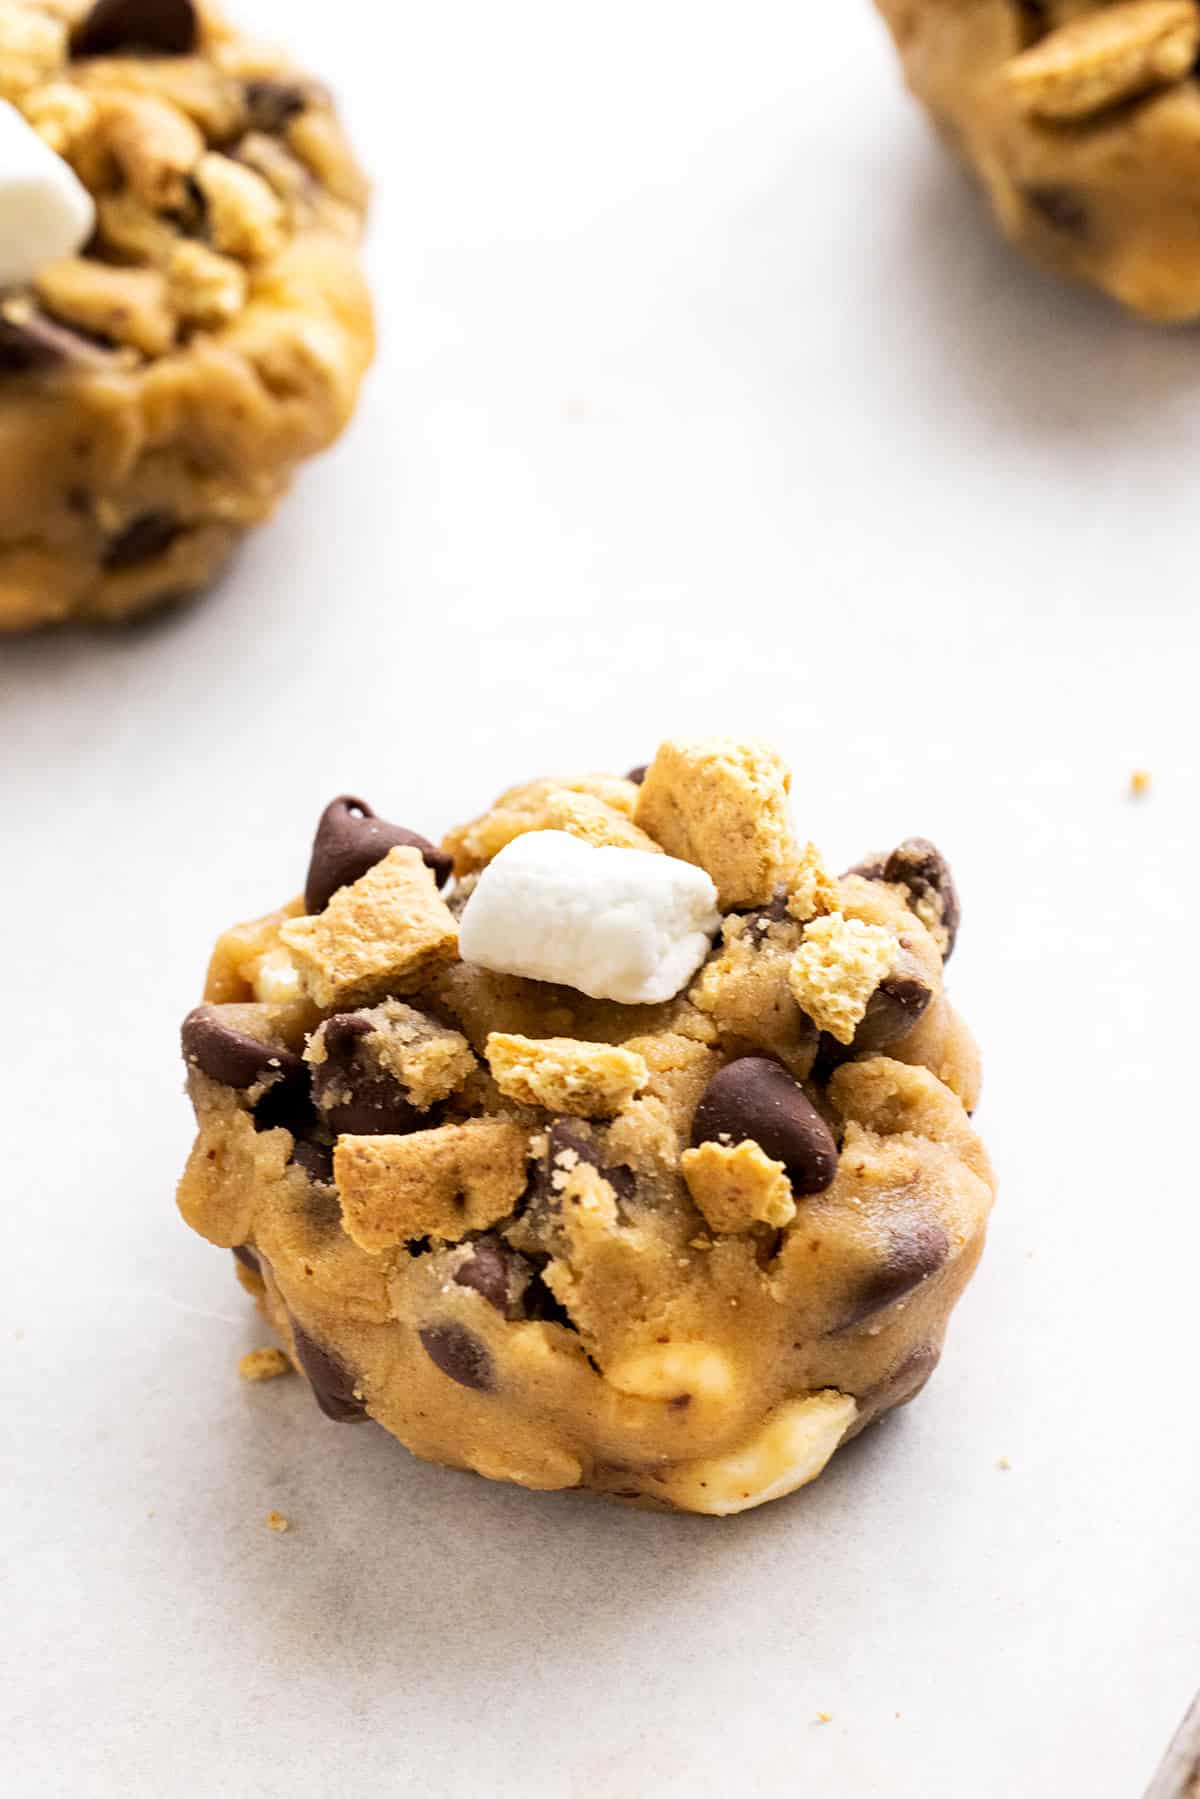
I add a few more chocolate chips on top, graham cracker pieces, and one marshmallow in the center.
Don’t be tempted to add any more, trust me! An overabundance of marshmallows in the dough will cause the cookie to lose its shape because too much water will be released as it melts.
Step 10: Arrange the Dough
For a thick and chewy texture, bake the cookie dough when they are slightly below room temperature. If making the dough ahead of time, let it sit at room temperature for a few minutes so that the centers are not raw.
Place the dough pieces at least 2-inches apart on a parchment paper lined sheet pan. Don’t overcrowd them because they will expand, about 8 on a large tray.

Step 11: Baking the Cookies
Bake one tray at a time for about 10 minutes, rotating halfway through. Look for the edges to set, with a slightly puffy center, and for the marshmallow to be toasted. Let them cool on the tray to finish cooking. Enjoy while still warm for a campfire treat!

Frequently Asked Questions
If you want to add a surprise element to the center of the S’mores cookies, you can stuff them with a small piece of graham cracker, a chocolate bar, and about 3 to 4 mini marshmallows or half of a large one. I would omit the one cup of mini marshmallows from the recipe.
Any marshmallows that come in contact with the hot pan, like the ones on the edges of the cookie dough, will melt and turn into a toffee-like brittle. Instead, place just one mini marshmallow on top of the cookie dough before baking. It will expand and turn golden brown but will not melt completely.
Place a small rectangular piece of the bar on top, but any engraving will melt. I recommend pressing it into the top of the cookie right out of the oven.
You have a few options to reheat a batch of S’mores cookies and make them warm and gooey. For single cookies, heat on the high setting in the microwave in 5-second increments until warm. For a large batch, place on a parchment paper-lined sheet pan and heat at 300ºF (149ºC) until warm, about 5 minutes.
More Cookie Recipes


If you tried this S’mores Cookie Recipe, please leave a 🌟 star rating and let me know how it went in the 📝 comments below!
S’mores Cookies

Ingredients
- 1 ¾ cup all-purpose flour
- 1 cup crumbled graham crackers, divided
- ½ teaspoon baking soda
- 14 tablespoons unsalted butter, divided
- ¾ cup packed dark brown sugar
- ½ cup granulated sugar
- 1 teaspoon kosher salt
- 2 teaspoons pure vanilla extract
- 1 large egg
- 1 large egg yolk
- 1 ½ cup semi-sweet or milk chocolate chips, divided
- 1 cup mini marshmallows, plus more for topping (51g, 1 ¾ ounces)
Instructions
- Preheat the Oven – Adjust the oven rack to the middle position. Heat to 375°F (191ºC).
- Mix the Dry Ingredients – In a medium bowl, whisk together the flour, ¾ cup of graham crackers, and baking soda. Set aside.
- Brown the Butter – Cut the butter into 14 even-sized pieces. In a medium skillet, melt 10 tablespoons of butter over medium-high heat, swirling to melt evenly. Stir and cook, scraping the bottom of the pan with a spatula, until butter is golden brown and nutty in aroma, 1 to 2 minutes. Turn off the heat, and remove the pan from the stove. Stir in the remaining 4 tablespoons of butter until completely melted.
- Combine the Butter and Sugars – In a stand mixer fitted with the whisk attachment, add the melted butter to the mixing bowl. Add the brown sugar, granulated sugar, salt, and vanilla. Whisk on medium speed (setting 5) until combined, 30 seconds.
- Mix the Eggs – Add the whole egg and yolk to the mixing bowl. Whisk on medium-high speed (setting 8) until smooth with no sugar lumps remaining, about 30 seconds. Let the mixture stand for 3 minutes. Repeat the whisking and resting process three more times: 30-seconds mixing at medium-high speed and 3 minutes of rest. After four total times, the mixture should be thick, smooth, and shiny.
- Add the Dry Ingredients – Using a rubber spatula or wooden spoon, stir in the flour mixture until just combined, about 1 minute. Stir in 1 ¼ cup chocolate chips and mini marshmallows. Give the dough a final stir to ensure no flour pockets remain.
- Chill the Dough – Transfer the mixing bowl to the refrigerator for 30 minutes or freezer for 15 minutes, or until the dough firms up, around 65 to 70ºF (18 to 21ºC). The texture should not feel overly sticky.
- Make Dough Balls – Divide the dough into 16 portions, each about 3 tablespoons (about 60 grams, 2 ounces), and roll into a ball. If the dough starts to warm and get sticky, place it on a sheet tray and refrigerate for 15 minutes.
- To Enhance the Look – For a rustic appearance, tear the dough balls in half. Press the two halves together with the lumpy torn sides facing upward to expose the chips. Shape the sides of the dough back into a circle. Press one marshmallow in the center of each ball, plus some of the remaining ¼ cup of chocolate chips and ¼ cup of crushed graham crackers, so they pop out of the surface.
- Arrange the Dough – Place the dough balls at least 2 inches apart on the lined baking sheets, 8 per tray. Smaller baking sheets can be used but will require baking in 3 batches. The dough should be room temperature or just below for even cooking, around 65 to 70ºF (18 to 21ºC).
- Baking the Cookies – Bake one tray at a time in the center position for 5 minutes, then rotate the baking sheet. Continue to bake until the edges are golden brown and the centers look slightly underdone, about 5 to 7 minutes. The color will continue to darken during cooling. Place the baking sheet on a wire rack and cool until they reach room temperature, 20 to 30 minutes. Make sure the oven returns to 375°F (191ºC) before baking the remaining tray.
Recipe Video

Notes
- Make Ahead: Cookie dough can be shaped into balls and refrigerated in a resealable plastic bag for up to 1 week or frozen for up to 2 months. Add one marshmallow, chocolate chips, and graham crackers on top before baking.
- Storing: Baked cookies can be stored in an airtight container at room temperature for 5 days or 3 months in the freezer. Defrost before serving.
- Reheating: Heat one cookie in the microwave on the high setting in 5-second increments until warm. Alternatively, place multiple cookies on a baking sheet lined with parchment paper and bake at 300ºF (149ºC) until warm, about 5 minutes.
Nutrition Facts
Percent Daily Values are based on a 2000-calorie diet. All nutritional information is based on estimated third-party calculations. Each recipe and nutritional value will vary depending on the brands you use, measuring methods, and portion sizes per household.
Recipe Resources


Mary says
Can you make these cookies 5 oz.? Will they turn out okay?
Jessica Gavin says
That would make really huge cookies! It might work better to bake them that size in a skillet and serve it like a skillet cookie.
Jess says
They tasted AMAZING altho I had to add a lot of flour to get them to the right consistency. This could have been error on my part but by the time I got enough flour they were really crumbley. Still a good recipe though!
Jessica Gavin says
Thanks for your feedback! How did you measure the flour? Dip the cup or spoon in the flour? I usually dip the cup, it’s slightly denser that way. But adjust the level of the flour as needed.
Sarah says
These were great. I reduced the sugar a little and probably would more, but that’s just my taste. I am curious about the 4x whipping of the eggs butter and sugar, I did it, but I’m not familiar with that method and just wondering if you could share what that does?
Jessica Gavin says
Thanks for your feedback! I use a unique mixing technique to enhance the toffee flavor of the cookie. The sugars and warm butter mix to break down the sucrose into glucose and fructose. These monosaccharides can caramelize at lower temperatures, producing a more delicious cookie in just 10 minutes.
michelle says
These are delicious but a bit sweet for me, is it possible to reduce the sugar to baker’s percentage of 75%?
Jessica Gavin says
Hi Michelle- Are you thinking of reducing both brown and granulated sugar or just one? I have not tested reducing the amounts, but another reader recently provided feedback that they reduced the sugar and enjoyed the results.
B.A. says
My cookies spread quite a bit. When I looked at the metric recipe, it calls for 248g of flour. Generally, a cup of all-purpose flour is 120-128g. Therefore, 1 3/4 cups of flour should be 210-218g. Which version is correct? By the way, the cookies are delicious but didn’t hold their shape at all.
Jessica Gavin says
Thanks for your feedback! I use 142g as my measurement for 1 cup of flour, when I develop my recipes, so it’s on the higher end. I also do the dip and sweep method, which is heavier than the spoon and level method. Did you weigh out the recommended flour amount? I also only put 1 mini marshmallow on top because I’ve found that anymore causes the cookie to spread.
Whitney says
This recipe was probably the most complicated glorified chocolate chip cookie recipe I have ever encountered. Like many others, mine spread during cooking.
Jessica Gavin says
I appreciate your feedback! Were the cookies chilled enough? How did you weigh the flour? I usually use dip and sweep, which yields slightly more flour compared to the spoon method.
Lisa says
These cookies were crazy delicious! However, my cookies spread and ended up extremely flat. The dough was pretty cool, less than 65 degrees. Would love to bake them again but I wanted to turn out like yours did in your photos. Any suggestions?
Jessica Gavin says
How did you measure the flour? Sometimes, if you add too little it could cause the cookies to spread. Also, putting too many marshmallows on top causes spread. I only add one.
Andréa says
Could I add pecans to this?
Jessica Gavin says
Yes, you can add in some roughly chopped pecans. I recommend 1/2 to 3/4 cups of nuts.
DJ says
This might be one of my new favorite cookies. On my first batch, some of the marshmallows melted out and caramelized, which is one of the best parts of this cookie, but it made it look so ugly, very unappealing. On a second batch I did the biscuit cutter trick; right out of the oven I quickly used a larger biscuit cutter around the cookie and spun it just a little to reshape them round. That also pushed the puddles of melted marshmallows against the cookie’s edges so the cookie was surrounded by a ring of crunchy caramel after it cooled.
Jessica Gavin says
Great tip for getting more round cookies!
Heather says
Good cookie recipe! Cookies are a bit too sweet for my liking. The brown butter is a nice touch:)
Jessica Gavin says
Thanks for you’re feedback, Heather!
V says
This recipe is very confusing. It calls for one egg, but the photo shows 2 eggs, and egg is always plural in the instructions. I only used 1…hopefully they will turn out ok…if not, trying 2 next time. Also the batter was really tacky. Any tips for getting the batter to not stick to your hands so much when forming the ball of dough? Thanks!
Jessica Gavin says
Hi there! In the recipe, it calls for one large and one egg yolk. Sorry for the confusion! Did you happen to weigh the flour? If it feels super tacky after chilling, then you may need to add a light dusting of flour to help with shaping. Let me know how it goes!