
Flaky and buttery homemade biscuits hot from the oven! I guarantee these little guys will disappear fast from the dinner table. The key to creating tender and flaky layers is incorporating small pieces of cold butter into the dough and stacking the layers.

Jessica’s Recipe Science
- Flatten butter slices into nickel-sized pieces—these melt and release steam during baking, creating flaky layers.
- Cut biscuits with a straight-down motion—twisting seals the edges, preventing the layers from rising properly.
- Rest and chill biscuits before baking to relax the gluten, keeping the butter cold for flaky layers. This also helps them rise evenly.
Jump To a Section
Featured Comment 17
“This is now my go-to recipe for biscuits. I followed it step-by-step and they turned out perfect – buttery and flakey!”—Sonya
Why It Works
Homemade biscuits with crunchy tops and flaky layers make any meal feel special. This quick bread recipe allows you to mix, shape, and bake quickly, which works well when preparing a feast for the family. However, there are a few crucial techniques to be aware of before you get elbow-deep in flour.
I extensively tested this country-style buttermilk biscuit recipe for my Easy Culinary Science for Better Cooking cookbook. After many experiments in the test kitchen, I finally nailed just the right texture and flavor contrast. Although it seems simple and requires few ingredients, the preparation and process are even more critical.
Ingredients You’ll Need
- Flour: All-purpose flour contains 10 to 12 percent protein to provide structure created by the gluten network formed during mixing.
- Leavening Agent: Leavening agents like baking soda and baking powder promote browning and rise. They also help neutralize the acid in the buttermilk to reduce some natural tanginess.
- Salt: Enhances the savory taste of the biscuit dough.
- Sugar: A small amount of sugar helps accelerate the formation of a golden color as the biscuits cook quickly in the oven. It also adds a bit of crunch.
- Buttermilk: Buttermilk hydrates the flour proteins for gluten formation, keeps the biscuits moist, and adds extra flavor from the slight tanginess in the cultured milk.
- Butter: Chilled unsalted butter provides flavor and lots of mini layers in the bread.
See the recipe card below for all ingredients and measurements (US and metric).
Ingredient Substitutions
This easy homemade biscuit recipe is easy to customize! Try these tasty options:
- Flour Alternatives: Whole wheat or white whole wheat flour can be used for heartier biscuits. More buttermilk may be needed to hydrate the dough. For those with dietary restrictions, use gluten-free flour. Check out my parmesan drop biscuit recipe if you want to try using self-rising flour.
- Butter Swaps: For a more decadent biscuit, use other types of butter, like European or Irish butter, with higher fat. Salted butter can be used; however, reduce the added salt to 1 ½ teaspoons.
- Add Seasoning: Add Cajun seasoning for a spicy kick or pumpkin pie spice for a sweeter aroma.
- Herbs: Add chopped rosemary, thyme, tarragon, sage, chives, or green onions. For a bold herb taste, add dried Italian seasoning.
- Cheese: Add grated parmesan, cheddar cheese, smoked gouda, or gruyere.
- Meat: Add crispy chopped bacon for a savory and smoky taste. It tastes delicious with cheddar cheese and chives!
How to Make Homemade Biscuits
Step 1: Heat the Oven
Position your oven rack in the lower-middle section and preheat to 450°F (232°C). This setup encourages the dough to rise quickly for tall biscuits while achieving a golden, crisp exterior and bottom.

Step 2: Mix the Dry Ingredients
Whisk together the flour, baking powder, baking soda, salt, and sugar in a medium bowl. This blend evenly distributes the leavening agents and salt, ensuring a consistent rise and balanced flavor in each biscuit.
Step 3: Add the Butter
Slice the butter into 1/8-inch thick pieces. Gradually add a few slices at a time to the flour mixture, tossing to coat. This step helps create small pockets of butter throughout the dough, which melt during baking to produce those signature flaky layers.

Step 4: Cut in the Butter
Press each butter slice between your floured thumb and pointer finger, flattening it into nickel-sized pieces. Repeat with the remaining butter, then toss to combine. Freezing the mixture for 15 minutes helps keep the butter cold, essential for creating flaky layers as it melts during baking.
Pro Tip: The small butter pockets melt into the dough during baking, leaving holes for steam and gas to expand and partition the layers.

Step 5: Add the Buttermilk
Slowly pour the buttermilk into the chilled flour mixture, stirring gently with a fork until combined. This gentle mixing hydrates the flour without overworking the dough, maintaining a tender, flaky texture in the finished biscuits.
Step 6: Knead the Dough
Gently knead the biscuit mixture in the bowl a few times until a shaggy dough forms—it should look slightly dry. Add 1 to 2 extra tablespoons of buttermilk to ensure most of the flour is hydrated, allowing the dough to come together without overmixing.

Step 7: Flatten the Dough
Place the dough onto a lightly floured surface, then gently shape and press it with your hands into an 8 x 8-inch square, about 1 inch thick. The dough should come together smoothly without being sticky.

Step 8: Cut and Stack
Cut the dough into 4 squares and stack them on each other.

Stacking the dough adds extra layers that wouldn’t be there if you just cut out biscuits immediately after mixing.

Step 9: Roll
Lightly flour a rolling pin and gently roll the dough into an 8 x 8-inch square, maintaining a 1-inch thickness. This even thickness ensures consistent baking and flaky layers in the biscuits.

Step 10: Cut into Biscuits
Use straight-down motions when cutting biscuits, as any twisting motion will cause the biscuits to stick together on the edges and ruin the layers.
Tips for Perfect Execution: This recipe is unique because the dough may initially seem slightly dry. Rest assured that the lightly floured and rigid surface adds lovely texture to the biscuits’ tops.
Step 11: Chill the Biscuits
Once the biscuits are cut, they should rest and refrigerate for 30 minutes on a baking sheet before baking. This allows the gluten network to relax after kneading and rolling and keeps the butter cold for building flaky layers.
Expert Tip: Relaxing the dough also helps the biscuits rise evenly during baking so the heights are more symmetrical and do not fall over.
Step 12: Bake
Transfer the biscuits to a parchment-lined baking sheet, spacing them at least 1 inch apart. Brush the tops of each biscuit with melted butter, then sprinkle with a pinch of salt for extra flavor. Bake at 450°F until golden brown, about 10 to 11 minutes.

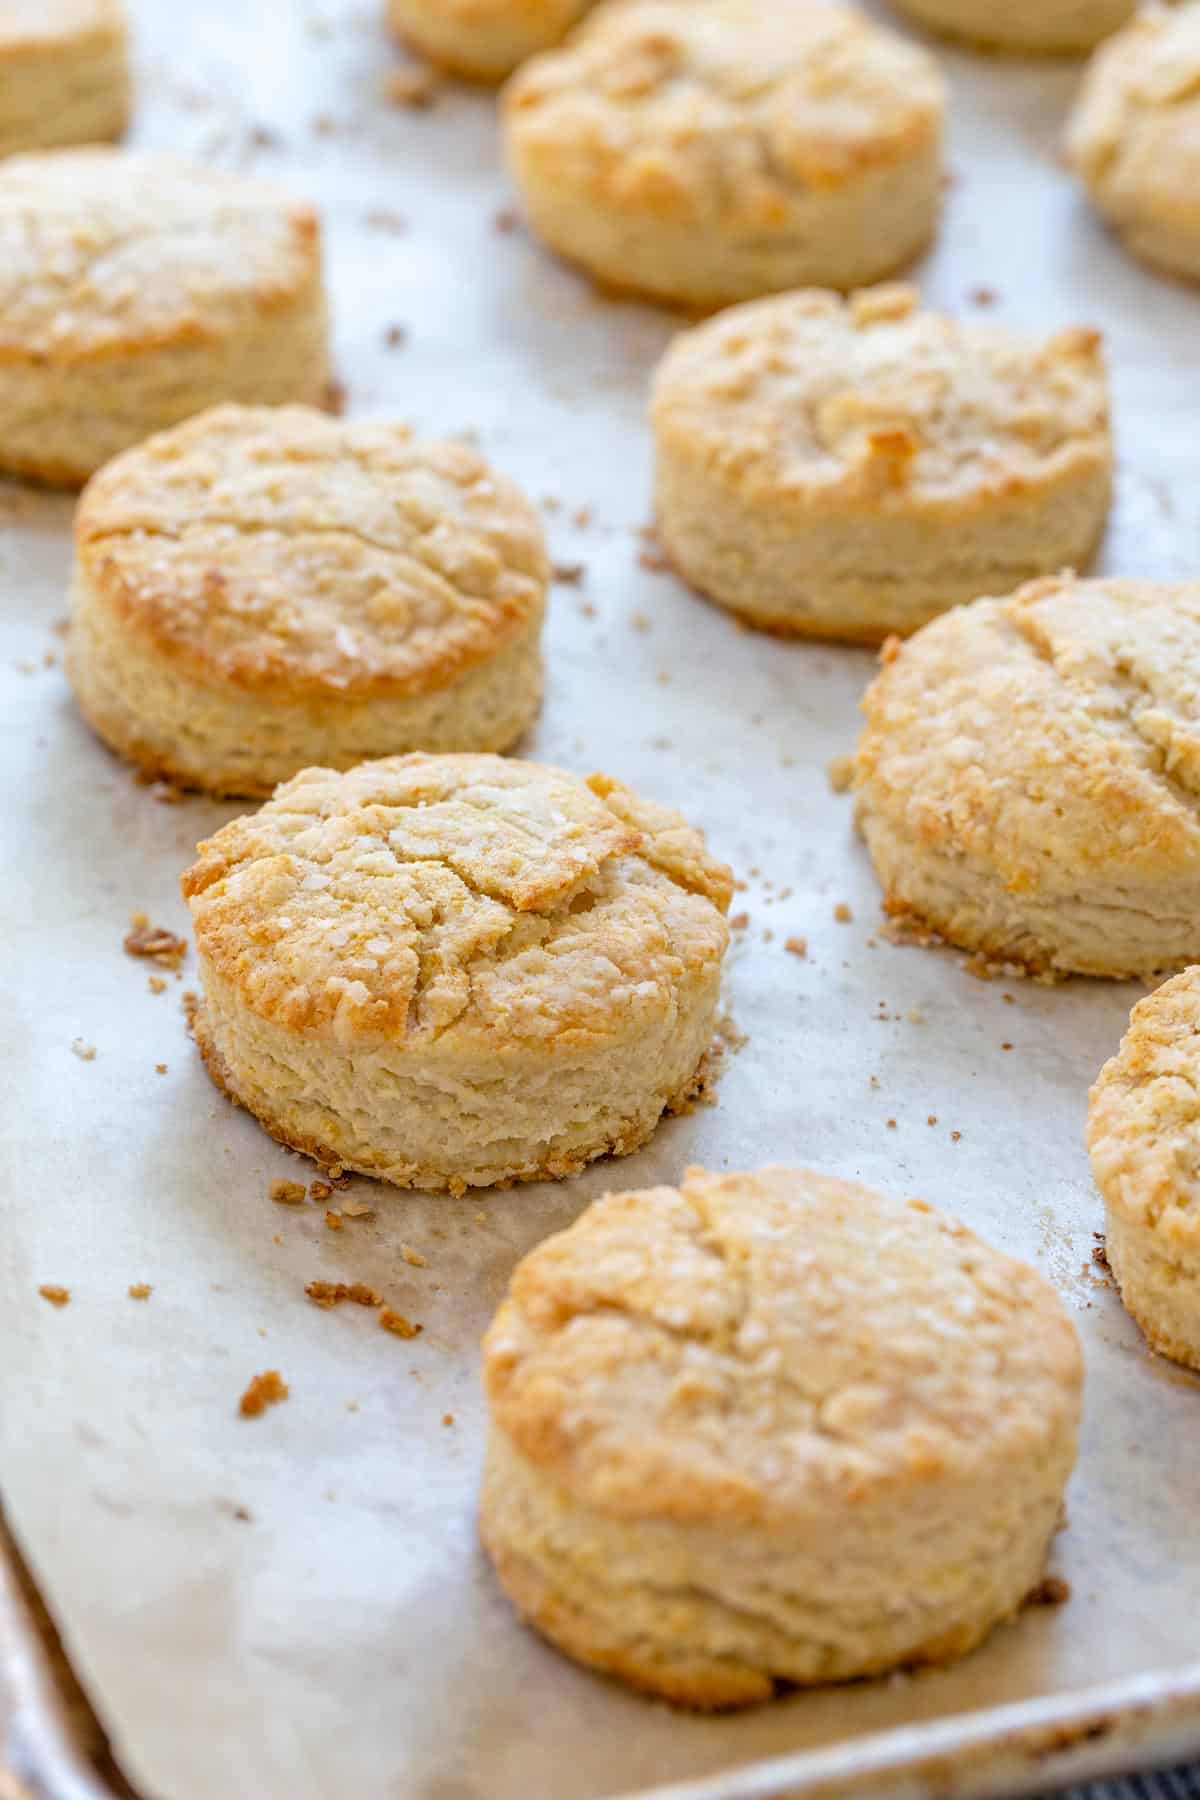
Step 13: Cool
Let the biscuits cool on the baking sheet for 5 to 10 minutes before serving. If not serving immediately, transfer them to a wire rack to keep them from becoming soggy on the bottom.
Serving Suggestions: After all your hard work, you’ll be rewarded with hot, fresh, buttery biscuits. Serve with jam, honey butter, or eggs Benedict.
Frequently Asked Questions
After breaking the butter and flour mixture into smaller pieces, briefly freeze it, and then chill the cut-out biscuits to ensure defined layers. This keeps the butter from melting into the protein network as it is mixed, rolled, and shaped. The key is to create separate sheets of dough before it goes into the oven.
You can use your fingertips or a pastry cutter to break the butter into the flour. Alternatively, you can use a food processor to quickly break the butter into pea-sized pieces. For super flaky biscuits, grate the cold butter with a box grater to give thin shreds.
When it comes to biscuits, both buttermilk and heavy cream bring unique benefits. Buttermilk gives biscuits a subtle tang and acidity, which helps tenderize the dough and activate baking soda for a lighter, fluffier texture. Heavy cream, on the other hand, adds richness and a slightly denser, buttery crumb.
Serve This With


If you tried these Homemade Biscuits, please leave a 🌟 star rating and let me know how it went in the 📝 comments below!
Homemade Biscuits

Ingredients
- 3 ½ cups all-purpose flour, more for dusting
- 1 tablespoon baking powder
- ½ teaspoon baking soda
- 2 teaspoons kosher salt, more for topping
- 2 teaspoons granulated sugar
- 1 cup unsalted butter, plus 2 tablespoons for brushing
- 1 cup buttermilk, plus 2 tablespoons, chilled
Instructions
- Heat the Oven – Adjust the oven rack to the lower-middle position. Preheat to 450°F (232°C).
- Mix the Dry Ingredients – In a medium bowl, whisk together the flour, baking powder, baking soda, salt, and sugar.
- Add the Butter – Cut 1 cup of butter into 1⁄8-inch thick pieces. Add a few butter slices at a time into the flour mixture and toss to coat.
- Cut in the Butter – Squeeze each slice of butter between a floured thumb and pointer finger, pressing and breaking the butter off into flat, nickel-sized pieces. Repeat the process with the remaining butter then toss to combine. Freeze the mixture in the bowl until chilled, 15 minutes.
- Add the Buttermilk – Gradually add 1 cup buttermilk into the chilled flour mixture, stirring with a fork until incorporated.
- Knead the Dough – Knead the biscuit mixture in the bowl a few times until a shaggy dough forms; it will look slightly dry. If needed, add an extra 1 to 2 tablespoons of buttermilk so that most of the flour is hydrated and can be kneaded into the dough.
- Flatten the Dough – Lightly dust a working surface with the flour. Place the mixture onto the floured surface and shape and press with hands until combined into a 1-inch thick square, about 8 x 8 inches, the dough will not be sticky.
- Cut and Stack – Cut the dough into 4 even-shaped squares and stack them as evenly as possible on top of each other.
- Roll – Lightly flour a rolling pin and roll the dough out into a 1-inch thick square, 8 x 8 inches.
- Cut into Biscuits – Leave about a 1⁄4-inch border along the edges when cutting the biscuits to give even layers. Using a 2 1⁄2-inch floured biscuit cutter, press straight down into the dough, without turning.
- Chill the Biscuits – Transfer to a parchment paper–lined sheet pan and repeat with the remaining dough. Refrigerate the biscuits for 30 minutes before baking.
- Bake – Transfer the biscuits to a new parchment paper–lined sheet pan. Make sure that they are at least 1 inch apart. Melt 2 tablespoons of butter then brush the tops of each biscuit and sprinkle with salt. Bake until golden brown, 10 to 11 minutes.
- Cool – Let the biscuits cool for 5 to 10 minutes before serving. Transfer to a wire wrack if not serving immediately.
Recipe Video

Notes
- Make It Gluten-Free: Substitute gluten-free flour for all-purpose wheat flour. I recommend Bob’s Red Mill 1:1 Baking Flour.
- Storing: Store in an airtight container for 5 days or freeze for 3 months.
- Reheating: Heat in the oven at 350ºF (177ºF) until warm, about 5 to 10 minutes, adding more time if frozen. Wrap in foil if desired to prevent browning. Alternatively, microwave in 15-second increments until warm.
Nutrition Facts
Percent Daily Values are based on a 2000-calorie diet. All nutritional information is based on estimated third-party calculations. Each recipe and nutritional value will vary depending on the brands you use, measuring methods, and portion sizes per household.


Carolyn Crane says
I usually freeze and grate my butter in. Will this still work or is it best to do the way you described
Jessica Gavin says
You can definitely grate the butter! I’ve found it helps gives a flakier texture when I’ve made biscuits in the past. Just make sure to still break the flour into the pieces of butter to coat the flour proteins.
DA says
I love this recipe! I only use 1/2 teaspoon of salt and add a tablespoon of sugar. I also use pastry flour for a very light biscuit. The stacking yields tall, flaky biscuits. I only gave 4 stars because I found 2 teaspoons to be too salty.
Jessica Gavin says
Appreciate your feedback on the biscuits! I will have to try the pastry flour, so curious about the texture!
Judy says
Jessica, We wait in anticipation for every recipe. Love all the photos and the detailed information. We got our son your cookbook as he has a very scientific mind and we knew he would love all the details. I’m limiting my carbs right now but will be making these down the road. I can already taste them. Thanks for all you do, Judy & Timothy
Jessica Gavin says
Thank you, Judy! I’m thrilled that your son now has the cookbook to experiment with in the kitchen. Always so grateful for your support!
Gary Gushue says
I made Jessica Gavins biscuits & they were so much better than mine with no exaggeration. She shows you how she does it & very self explanatory in her techniques. Sometimes different chefs have better recipes than yours sorry but I have to admit it. Everyone has a different,better,tastier way💯❤️
Jessica Gavin says
Thanks for the feedback, Gary! I’m so happy that you enjoyed the biscuit recipe.
Rhonda Wilson says
Can these biscuits be frozen once they a cut out for future use?
Jessica Gavin says
Yes, you can freeze the unbaked biscuits. Just make sure to let them defrost slightly before baking.
Sonya says
This is now my go-to recipe for biscuits. I followed it step-by-step and they turned out perfect – buttery and flakey! Thanks Jessica for your recipes and the science behind the process.
Brittany O. says
Thanks for the specifics on the recipe.
Very helpful information provided on what the ingredients do.
The photos were very helpful also in that they helped to clarify the stacking process in better understanding how you meant for the layering process.
Therefore providing a more flakier biscuit.
I heard that substituting vinegar into whole milk produces the thinking agent for the buttermilk(in the event that buttermilk isn’t available or on hand),..do you think it might affect the flavor even though lots of butter is being used..?
Thanks.
MJ Hamilton says
My mother was a dietitian and told me this trick years ago. I typically use lemon juice instead of vinegar but it does not affect the flavor. I prefer buttermilk, but in a pinch, this will work. I’ve also read a little sour cream or yogurt added to milk may work as well but haven’t tried it. I’m far from a culinary expert but hope this helps. I’m baking the biscuits this morning and can’t wait to try them.
Jessica Gavin says
Great tips, thank you for sharing your ingredient substitutions!
Stacey Slack says
Hi Jessica
I’m some excited to try these…I appreciate your scientific as well!!!
One question…could you please tell me how many these make.
Thanks so much
Have a blessed day
Stacey
Jessica Gavin says
The recipe makes 14 biscuits.
Judy Caywood says
Jessica,
I love all the information on your recipes, the science of it. Your details are unique and I learn so much from you. I like to make biscuits but now they will be better than ever. I can’t wait to try the layering and when I make these I will be thinking of what each ingredient does and yes, I am thinking about those pats of butter melting as the biscuits bake.
Thank you – Judy