Learn how to make a stunning fresh fruit tart recipe with a buttery crust, silky custard, and vibrant seasonal fruit. This bakery-style dessert is easier than you think, with simple, science-backed steps for impressive results.
Jessica’s Recipe Science
- Cooking the pastry cream to 190–200°F fully gelatinizes starch, creating a stable, sliceable creamy filling.
- Chilling the dough solidifies butter, reducing gluten development and preventing tart crust shrinkage.
- Dry fruit prevents excess moisture from diluting the pastry cream’s surface. An apricot glaze keeps the fruit from drying out.
Why It Works
This fruit tart recipe breaks down each component so you can confidently create a bakery-quality tart from scratch at home. From controlling gluten development in the crust to properly thickening the custard and preserving the texture of fresh fruit toppings, I’ll guide you through the science behind each step so your tart looks stunning and tastes even better.
For a few years, I worked at a European bakery, Boniere Bakery, in my hometown of Alameda, California. The pastry chef, Donna, would create the most elegant fruit tarts—beautifully arranged with berries and tropical fruits. Watching her transform simple ingredients into a showpiece dessert inspired my love for pastry.
Jump To a Section
Ingredients You’ll Need
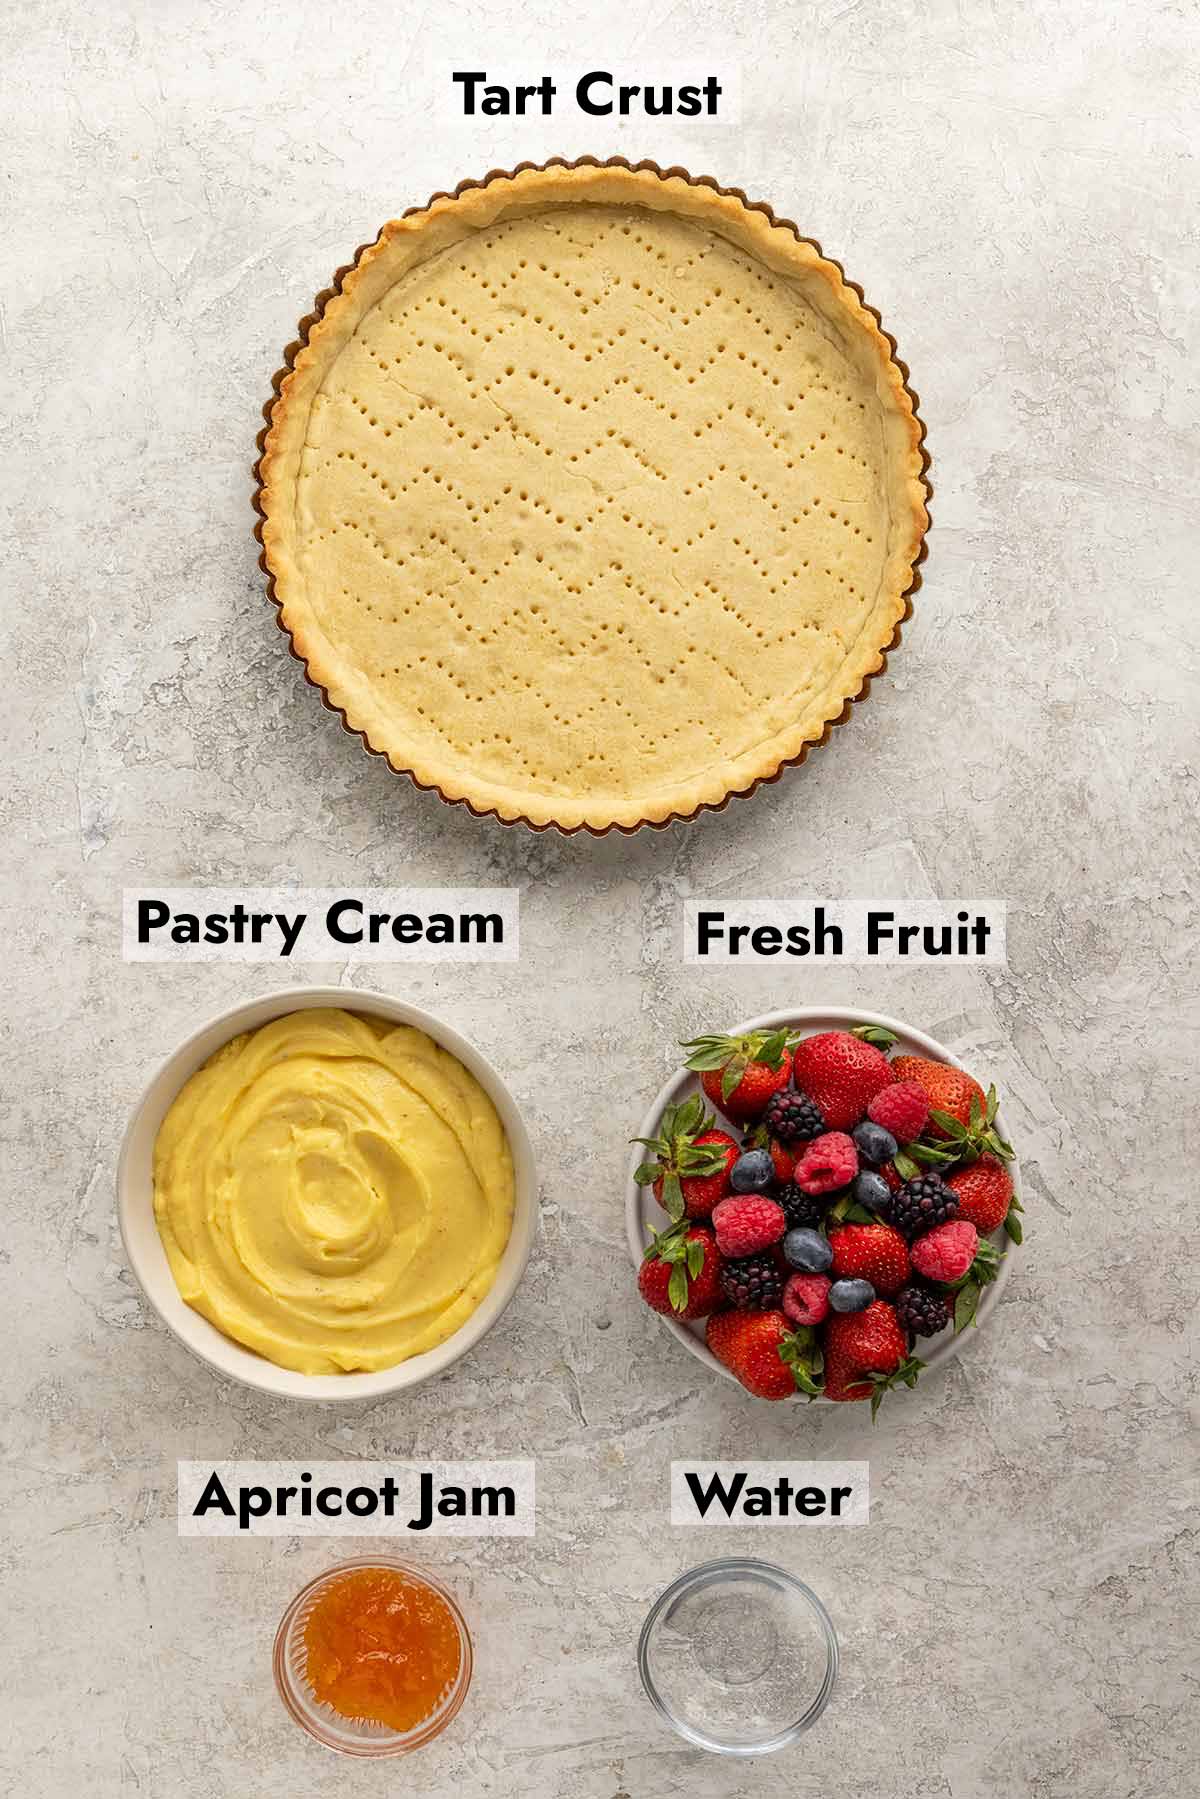
- Pastry Cream: I use my vanilla pastry cream recipe as the tart’s filling. It’s a custard made with whole milk, which creates a creamy base, while sugar sweetens and stabilizes it, resulting in a smooth texture. Egg yolks add richness and emulsify, cornstarch thickens as it cooks, and vanilla adds flavor. A pinch of salt balances sweetness, and butter finishes the pastry cream with a rich, glossy texture.
- Tart Crust: My tart crust recipe delivers a tender texture that’s easy to slice. All-purpose flour provides structure, while powdered sugar creates a tender, shortbread-like texture. Butter adds flavor and flakiness, melting to form a delicate crumb, while the egg binds the dough and adds richness. Vanilla extract enhances the overall flavor of the crust.
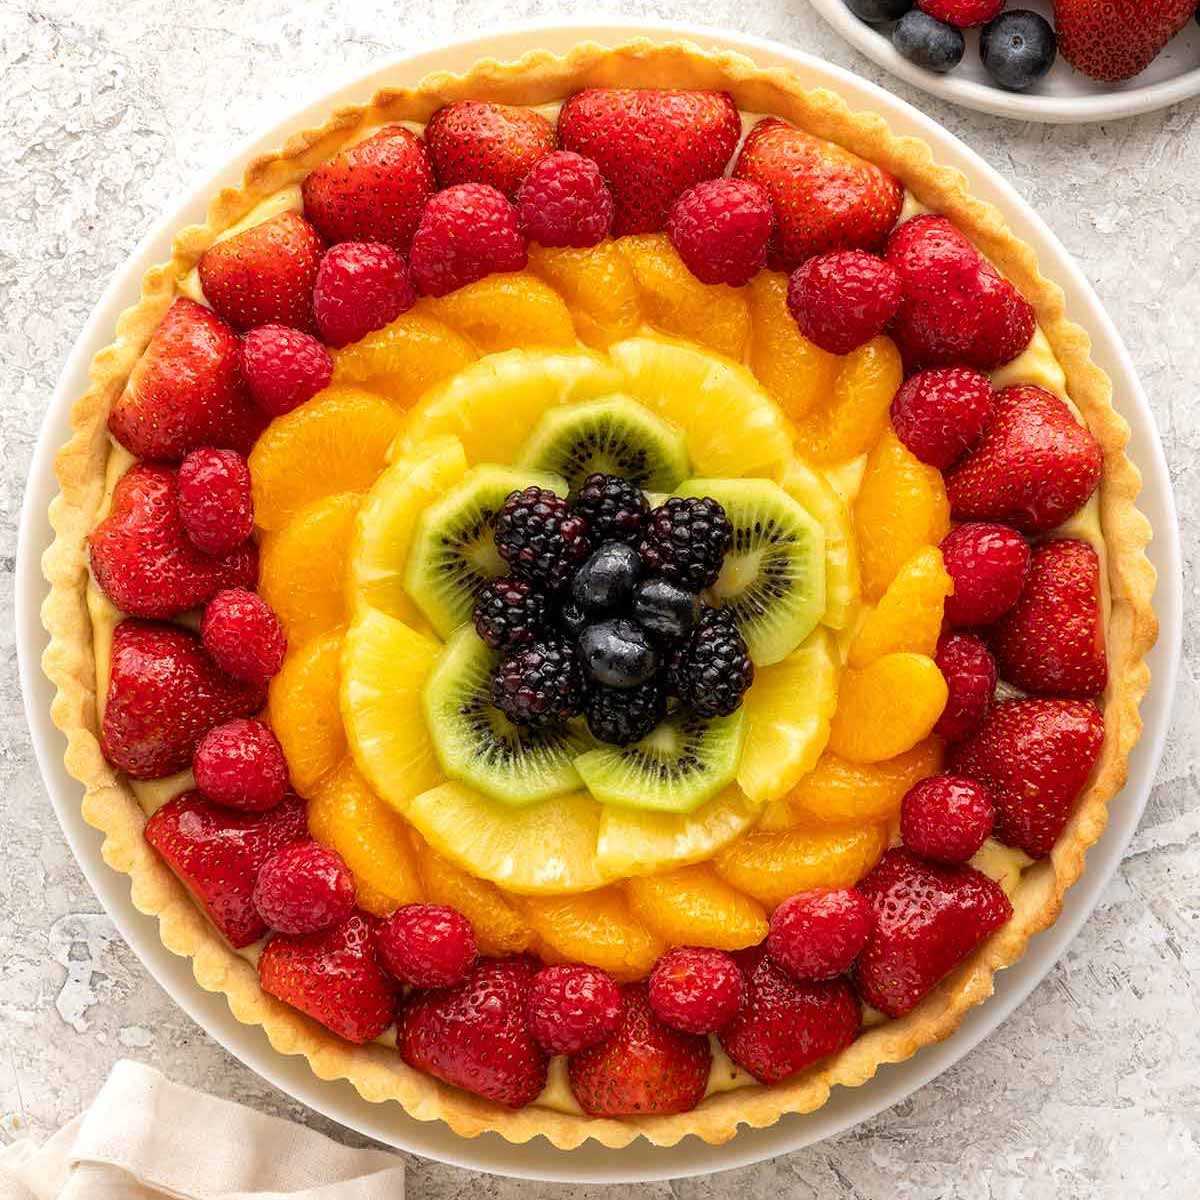
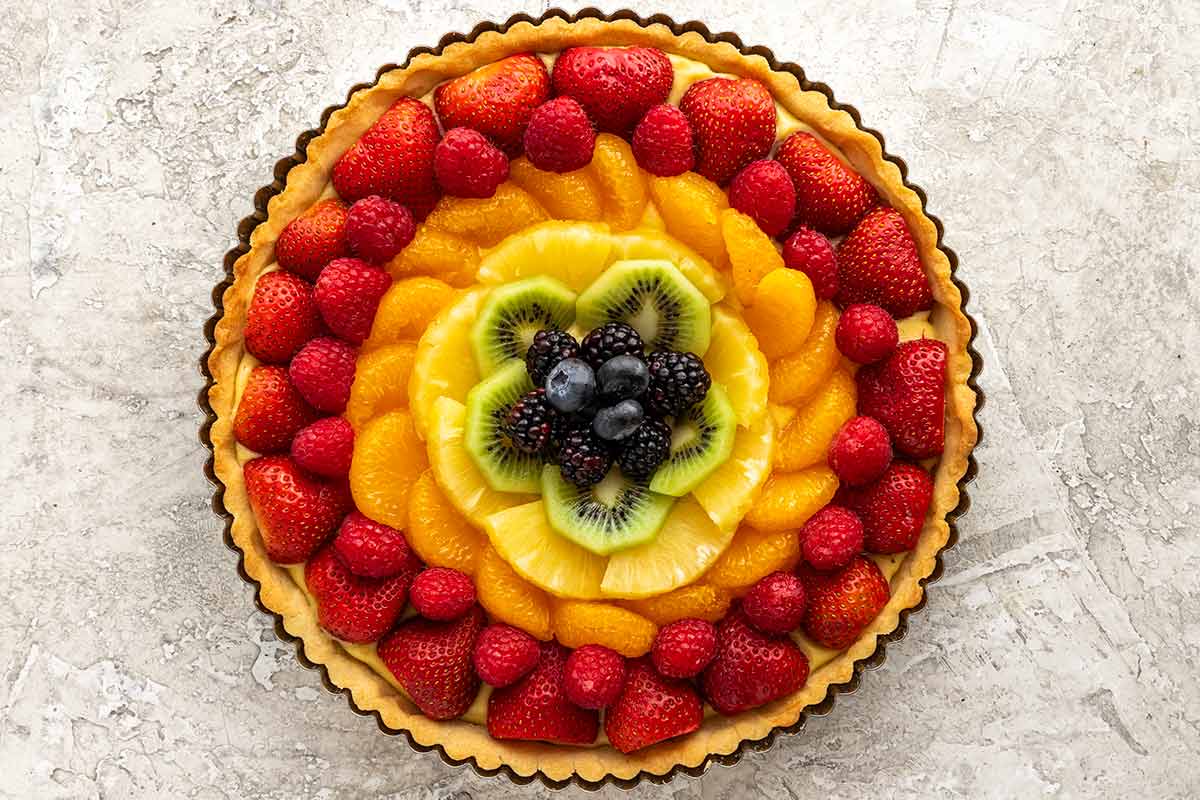
- Fruit: This is where you can customize the dessert! Select fresh, in-season fruits for the best taste. I like to add a colorful mix of strawberries, blueberries, raspberries, blackberries, kiwi slices, pineapples, and mandarin oranges.
- Glaze: This is optional, but I like to brush on a light glaze for a glossy shine and to protect the fruit from drying out. Use a combination of apricot preserves and water to dilute.
See the recipe card below for all ingredients and measurements (US and metric).
Ingredient Substitutions
This fruit tart recipe is easy to customize! Try these delicious variations:
- Store-bought shell: Use a grocery store tart shell to save time instead of making one from scratch.
- Sugar Cookie Dough: Press into the pan as a quick crust substitute. Try my easy homemade sugar cookie crust from my fruit pizza recipe.
- Lighter Filling: Use heavy cream to make whipped cream and fold some into the chilled pastry cream for a lighter, mousse-like texture.
- Pastry Cream Options: You can mix in some softened cream cheese for a tangier taste. Try my chocolate pastry cream filling, which I use in my chocolate cream pie recipe. It pairs well with mixed berries!
- Fruit Options: Add stone fruits such as peaches, nectarines, or plums for seasonal variety. Add sliced cantaloupe, honeydew, or mango for a tropical fruit twist.
- Glaze Options: Use apple jelly, strawberry jam, or any jam or preserve that pairs well with the fruit you choose. You can strain the glaze to remove any large chunks, resulting in a smoother glaze.
How to Make a Fruit Tart
Step 1: Heat the Milk
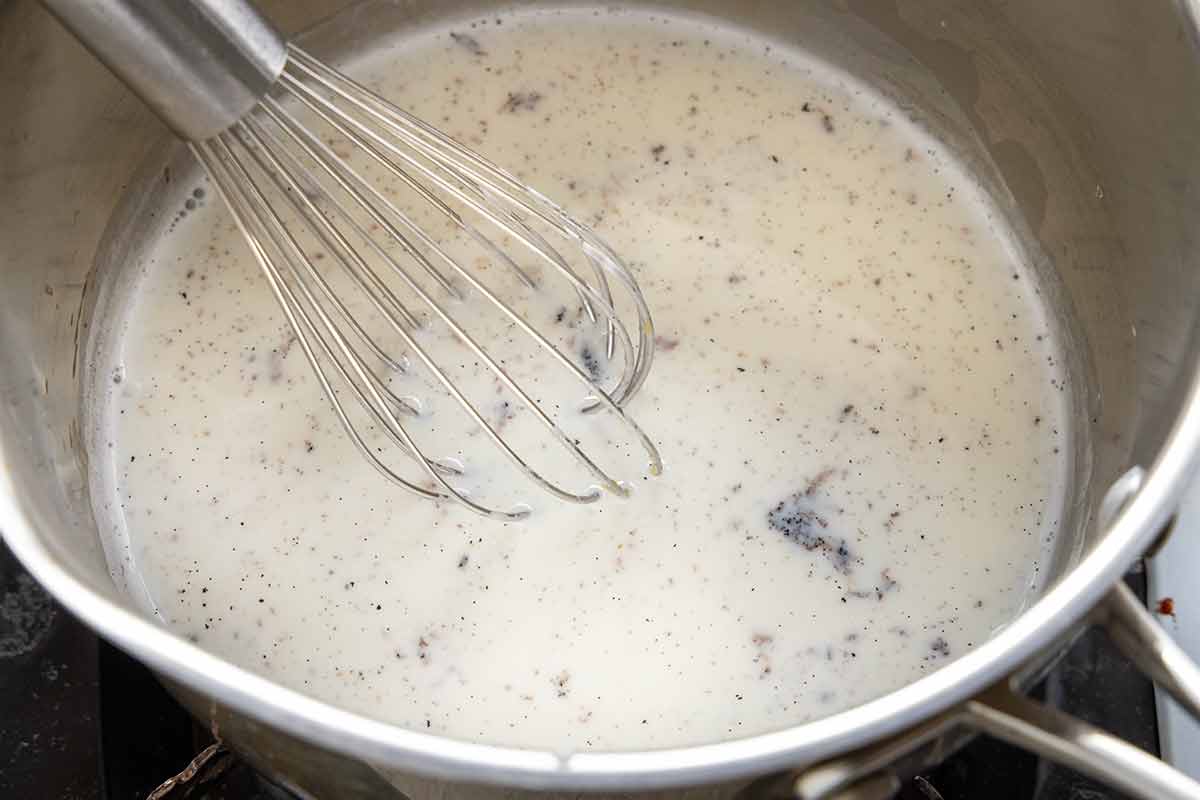
Gently heating the milk to about 185°F (85 °C) dissolves the sugar and extracts flavor without curdling the proteins or scorching the milk. I add the vanilla bean and its seeds to the milk to gently extract as much flavor as possible. Using both the seeds and the pod gives the pastry cream a more complex, well-rounded vanilla taste.
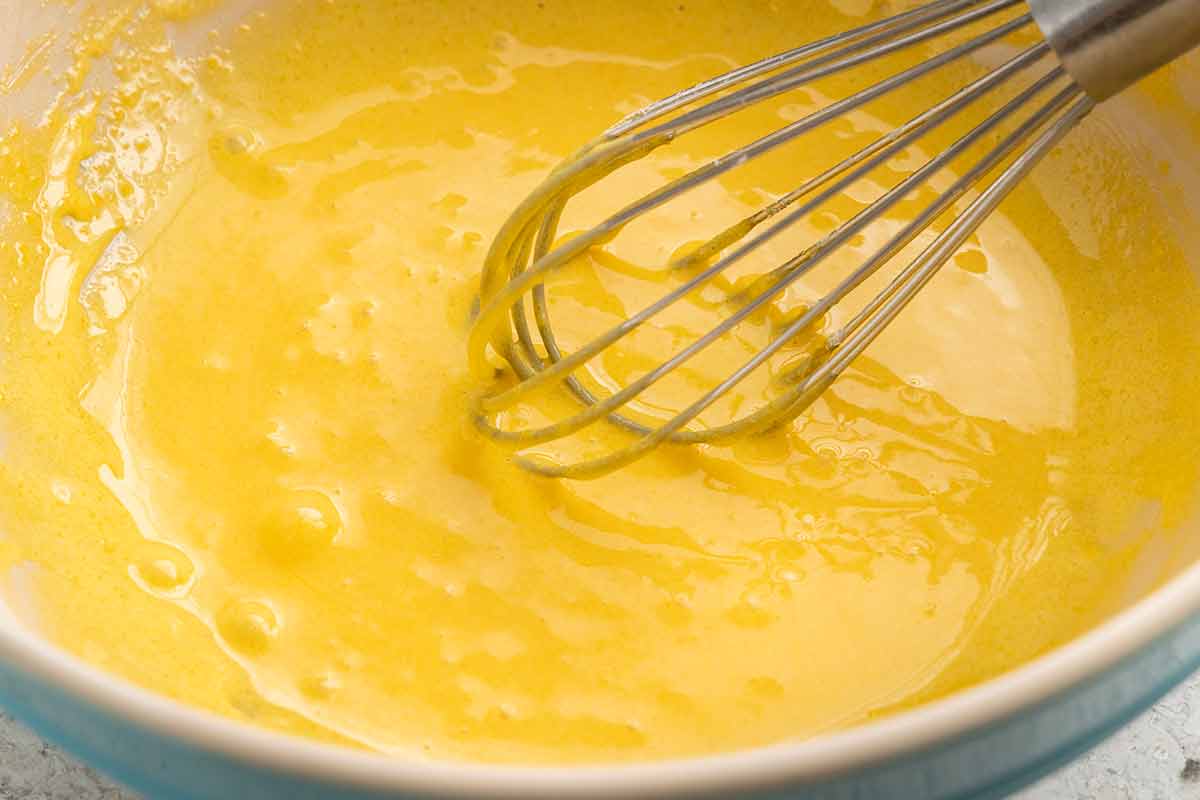
Step 2: Whisk the Yolk Mixture
Whisking the egg yolks, sugar, cornstarch, and salt evenly disperses the starch and dissolves the sugar, helping prevent lumps and ensuring the custard thickens smoothly.

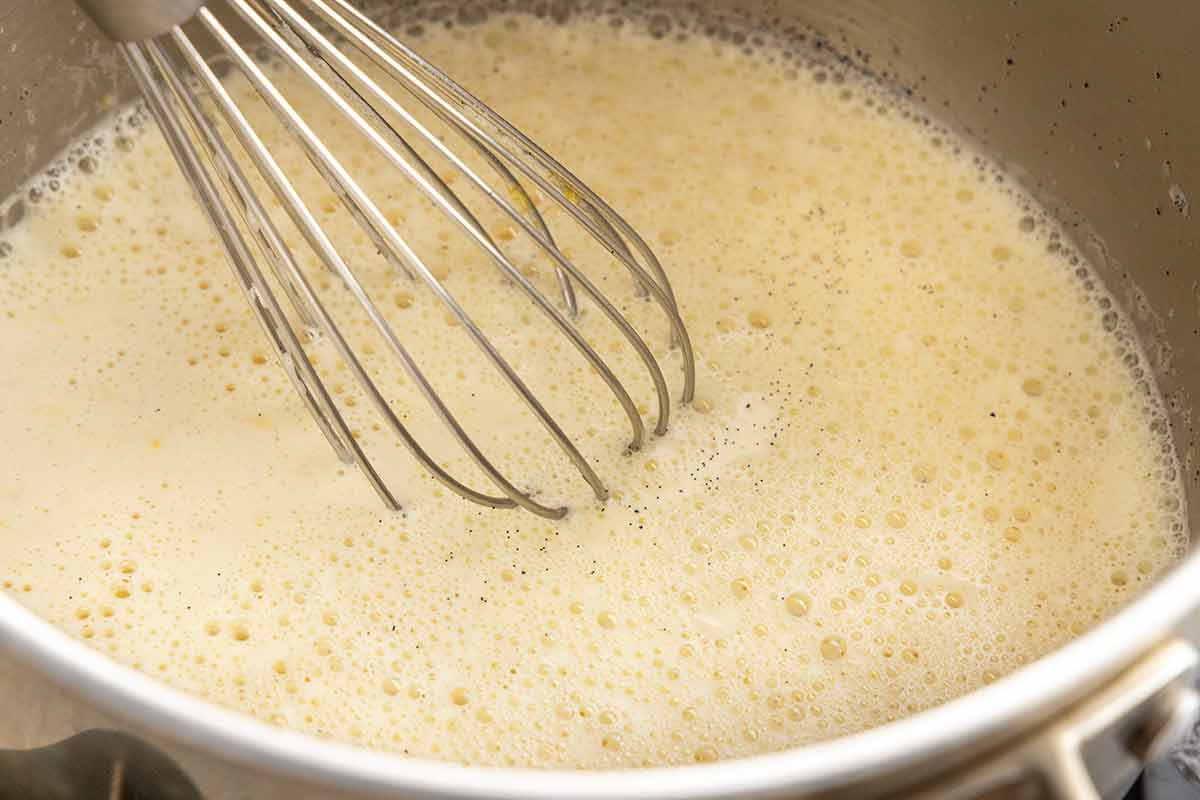
Step 3: Temper the Eggs
Slowly whisking hot milk into the egg mixture gently raises the temperature, preventing the proteins from setting too quickly and scrambling.
Step 4: Cook the Pastry Cream
Return the mixture to the saucepan and cook over medium heat, whisking constantly, until thickened and large bubbles break the surface. Continue cooking for 1 to 2 minutes to fully gelatinize the starch and deactivate amylase in the egg yolks. Aim for 190-200°F for a smooth, stable custard, whisking continuously to prevent scorching.
Ingredient Chemistry: Egg yolks contain alpha-amylase, which can break down starch and thin the custard. Heating above 176°F deactivates the enzyme, but since sugar stabilizes it, cooking slightly hotter ensures it stays fully thickened.
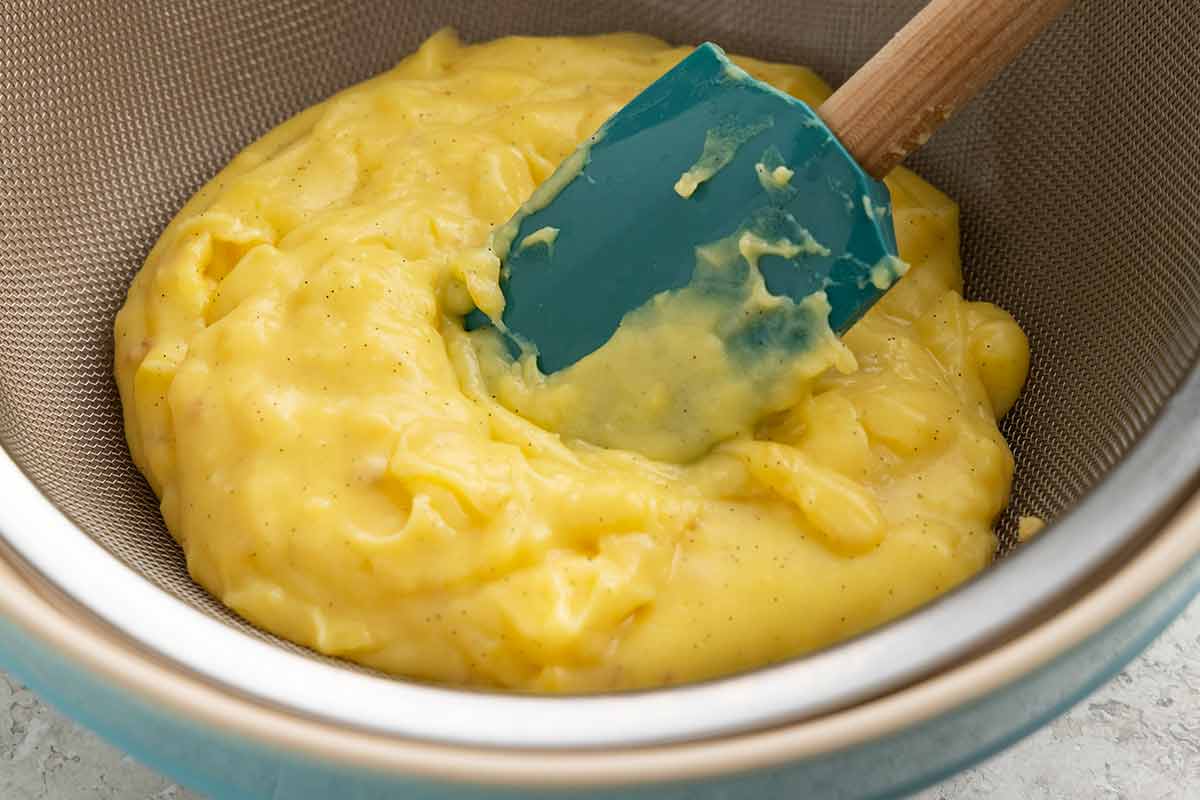
Step 5: Strain the Pastry Cream
Strain the hot pastry cream through a fine-mesh sieve into a bowl to remove any small lumps and create a smooth texture. This optional step helps ensure a more consistent custard and removes any bits of vanilla pod. While it may slightly soften the firmness, the difference is minimal once the pastry cream is stirred before using.
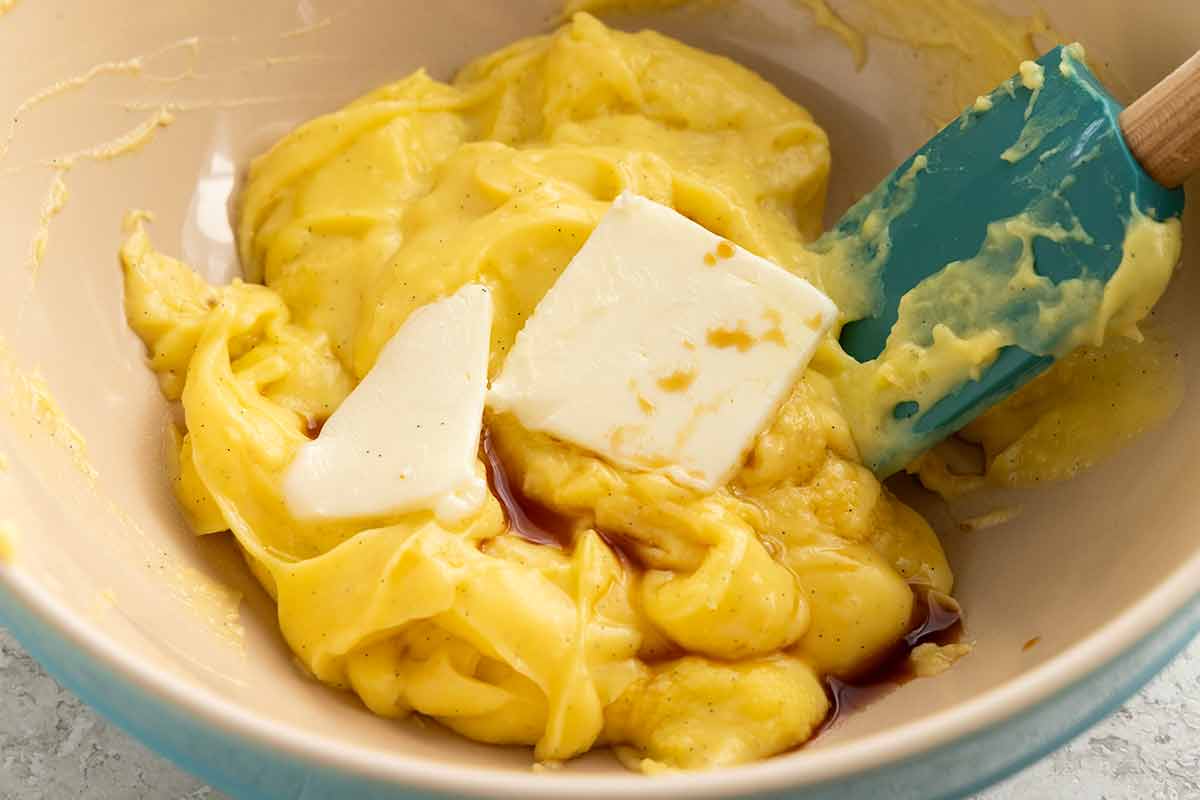
Step 6: Add the Butter and Vanilla
Whisking in the butter and vanilla off the heat enriches the custard, enhances flavor, and helps the butter emulsify smoothly without separating.
Step 7: Cool the Pastry Cream
Placing the bowl over an ice bath quickly cools the custard and stops the cooking process, while pressing plastic wrap directly on the surface prevents a skin from forming. Cool for 2 hours in the refrigerator to let the pastry cream thicken. Meanwhile, prepare the tart crust recipe.
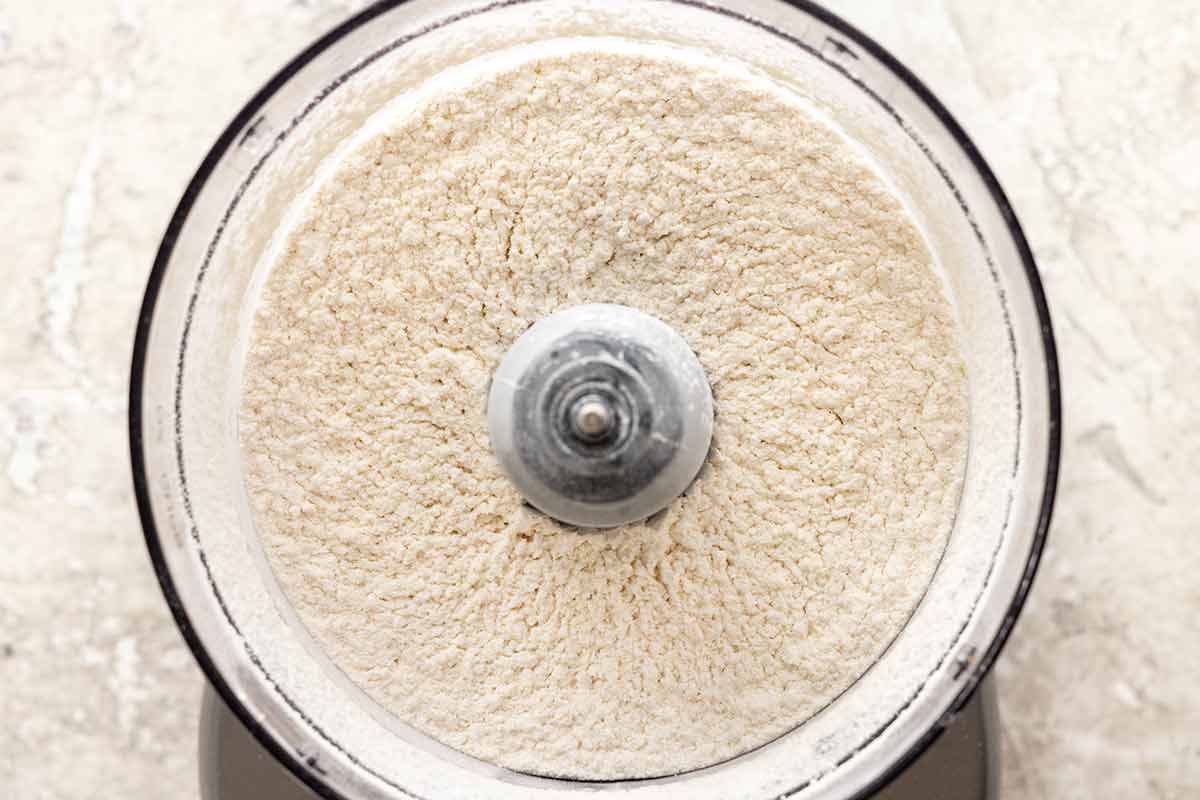
Step 8: Mix the Dry Ingredients
Add the flour, powdered sugar, and salt to a food processor and pulse briefly to evenly distribute the ingredients for consistent sweetness and structure.
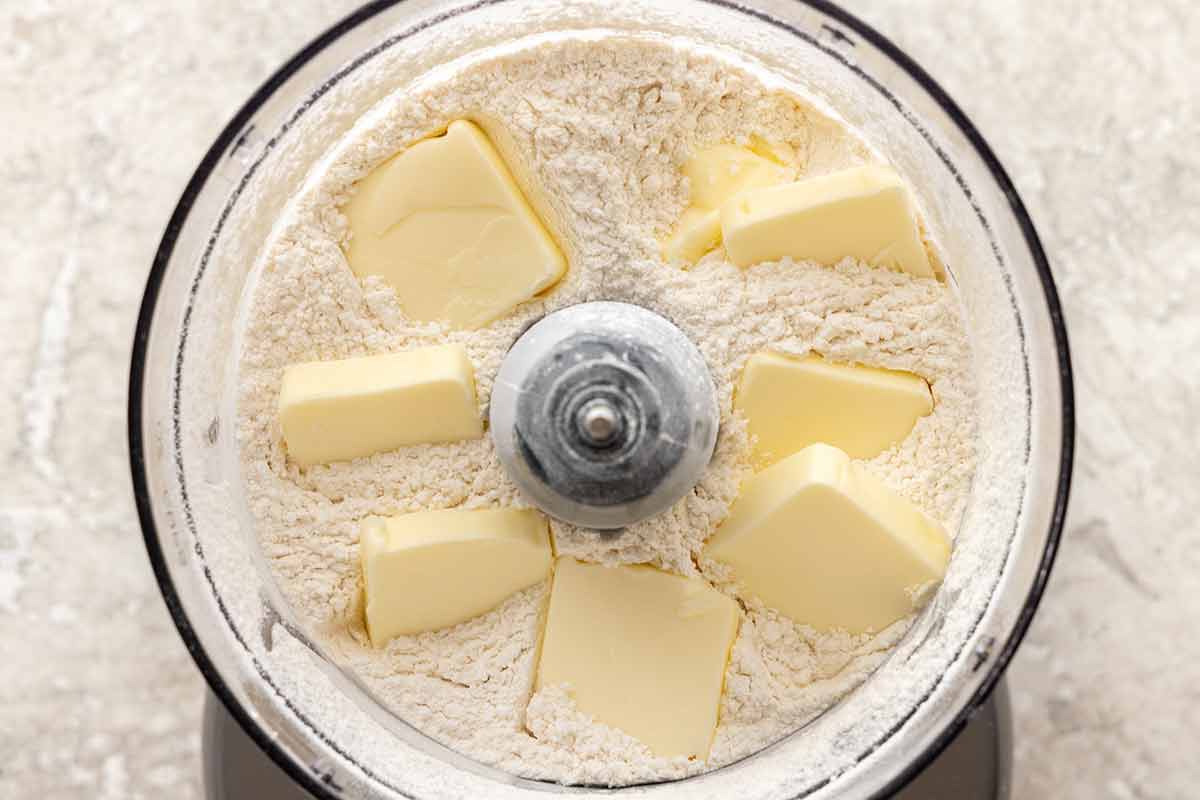
Step 9: Cut in the Butter
Scatter cold butter over the flour mixture and pulse until it resembles wet sand with pea-sized pieces; coating the flour with fat slows gluten development, keeping the crust tender instead of tough.
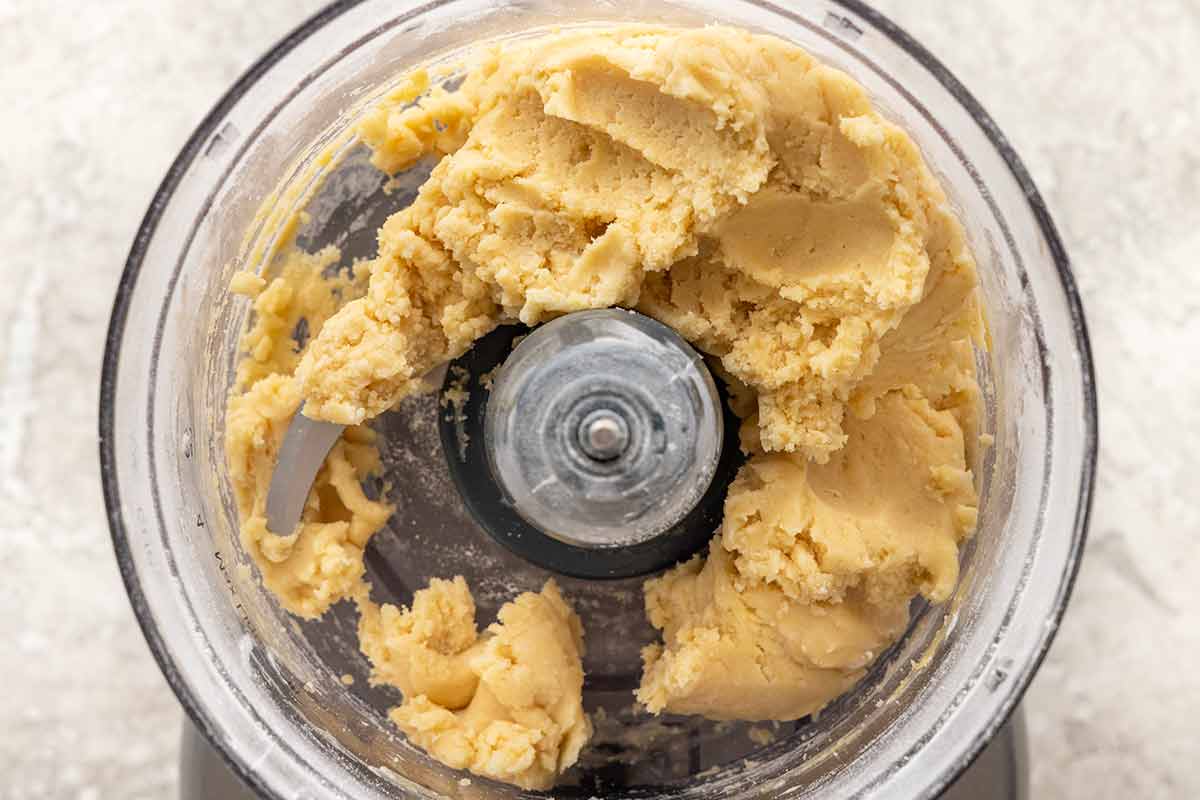
Step 10: Incorporate the Wet Ingredients
Whisk the egg and vanilla, then drizzle them into the mixture while pulsing; the egg adds moisture and proteins that bind the dough into a cohesive crust.
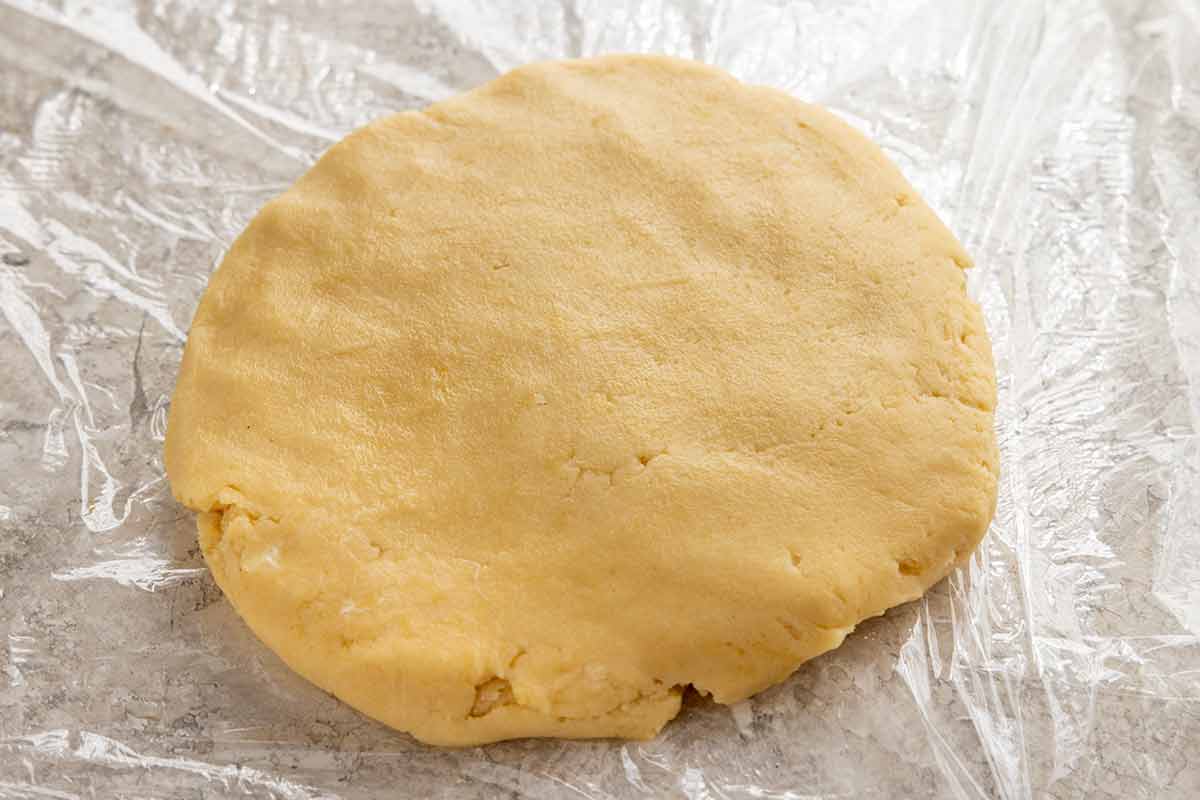
Step 11: Chill the Dough
Shape the dough into a disk and chill for 1 hour (or freeze for 30 minutes); this firms the butter and relaxes the gluten, helping prevent shrinking during baking.
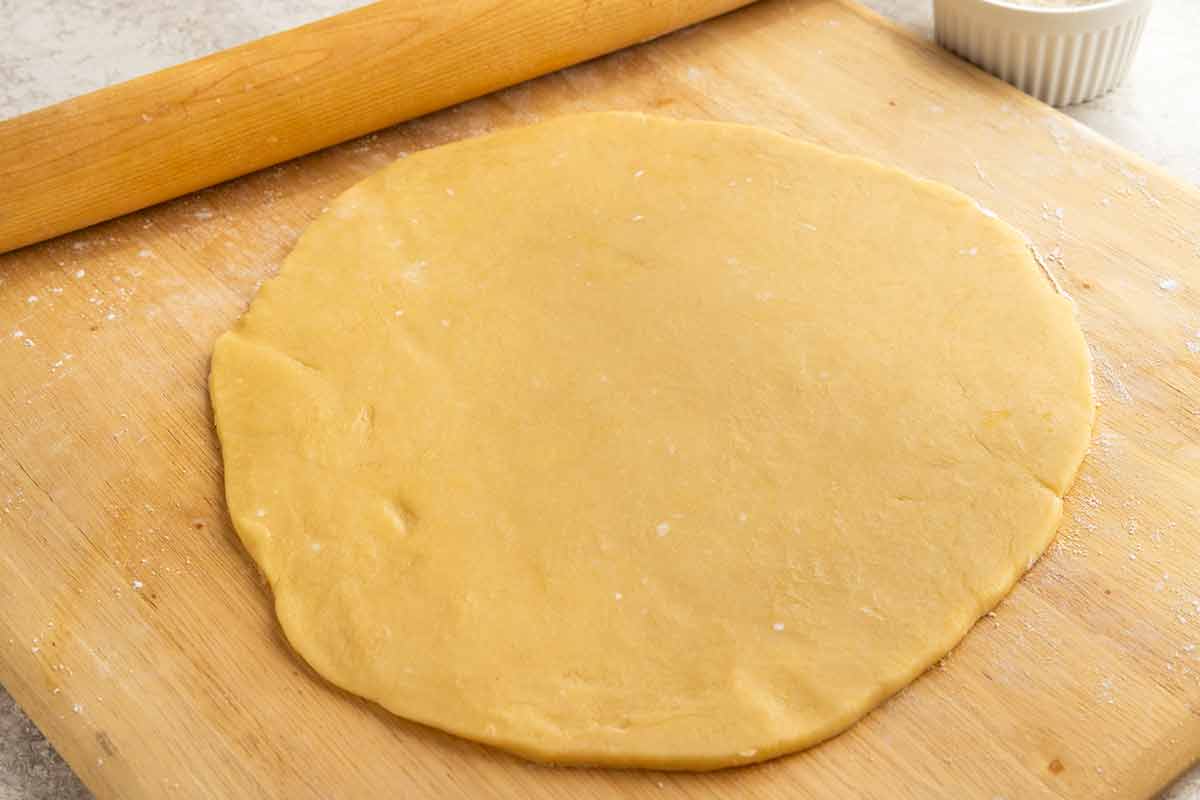
Step 12: Roll the Dough
Let the dough soften slightly, then roll it to about ⅛-inch thick on a lightly floured surface. This thickness makes it sturdy enough to hold the filling while staying delicate when sliced.
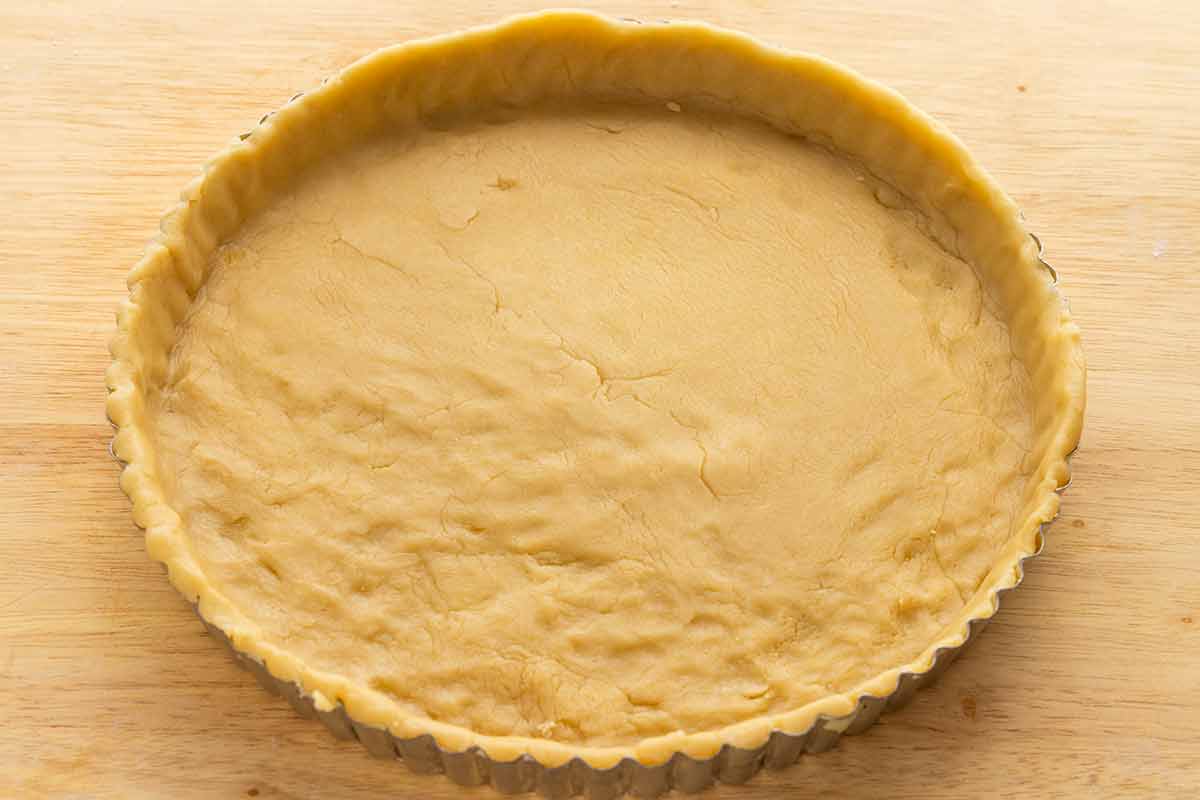
Step 13: Form the Tart Shell
Ease the dough into a 9- or 10-inch tart pan with a removable bottom, pressing it evenly along the bottom and sides. Patch any thin spots with scraps so the crust bakes evenly and doesn’t crack.
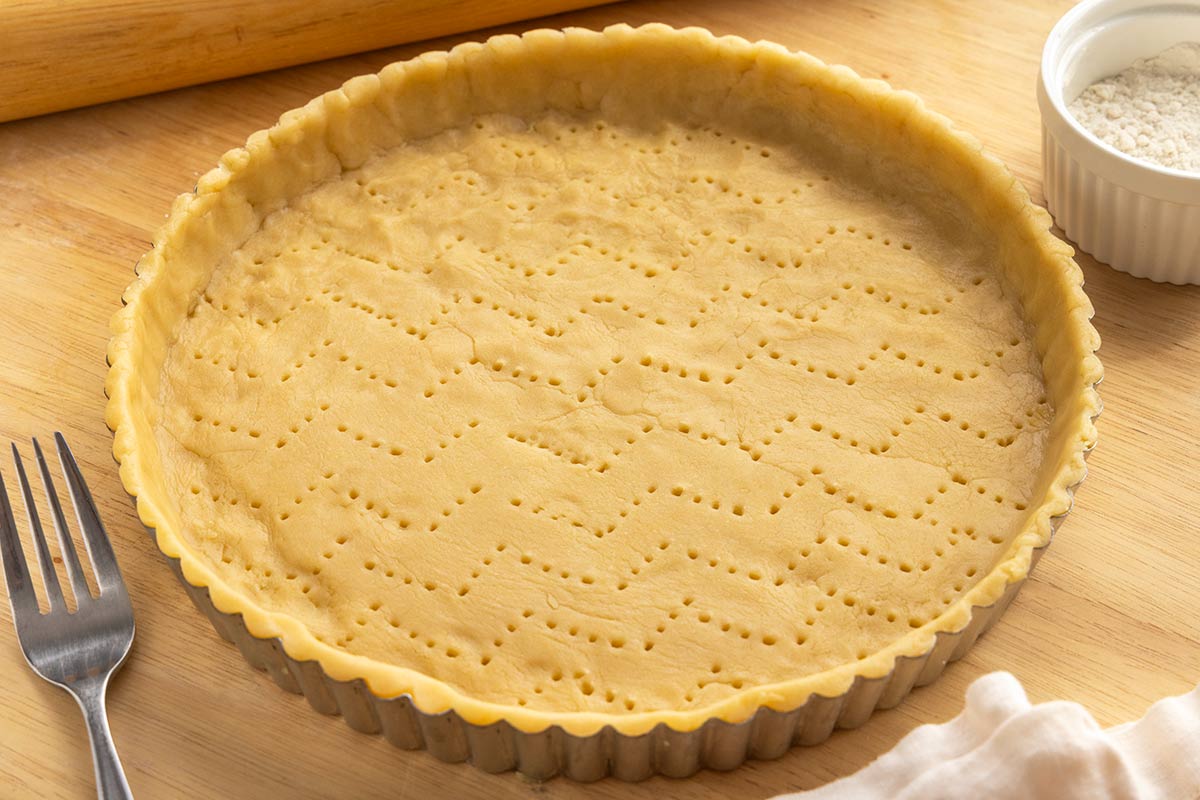
Roll a rolling pin over the top to trim excess dough, then press it slightly above the rim to account for shrinkage as the butter melts and gluten tightens during baking. Use a fork to dock (poke holes) in the bottom about 1 inch apart—the holes let steam escape, preventing the crust from puffing or bubbling.
Step 14: Freeze the Dough
Freezing the shaped crust for 30 minutes re-solidifies the butter, helping it hold its shape and minimize shrinkage during baking. Don’t skip this step!
Step 15: Heat the Oven
Bake the tart crust at 375°F (191°C); the high heat quickly sets the structure while the butter melts, creating a crisp, tender crumb.
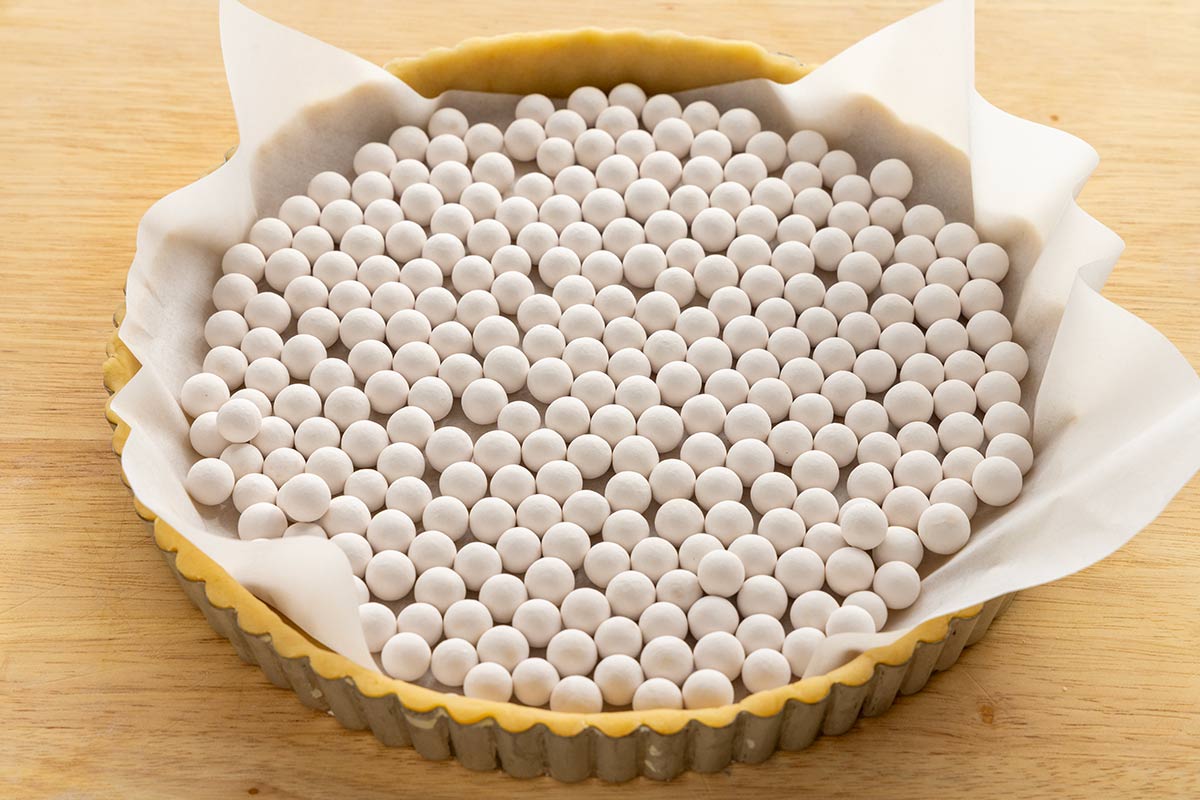
Step 16: Add the Pie Weights
Line the crust with parchment or foil and fill with pie weights (or rice/beans) to keep the bottom flat and the sides supported during baking—skipping this can cause the shell to shrink and collapse.
Step 17: Bake the Crust
Blind bake the tart shell with parchment and pie weights for 15 minutes to set the structure before adding filling. The weights keep the bottom flat and support the sides as butter melts and steam forms, preventing puffing or collapse. Remove the weights, then bake about 10 minutes longer until golden brown and fully cooked.
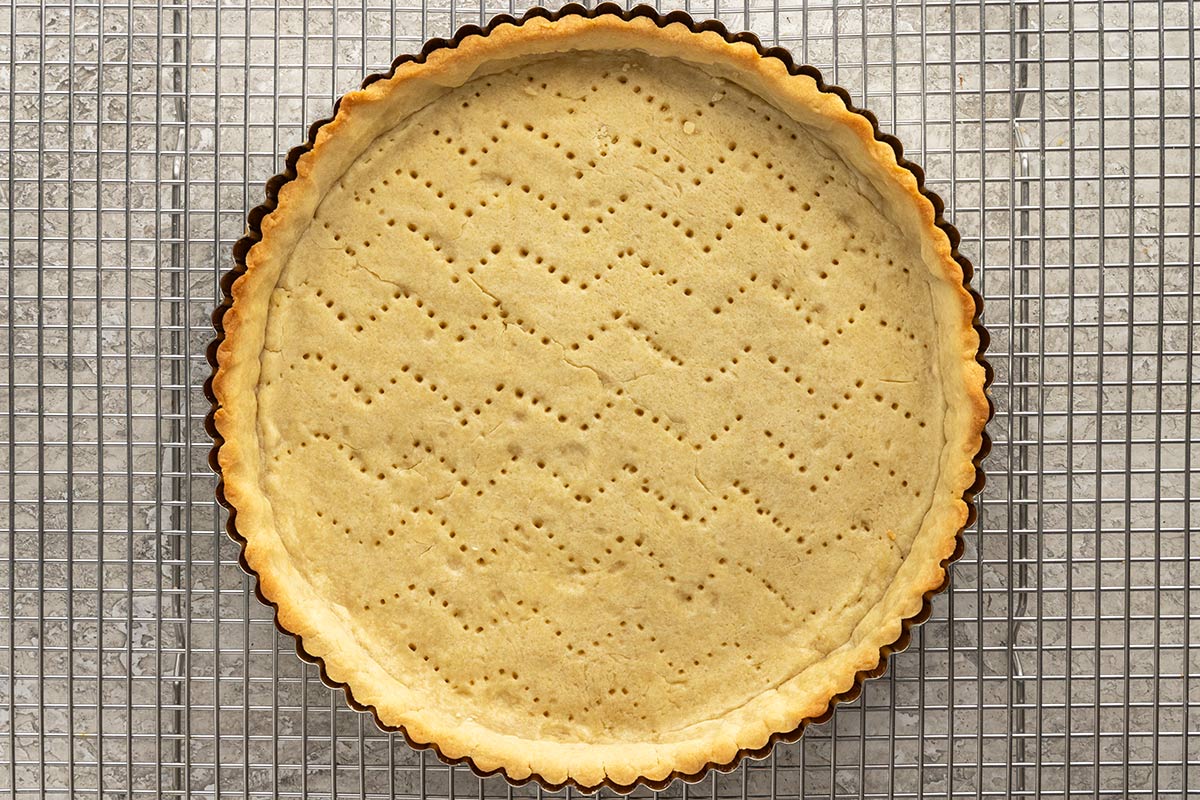
Step 18: Cool the Crust
Transfer the tart crust to a wire rack and cool completely; as it cools, the butter solidifies and the starches set, forming a crisp shell, while airflow underneath prevents steam from softening the bottom.
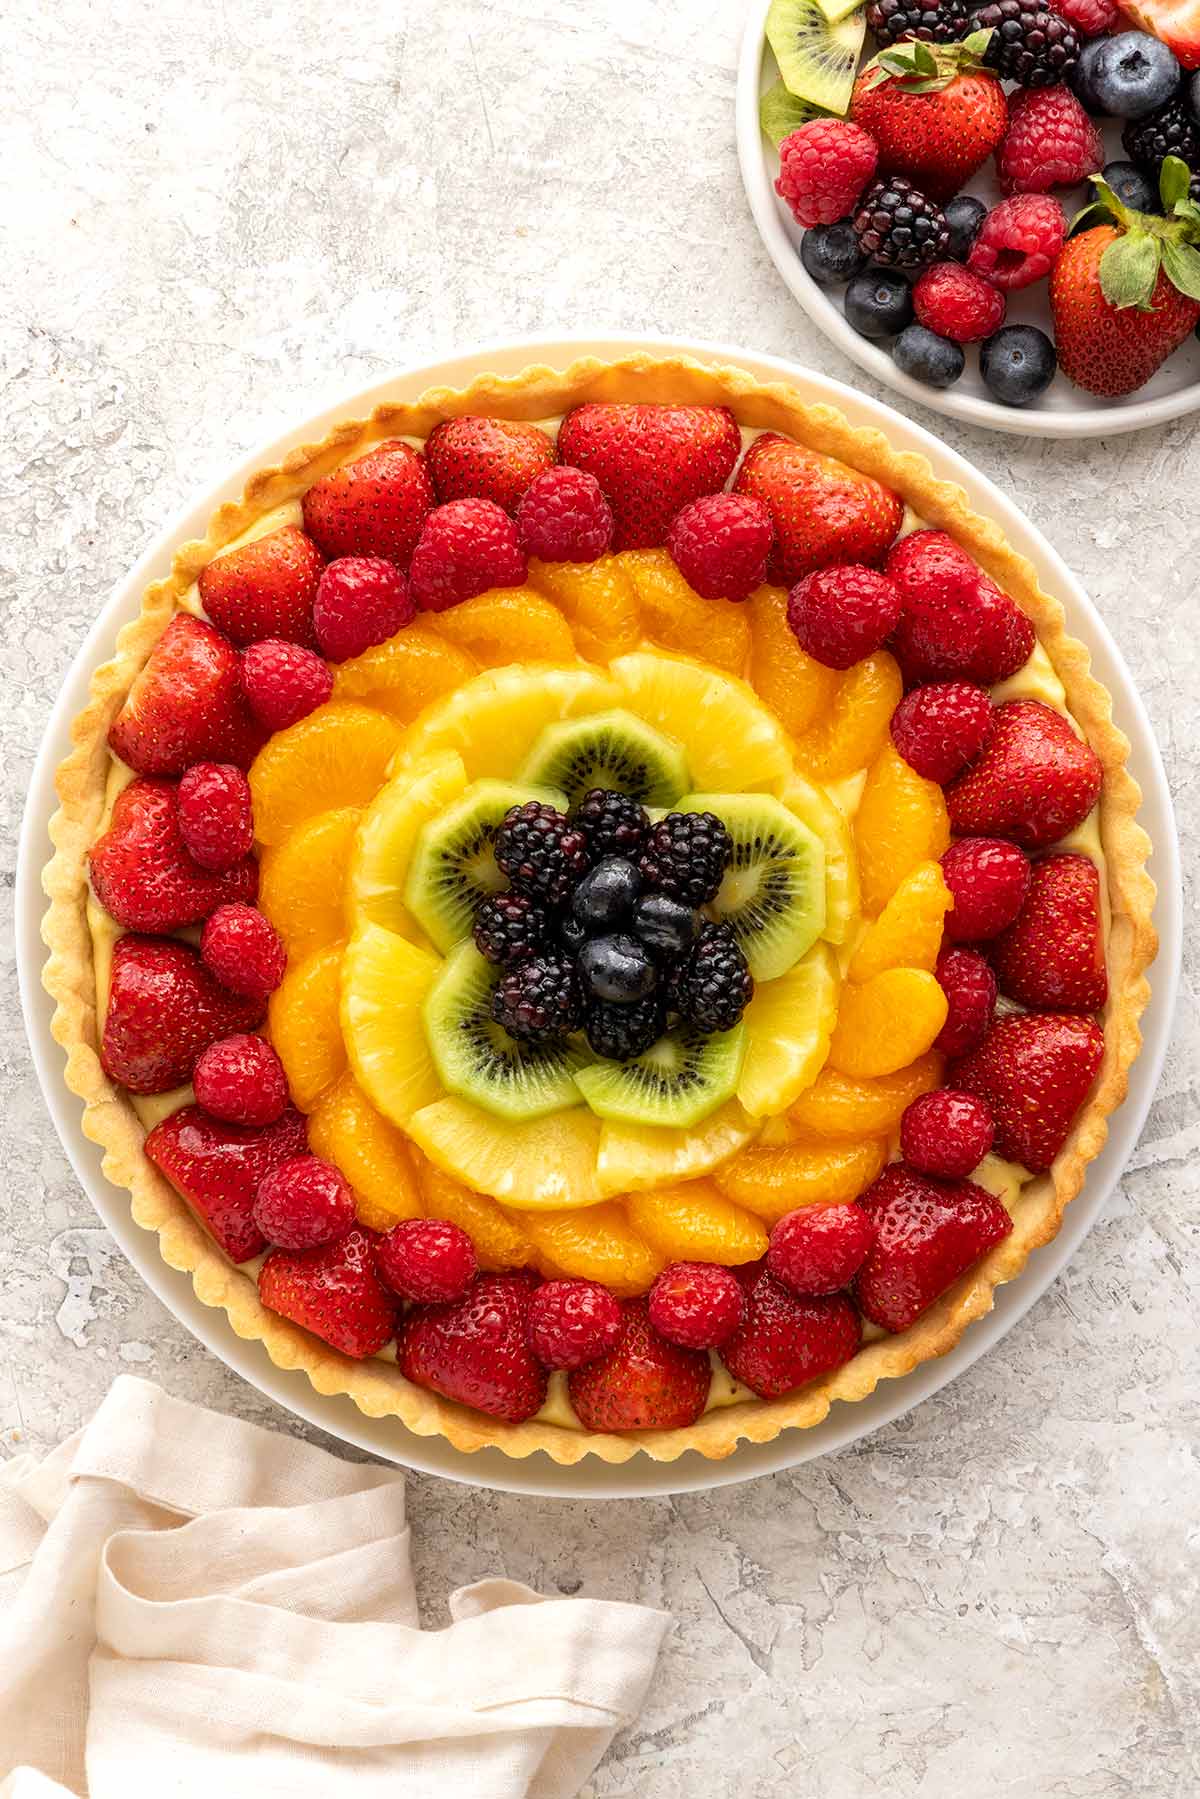
Step 19: Arrange the Fruit Tart
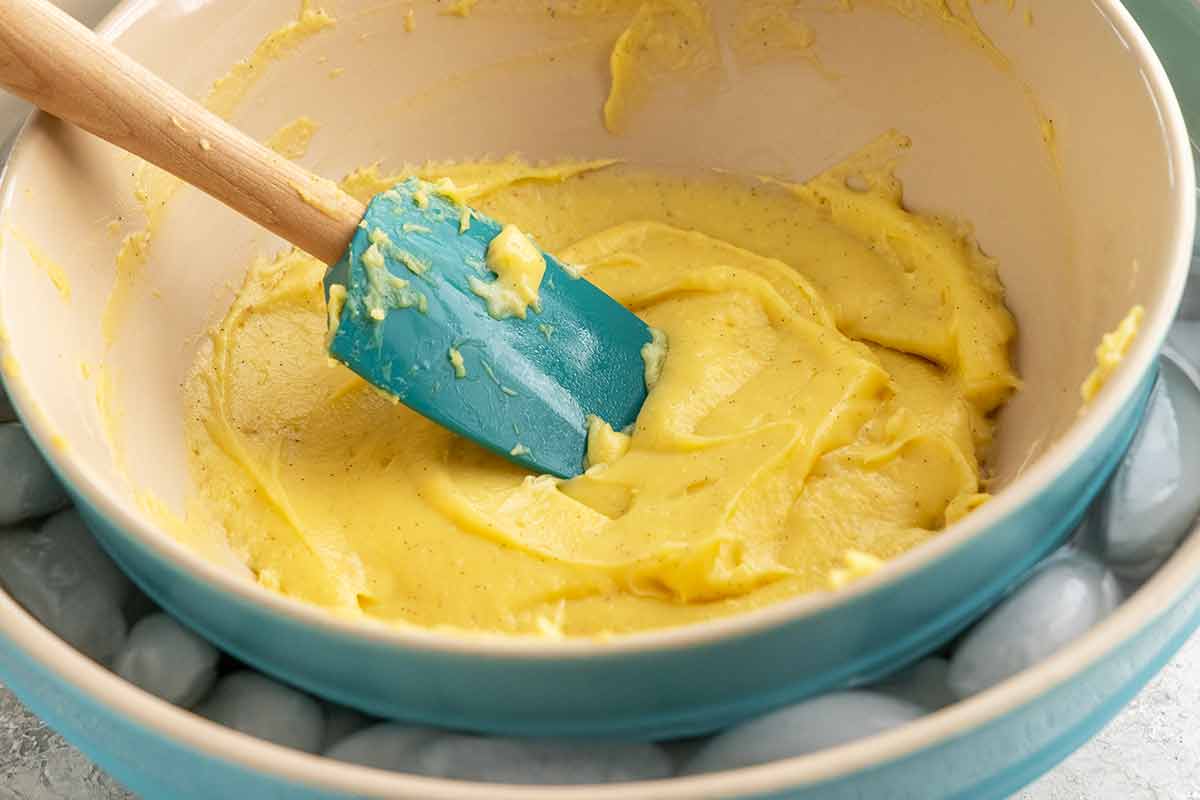
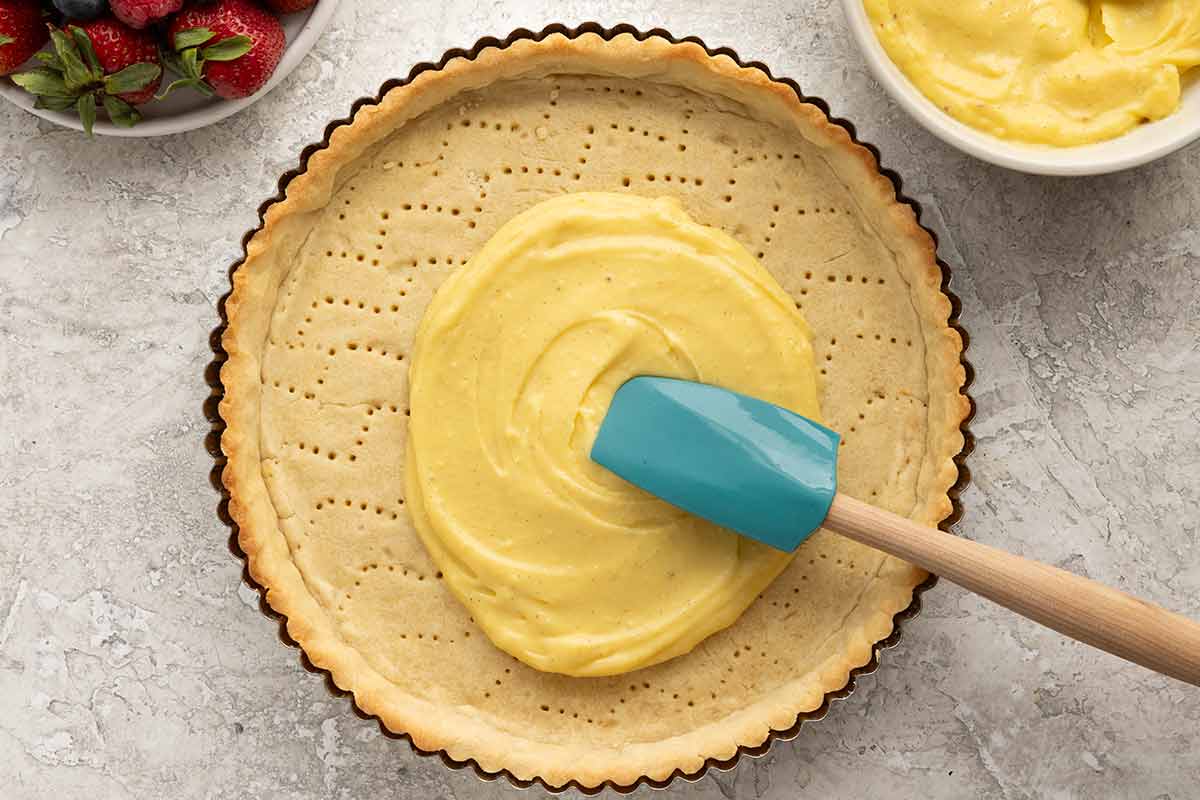
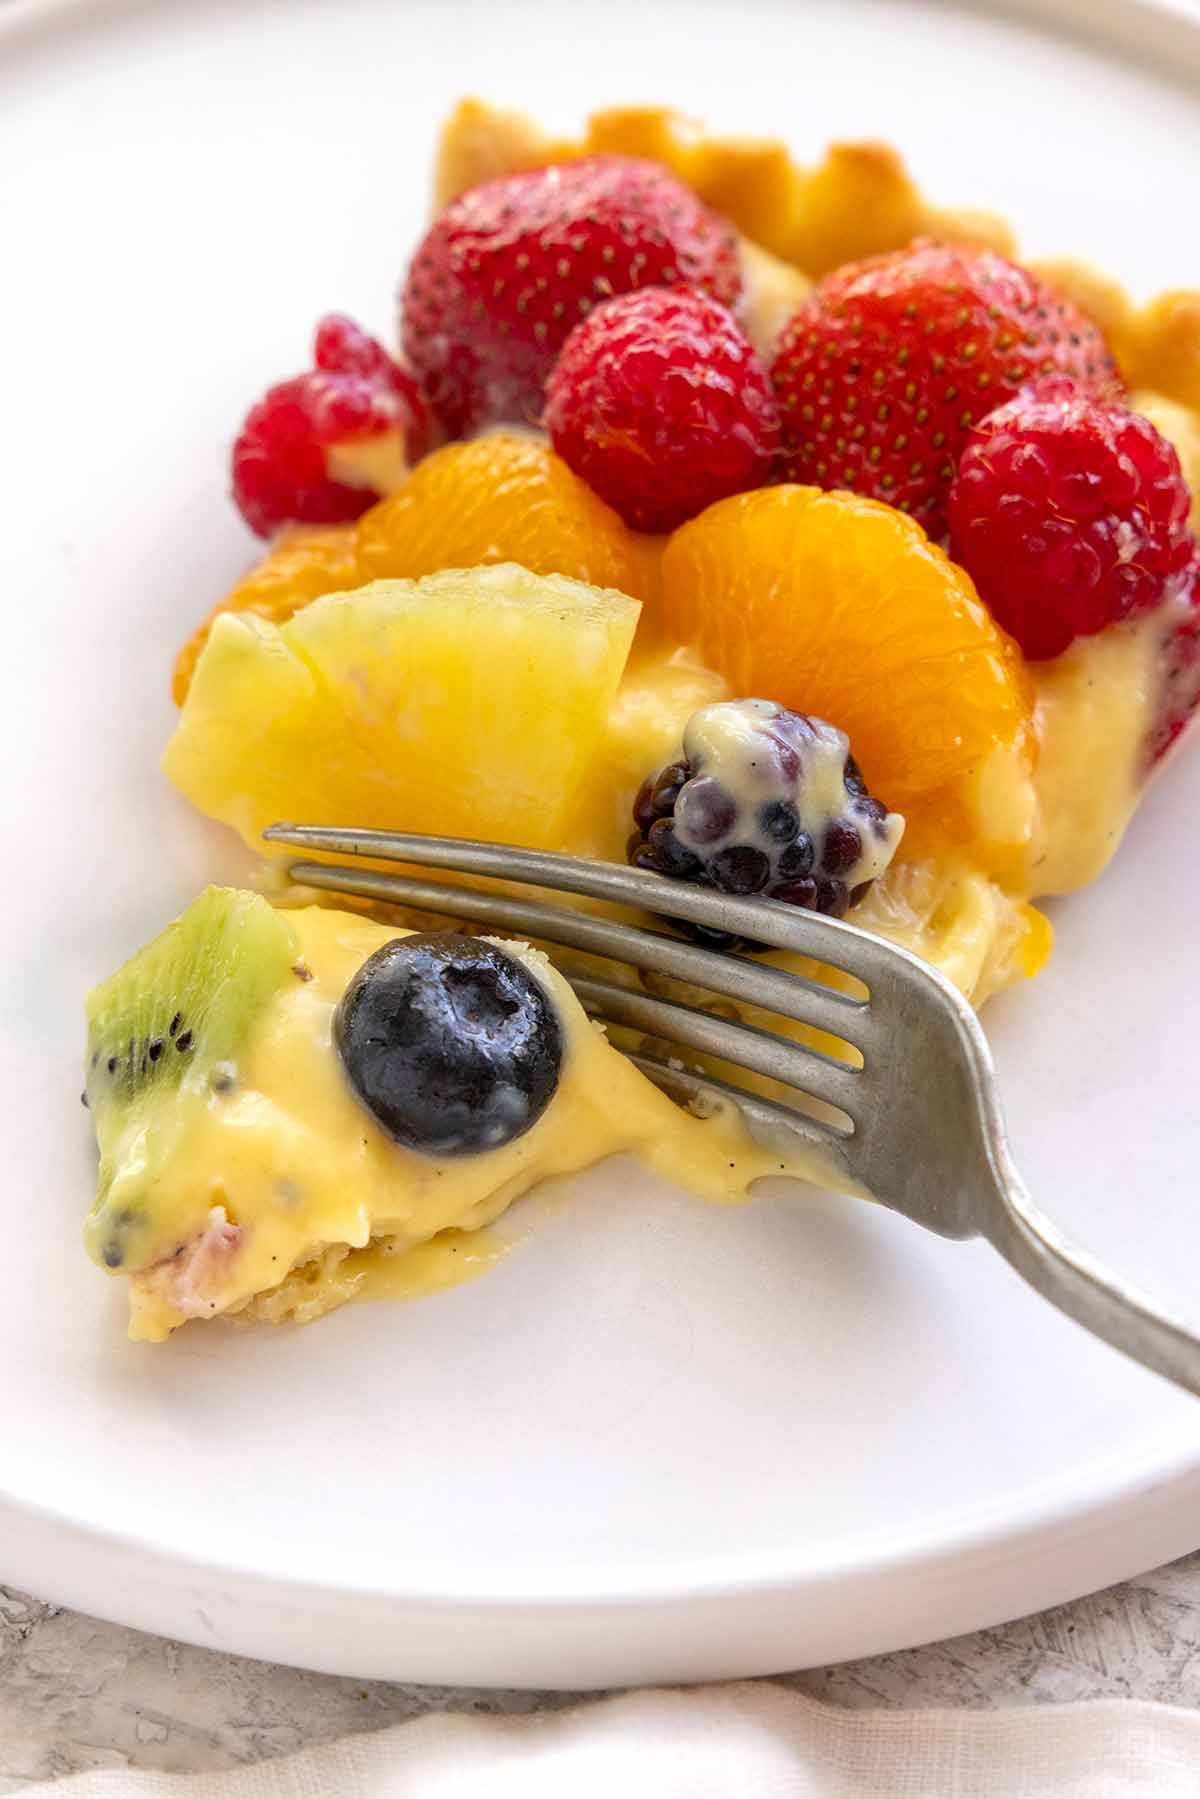
Remove the custard from the refrigerator, then use a spatula to gently mix until smooth. You don’t want to break down the cornstarch gel structure, or the pastry cream will not be as thick. Evenly spread the pastry cream into the cool crust. Use your creativity to arrange the fruit on top of the custard.
Pro Tip: You can add a light layer of melted chocolate (white, milk, or dark chocolate) to the bottom and sides of the tart shell. Refrigerate to set before adding the pastry cream. This creates an additional protective layer to prevent a soggy crust. I have not seen this to be an issue without the sturdy tart crust, but it’s an option.
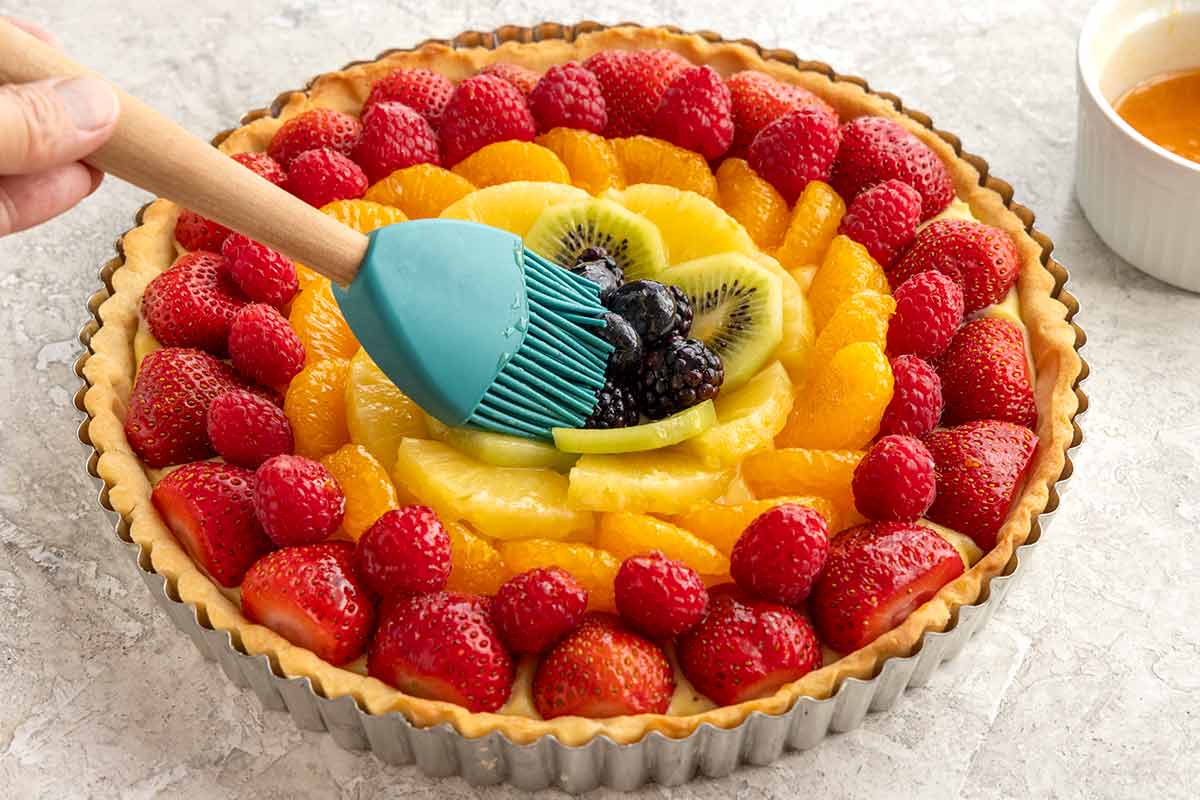
Step 20: Glaze the Tart
Apricot preserves have a neutral, fruity flavor and a light color that pairs well with a variety of fruits. Mix it with some water to thin the consistency, then heat it in the microwave until it forms a glaze. Use a pastry brush to lightly glaze the surface of the fruits.
Tips for Perfect Execution: If you have any cut fruit, like sliced strawberries, wait to add the glaze until right before serving, within a few hours of serving. The sugar in the preserve will draw moisture out of the fruit, which may leak into the custard.
Step 21: To Serve
For the best flavor and texture, I recommend serving this stunning fruit tart the same day you prepare it. You can prepare the tart crust and pastry cream a few days ahead to make decorating quick and easy. I’ve also made individual fruit tarts, so you don’t have to slice them; guests love having their own portion.
Frequently Asked Questions
For tarts, the two most common crusts are pâte sucrée and pâte sablée, each with a distinct texture and use. Pâte sucrée, also called sweet tart dough or sweet shortcrust pastry, is slightly firm and crisp, with added egg for structure, making it ideal for fruit tarts with pastry cream, as it holds clean slices. Pâte sablée, often referred to as a shortbread crust, is more delicate, tender, and crumbly due to its higher fat content, giving it a melt-in-your-mouth texture that’s better suited for simpler fillings.
To prevent a soggy fruit tart, start by fully blind-baking the crust until golden, forming a crisp, dry barrier. You can also brush a thin layer of melted chocolate over the cooled crust and let it set in the fridge. This creates a moisture-resistant seal between the crust and the creamy filling. Also, make sure the pastry cream is well chilled and thick, and that the fruit is completely dry before assembling to keep excess moisture from softening the crust.
Fruit tarts are typically filled with pastry cream, a rich, silky custard made from milk, egg yolks, sugar, and starch that thickens into a smooth, stable filling. It provides a creamy base that contrasts with the crisp crust and supports the fresh fruit on top. Variations can include lightened pastry cream (with whipped cream), cream cheese fillings, or even mascarpone, but classic fruit tarts most often use pastry cream for its structure and balanced sweetness.
More Dessert Recipes


If you tried this Fruit Tart Recipe, please leave a 🌟 star rating and let me know how it went in the 📝 comments below!
Fresh Fruit Tart

Ingredients
Pastry Cream
- 2 cups whole milk
- ½ cup granulated sugar, divided
- 1 vanilla bean, optional
- 5 large egg yolks
- 3 tablespoons cornstarch
- ⅛ teaspoon table salt
- 1 teaspoon vanilla extract, or vanilla bean paste
- 2 tablespoons unsalted butter
Tart Crust
- 1 ½ cups all-purpose flour
- ½ cup powdered sugar
- ¼ teaspoon table salt
- 8 tablespoons unsalted butter
- 1 large egg
- ½ vanilla extract
Fruit Tart
- 4 ½ cups assorted fruit
- 2 tablespoons apricot preserves
- 1 tablespoon water
Instructions
- Heat the Milk – In a medium saucepan, add the milk and ¼ cup of sugar. Use a paring knife to make a shallow cut lengthwise down the vanilla bean, scrape out the seeds, then add the seeds and pod to the saucepan. Heat over medium heat, whisking to dissolve the sugar, until the milk just begins to simmer, between 180 to 185ºF (82 to 85ºC), about 3 minutes; do not boil the milk! Turn off the heat and transfer the pan to a cool burner. For a stronger vanilla flavor, cover and steep for 30 minutes.
- Whisk the Yolk Mixture – In a large bowl, whisk together the egg yolks, ¼ cup sugar, cornstarch, and salt. Whisk until smooth and pale yellow, about 1 minute.
- Temper the Eggs – Remove the vanilla pod and discard it, if using. Slowly pour about ½ cup of the hot milk into the egg mixture while whisking constantly. Continue adding the milk in a slow stream, whisking until fully incorporated.
- Cook the Pastry Cream – Return the egg mixture to the saucepan and cook over medium heat, whisking constantly, until it thickens to a pudding consistency, about 3 minutes. Allow the mixture to cook undisturbed for 15 seconds; large bubbles should break the surface. Continue whisking and cook for 1 minute. The thickened pastry cream is done when it reaches between 190 to 200ºF (88 to 93ºC).
- Strain the Pastry Cream – For an extra silky texture, strain the pastry cream through a fine-mesh sieve into a clean medium bowl, using a spatula to press it through. This step is optional.
- Add the Butter and Vanilla – Whisk in the butter and vanilla extract until melted and smooth.
- Cool the Pastry Cream – Set the bowl of pastry cream over an ice-water bath and stir occasionally for a few minutes until it cools down. Press plastic wrap directly onto the surface to prevent a skin from forming. Chill in the ice water bath for 30 minutes. Transfer to the refrigerator for at least about 2 hours before using. The pastry cream will thicken up more after chilling.
- Mix the Dry Ingredients – Add the flour, powdered sugar, and salt to a food processor. Pulse about 5 times, until combined.
- Cut in the Butter – Slice the cold butter into 8 pieces, then evenly scatter it over the flour mixture. Pulse until the mixture resembles wet sand with some small coarse pieces, about 10 pulses.
- Incorporate the Wet Ingredients – In a small bowl, whisk together the egg and vanilla. Evenly drizzle over the flour and butter mixture. Pulse until a dough forms together, but do not overmix, about 15 pulses.
- Chill the Dough – Shape the dough into a flattened 1-inch-thick disk and wrap it tightly in plastic wrap. Refrigerate until firm, about 1 hour, or freeze for 30 minutes.
- Roll the Dough – Remove the dough from the refrigerator and let it sit at room temperature for 5 to 10 minutes until slightly pliable, making it easier to roll. Lightly dust the counter, dough, and rolling pin with flour. For easier transfer, you can place the dough on a sheet of parchment paper before dusting. Roll the dough, rotating and lightly dusting the bottom as needed to prevent sticking, until it’s about ⅛-inch thick, or large enough to fit your tart pan with a little overhang, roughly a 10 to 11-inch circle.
- Form the Tart Shell – Gently ease the rolled dough into a 9- or 10-inch tart pan, pressing it against the bottom and sides to create an even layer. Roll a rolling pin over the top of the pan to trim the excess dough and create a level edge. Use any scraps to patch thin spots if needed. For less shrinkage during baking, press the dough slightly above the rim of the pan. Use a fork to dock the bottom of the crust, poking holes about 1 inch apart.
- Freeze the Dough – Freeze the tart dough in the pan for 30 minutes. The dough should be very firm. This will help prevent shrinking when baked.
- Heat the Oven – Set the oven rack in the center position. Heat to 375°F (191°C).
- Add the Pie Weights – Place the tart pan on a sheet pan, then line the pie dish with a piece of parchment paper or foil with some overhang to make it easy to lift out. Add the pie weights to cover the bottom and sides; do not overfill. Dried beans or rice can also be used.
- Bake the Crust – Bake the tart crust for 15 minutes. Transfer to a wire rack and carefully remove the parchment paper filled with weights. Bake until edges are golden brown and fully cooked, about 10 minutes.
- Cool the Crust – Transfer the tart crust in the tin to a wire rack. Cool the crust completely on a cooling rack, about 30 to 40 minutes before adding the filling.
- Arrange the Fruit Tart – Carefully remove the tart ring (you can keep the base attached for easier transfer and slicing if desired), then place the crust on a serving dish. Take the chilled custard from the refrigerator, gently stir it with a spatula until smooth and spreadable, then evenly fill the tart shell. Before adding the fruit, make sure it is well rinsed and completely dry. Arrange the fruit on top of the custard in a decorative pattern.
- Glaze the Tart – In a small bowl, stir together the apricot preserves and water. Heat in the microwave in 10-second intervals until a thinner glaze forms, about 30 seconds. Cool slightly, then brush over the fruit.
- To Serve – Serve the fruit tart immediately or refrigerate.
Recipe Video

Notes
- Make Ahead: Wrap the dough in plastic and place it in an airtight container, refrigerated for up to 5 days. The baked tart shell can be stored at room temperature for 3 days. The pastry cream can be covered and refrigerated for up to 3 days.
- Mini Tarts: Roll the dough slightly thinner, about 1/16–⅛ inch, so the crust stays delicate. This recipe makes about 6 (4-inch) tarts or 12 (3-inch) tarts. Blind bake for 10 minutes, take out the pie weights, then continue to bake until lightly golden brown.
- Chocolate Coating: Melted white, milk, or dark chocolate can be lightly brushed on the inside of the tart shell to create a moisture barrier between the filling. Refrigerate after adding the chocolate coating, then refrigerate to harden before filling.
- Storing: Cover and refrigerate for up to 3 days.
Nutrition Facts
Percent Daily Values are based on a 2000-calorie diet. All nutritional information is based on estimated third-party calculations. Each recipe and nutritional value will vary depending on the brands you use, measuring methods, and portion sizes per household.


Leave a Comment