Learn how to make a sweet tart crust recipe (Pâte Sucrée) with a crisp, buttery texture and delicate sweetness. Create the perfect base for fruit tarts, chocolate ganache fillings, and more!
Jessica’s Recipe Science
- Cold unsalted butter coats the flour, limiting gluten development, so the crust bakes tender and shortbread-like rather than tough.
- Chilling the pastry dough in the fridge firms the butter and relaxes the gluten, reducing shrinking along the sides of the pan.
- Blind baking with pie weights prevents bubbling and keeps the crust flat as moisture evaporates, resulting in a crisp texture.
Why It Works
A great sweet tart crust recipe, also known as Pâte Sucrée, is the perfect base for countless tart recipes, from vibrant fruit tart topped with fresh fruit and vanilla pastry cream to rich fillings like chocolate ganache. Unlike flaky pastry dough used for pie crust, this dough bakes up crisp, tender, and slightly sweet—similar to a buttery shortbread cookie. The structure is sturdy enough to support fillings yet delicate when sliced.
This tart dough recipe focuses on simple ingredients and a few key techniques to control gluten development, manage moisture, and create balanced flavor. Using cold unsalted butter, egg–yolk–rich dough, and proper chilling ensures a perfect crust that holds its shape in a tart tin with a removable bottom. This is my go-to sweet tart dough that works beautifully for both full-size and mini tarts.
Jump To a Section
Ingredients You’ll Need
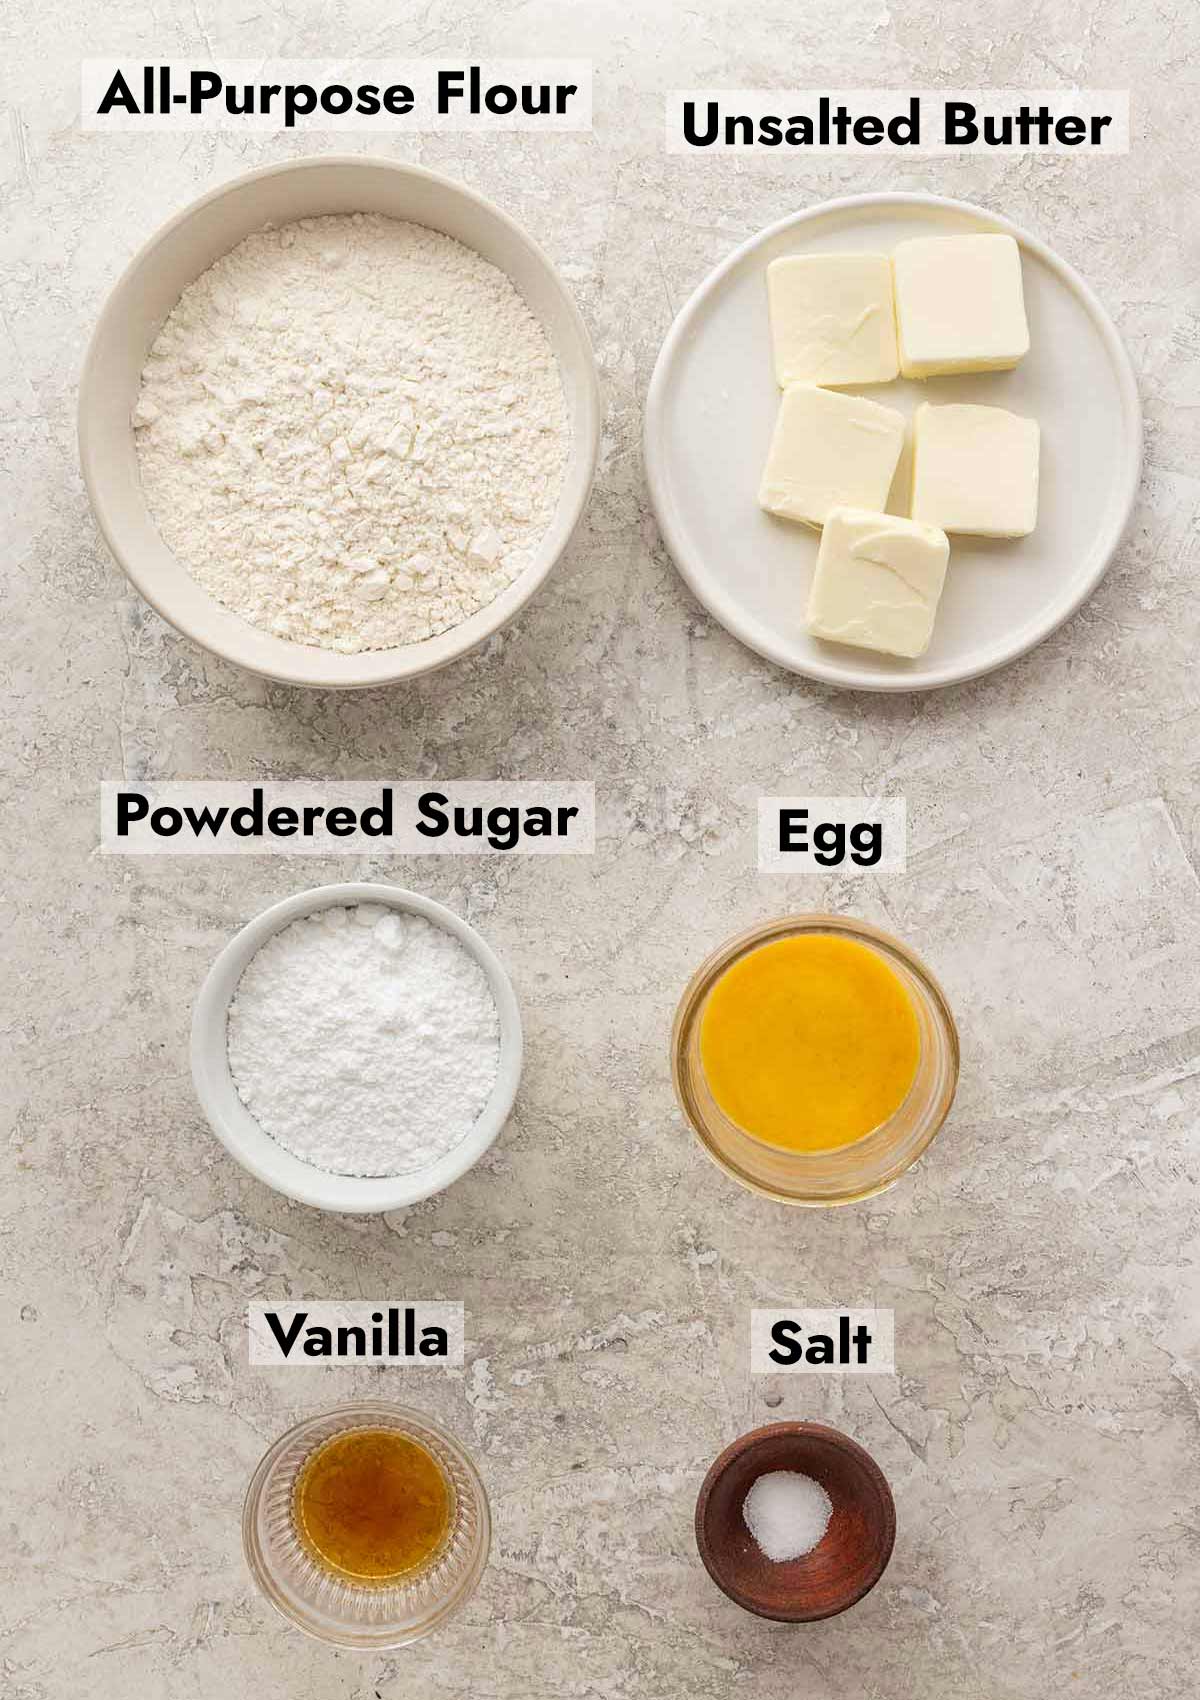
- All-Purpose Flour: Provides structure for the pastry dough. Its moderate protein level forms enough gluten for stability without making the crust tough.
- Powdered Sugar (Icing Sugar): Sweetens the crust and creates a finer crumb than granulated sugar, helping to produce a tender, shortbread-like texture.
- Salt: A small amount of table salt enhances the overall flavor and balances the crust’s sweetness.
- Butter: When cold unsalted butter is cut into the flour, the butter forms small pockets of fat that melt during baking, creating a tender, crisp texture similar to shortbread cookies.
- Egg: Adds moisture and proteins that help bind the dough together while providing structure once baked.
- Vanilla Extract: Adds a subtle aromatic flavor that pairs well with fillings such as pastry cream, custards, lemon meringue, or fruit.
See the recipe card below for all ingredients and measurements (US and metric).
Ingredient Substitutions
This sweet tart crust recipe is easy to customize! Try these delicious variations:
- Powdered Sugar Swap: Substitute granulated sugar for a slightly crunchier texture, though powdered sugar produces a more delicate crumb.
- Flour Options: Swap up to ¼ cup of the flour with almond flour for a nutty flavor and a slightly softer texture. Use gluten-free flour for dietary restrictions.
- Flavoring: Replace with almond extract or citrus zest for a different flavor profile that complements fruit tarts.
- Butter Options: Salted butter can be used, just don’t add additional salt.
How to Make Tart Crust
Step 1: Mix the Dry Ingredients
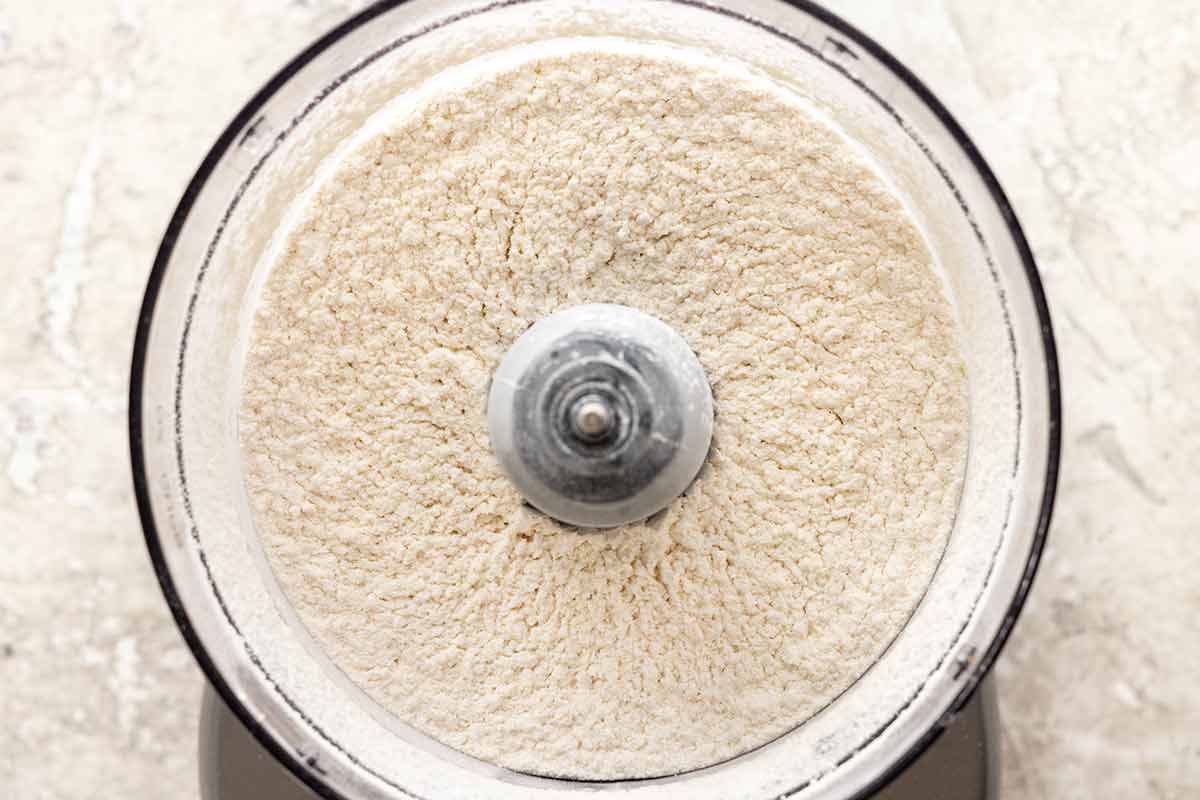
Add the flour, powdered sugar, and salt to a food processor and pulse briefly. This evenly distributes the ingredients so the crust has consistent sweetness and structure.
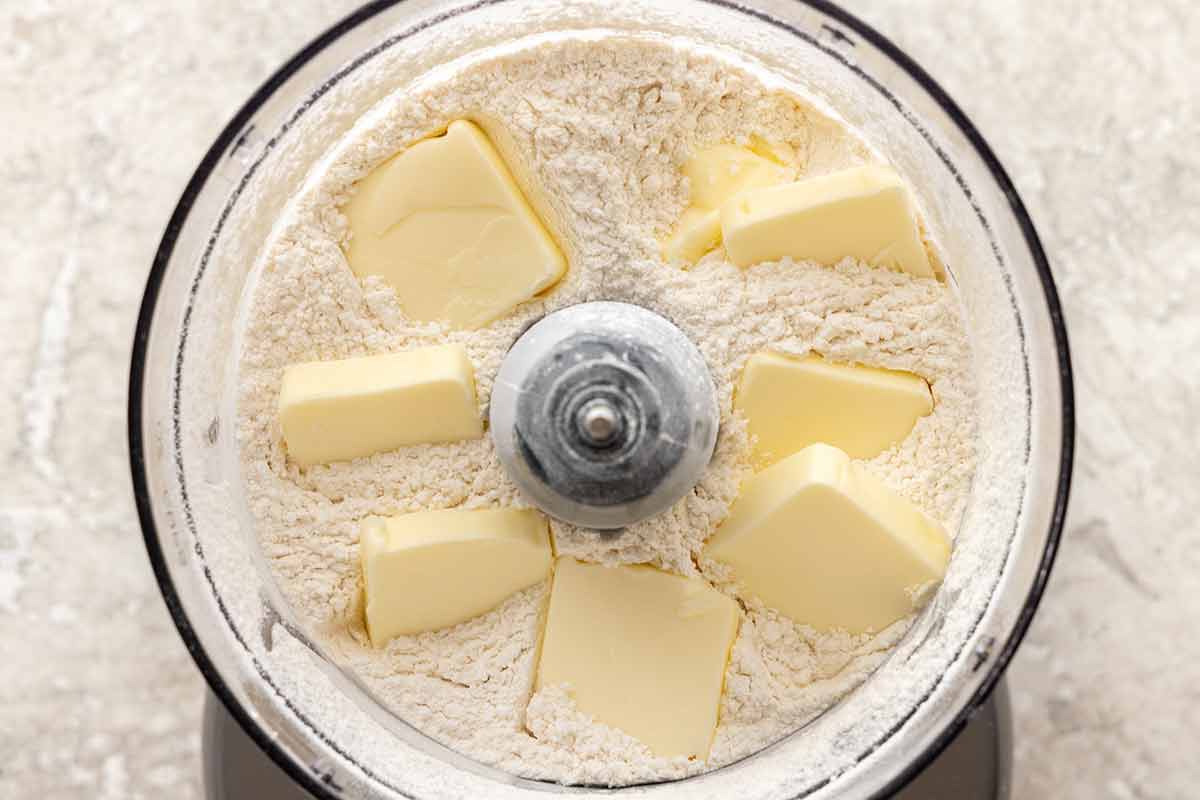
Step 2: Cut in the Butter
Scatter pieces of cold, unsalted butter over the flour mixture and pulse until the mixture resembles wet sand with pea-sized pieces of butter. Coating flour with fat slows gluten development, helping the crust stay tender instead of tough.
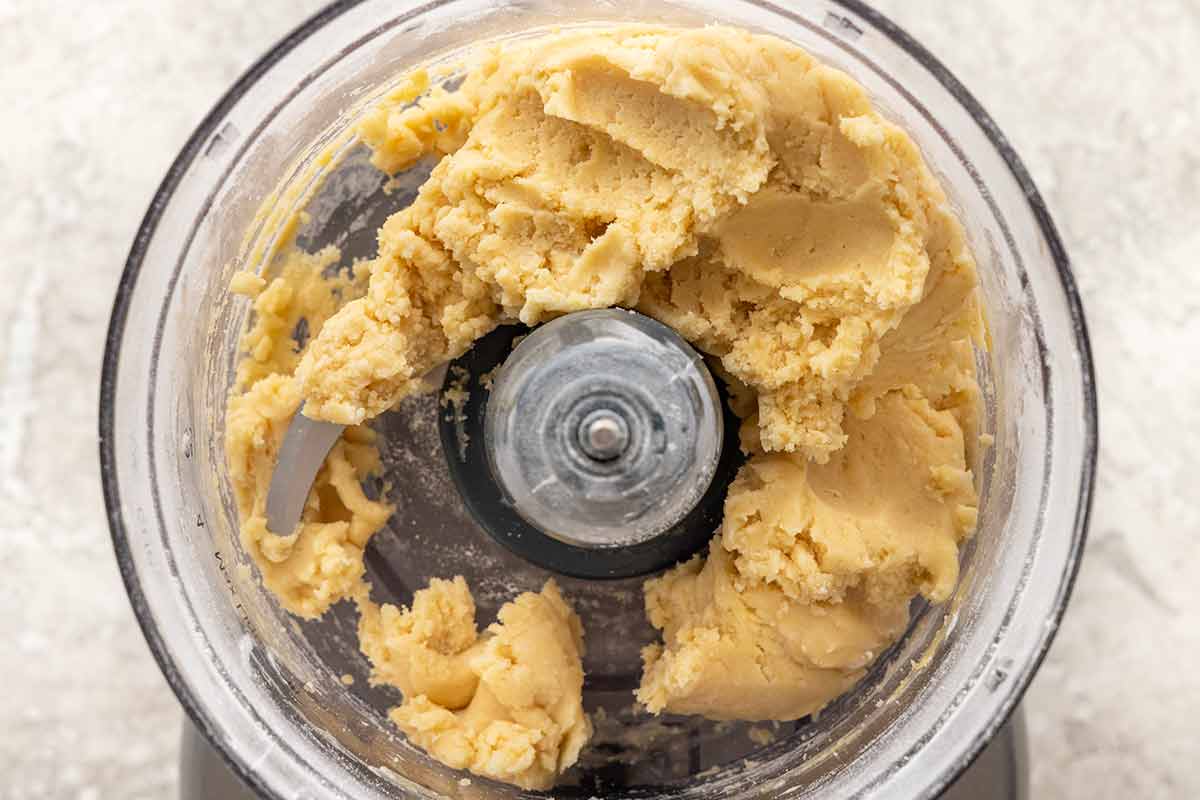
Step 3: Incorporate the Wet Ingredients
Whisk the egg and vanilla in a small bowl, then drizzle into the mixture while pulsing. The egg provides moisture and proteins that help bind the dough while maintaining a cohesive pastry crust.
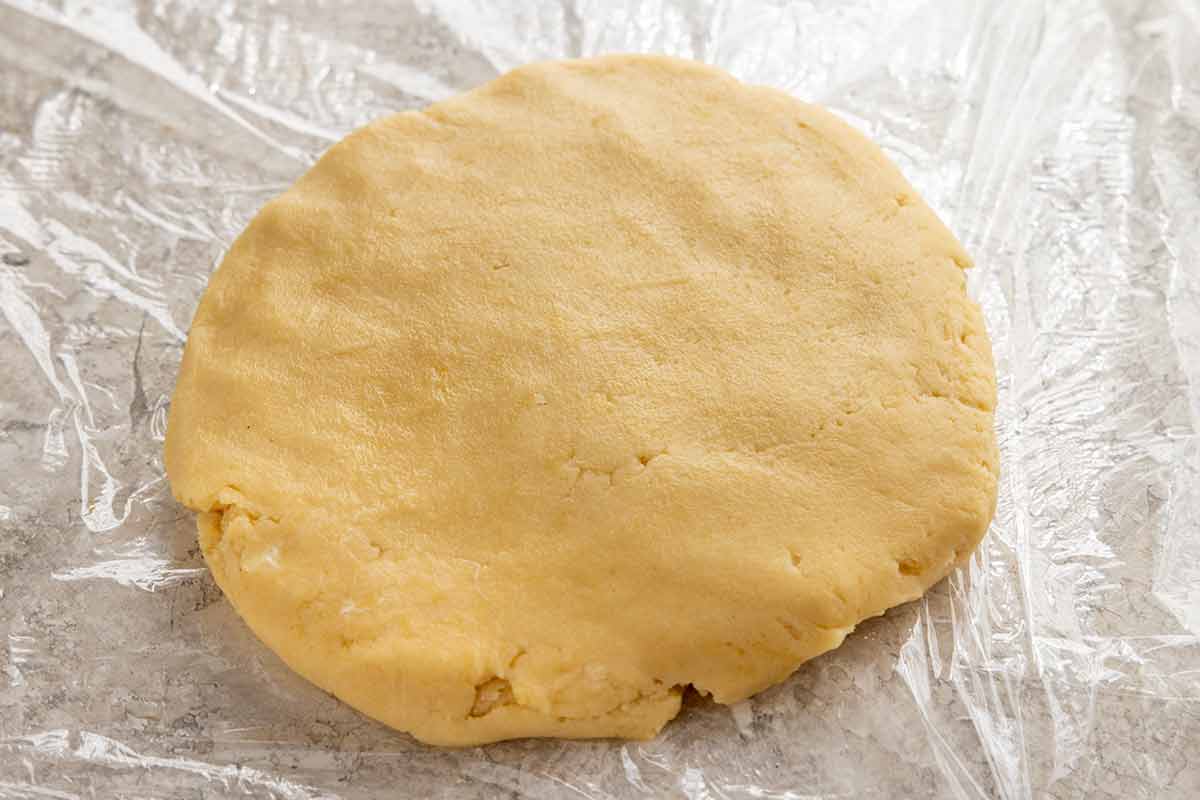
Step 4: Chill the Dough
Shape the dough into a disk and refrigerate it for about 1 hour, or freeze it for 30 minutes. Chilling firms the butter and allows the gluten to relax, preventing shrinkage during baking.
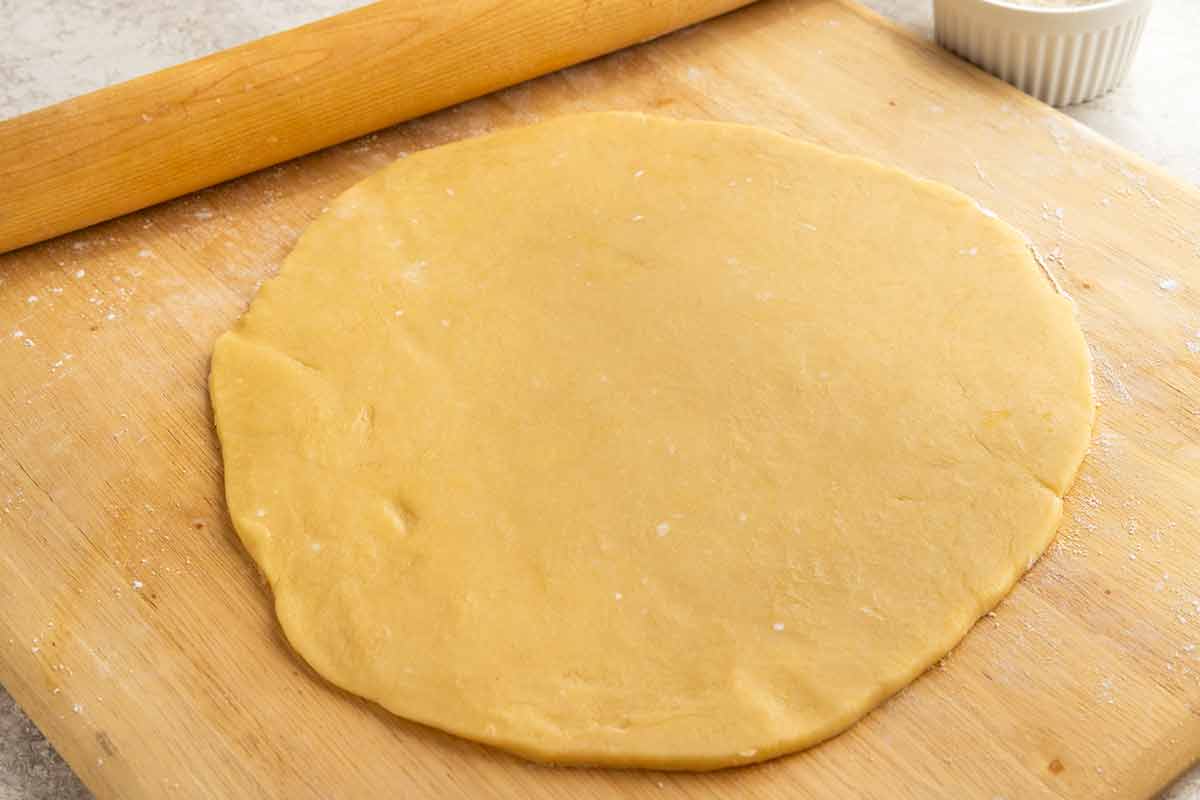
Step 5: Roll the Dough
Let the dough soften slightly before rolling it to about ⅛-inch thick. This thickness provides enough structure to support fillings while remaining delicate when sliced.
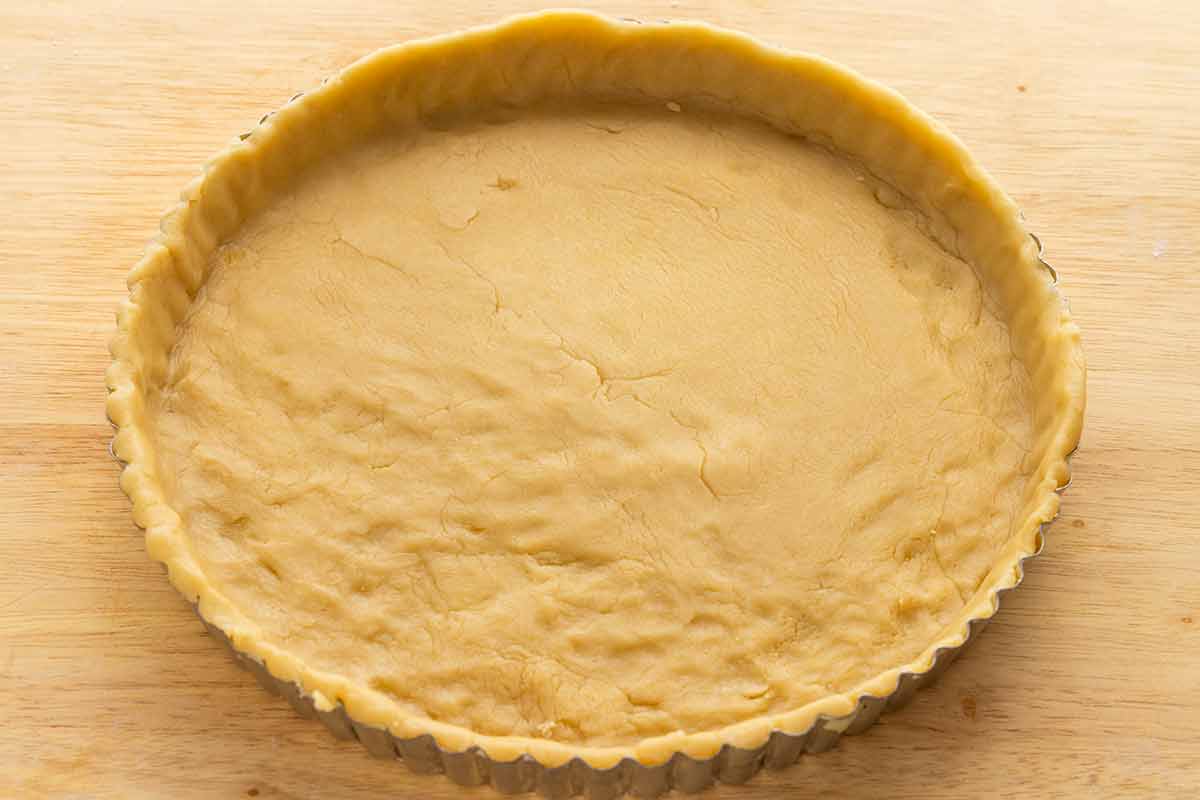
Step 6: Form the Tart Shell
Ease the dough into a 9 or 10-inch tart tin with a removable bottom, pressing it against the bottom and sides of the pan. There will not be much excess dough, depending on the size of the tart tin. If you notice thin spots, patch them with scraps so the crust bakes evenly and doesn’t crack.
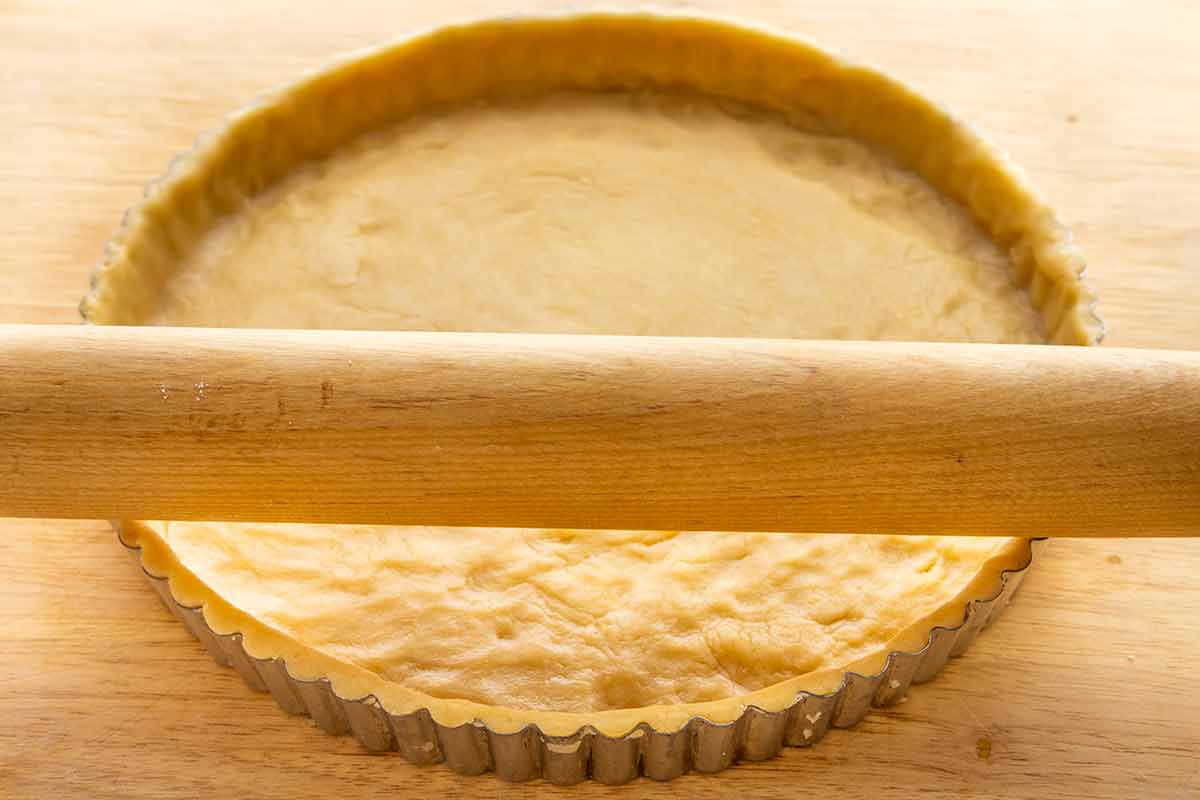
Roll a rolling pin over the top of the tart pan to trim the excess dough and create a clean, level edge. Press the dough slightly above the rim, as the butter will melt and the gluten will tighten during baking, causing the crust to shrink to the pan’s height.
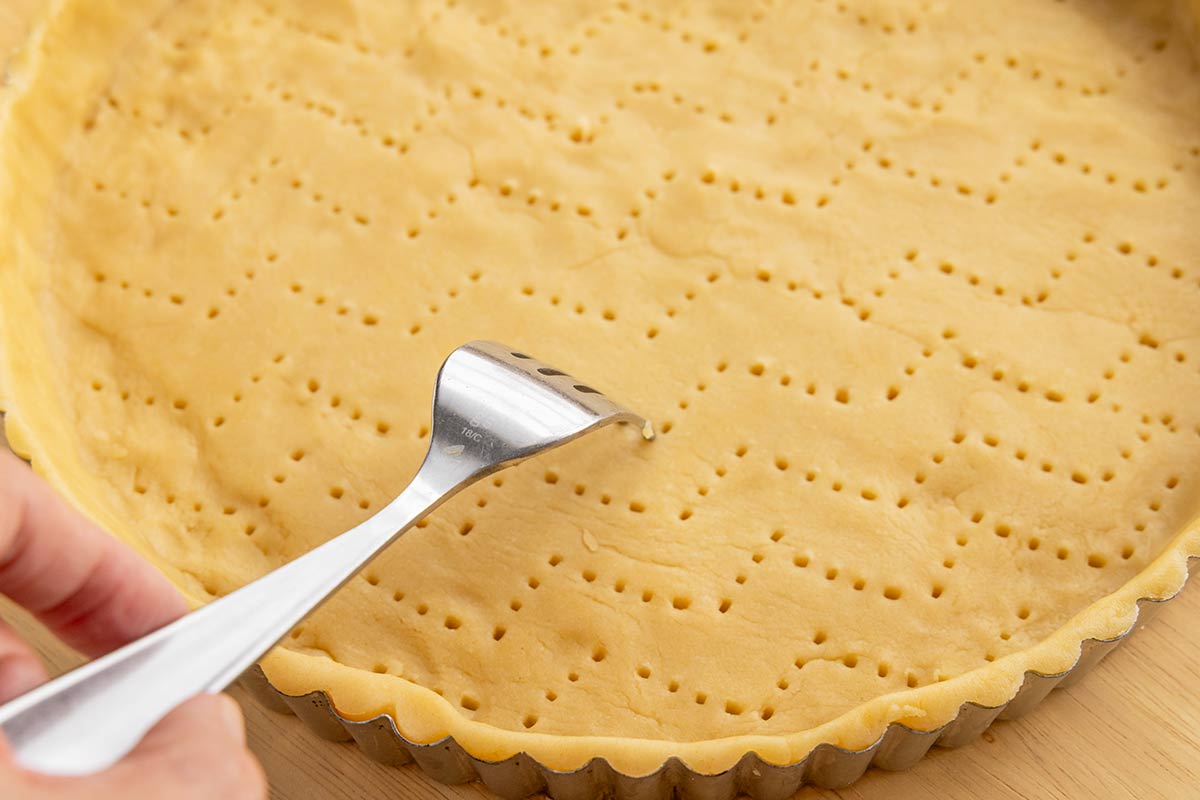
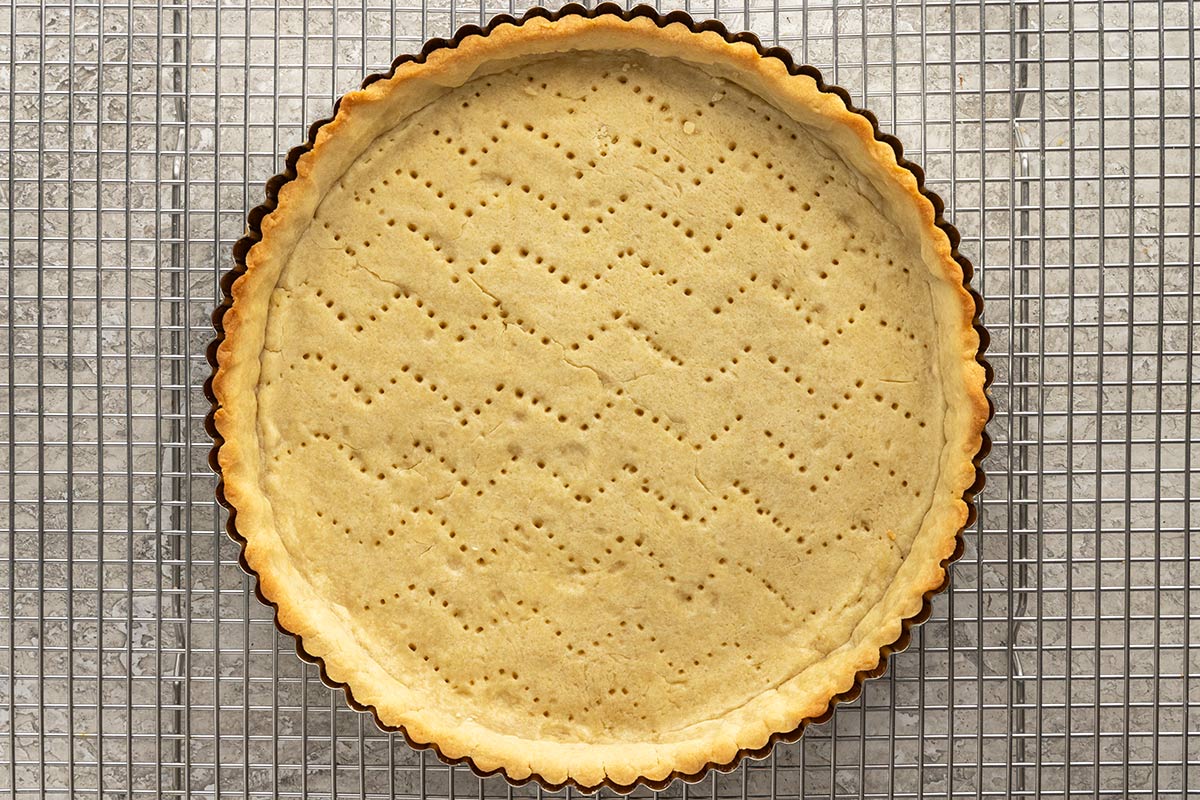
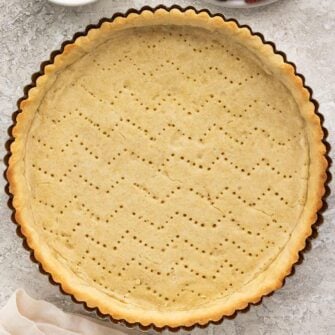
Tips for Perfect Execution: Use a fork to dock the bottom of the crust about 1 inch apart. These small holes allow steam from the butter and trapped moisture to escape, preventing the crust from puffing or bubbling as it bakes.
Step 7: Freeze the Dough
Freezing the shaped crust for 30 minutes solidifies the butter again, helping the crust keep its shape during baking.
Step 8: Heat the Oven
Bake the tart crust in a preheated oven at 375°F (191ºC). Proper oven temperature helps set the structure quickly while the butter melts, creating a crisp crumb.
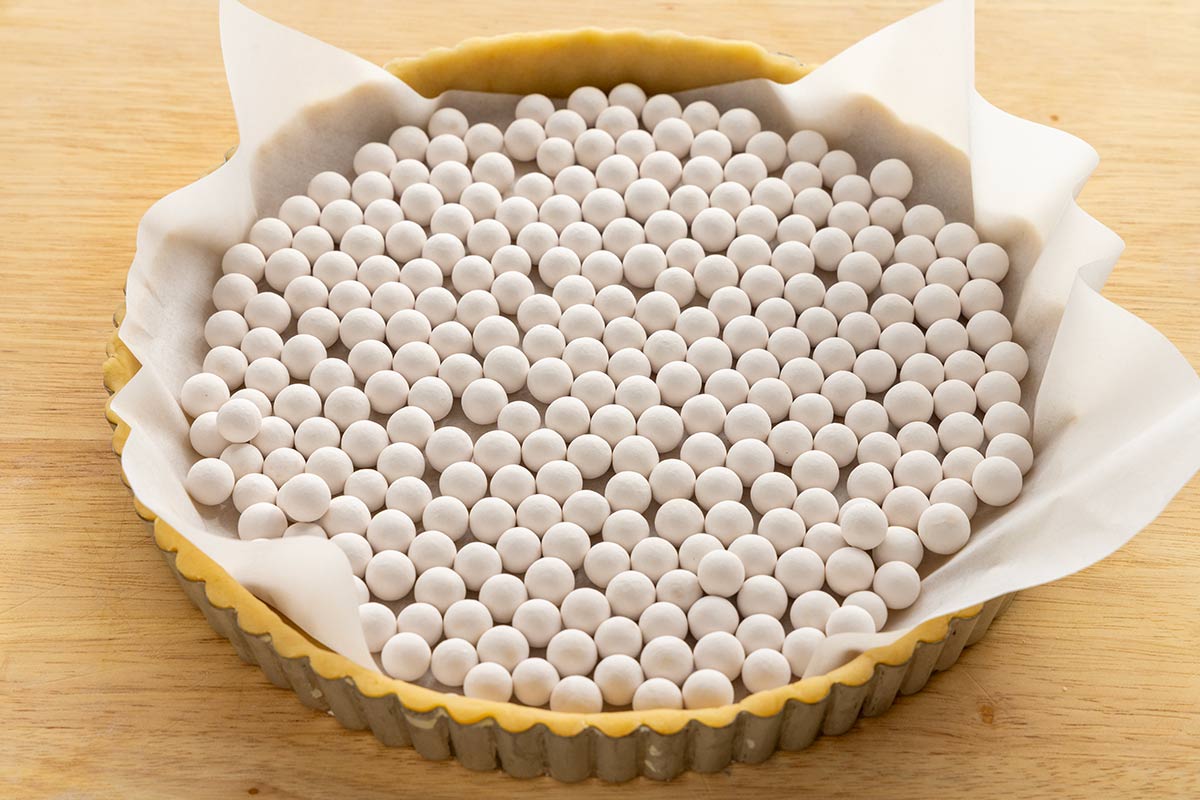
Step 9: Add the Pie Weights
Line the crust with parchment or foil and add ceramic pie weights, which look like white marbles. This step keeps the bottom flat and the sides of the pan supported during baking. This step should not be skipped, or the pie shell will shrink down into the bottom of the pan.
Quick Substitution: Use uncooked rice or beans instead of pie weights.
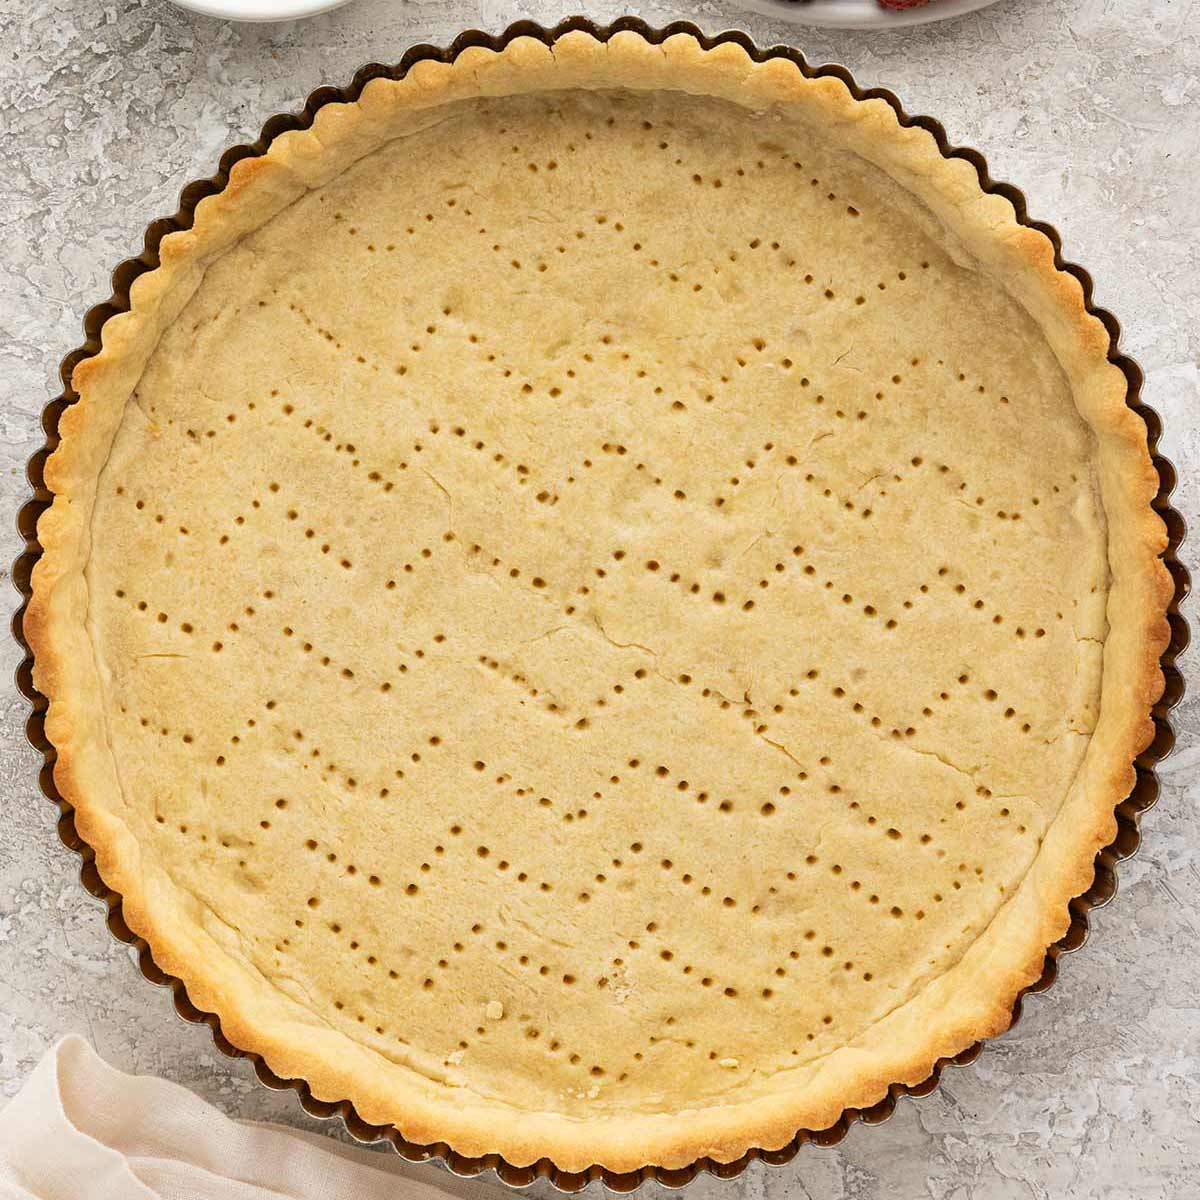
Step 10: Blind-Bake the Crust
Blind baking the tart shell with parchment paper and pie weights for 15 minutes sets the dough’s structure before adding the filling. The weights keep the bottom flat and support the sides of the pan so the crust doesn’t puff or collapse as the butter melts and steam forms. Depending on the application, you will want to either partially or fully bake the tart crust:
- Partially Baked Tart Crust – After removing the weights, bake for about 5 more minutes until the edges are lightly golden and crisp while the bottom remains slightly underbaked. This step is ideal for fillings that will continue baking in the oven, such as custards for quiche , pecan pie filling, pumpkin pie filling, or frangipane, allowing the crust and filling to finish cooking together without over-browning.
- Fully Baked Tart Crust – Bake about 10 minutes longer until the crust is completely golden brown and cooked through. This creates a crisp, sturdy shell that’s perfect for no-bake fillings such as pastry cream, chocolate ganache, apple pie filling, fresh fruit tarts, yogurt tart, or breakfast tart, where the crust must be fully set before assembling.
- Egg Wash – If you’d like to add an egg wash to the crust, do it right after the pie weights are removed, then bake as desired. This creates a shiny coating and a thin protective layer against moisture.
Step 11: Cool
Transfer the tart crust in the tin to a wire rack and let it cool completely before using. As the crust cools, the butter solidifies and the starches set, which helps the shell firm up and become crisp. Cooling on a wire rack also allows air to circulate underneath the pan, preventing trapped steam from softening the bottom of the crust before adding the filling.
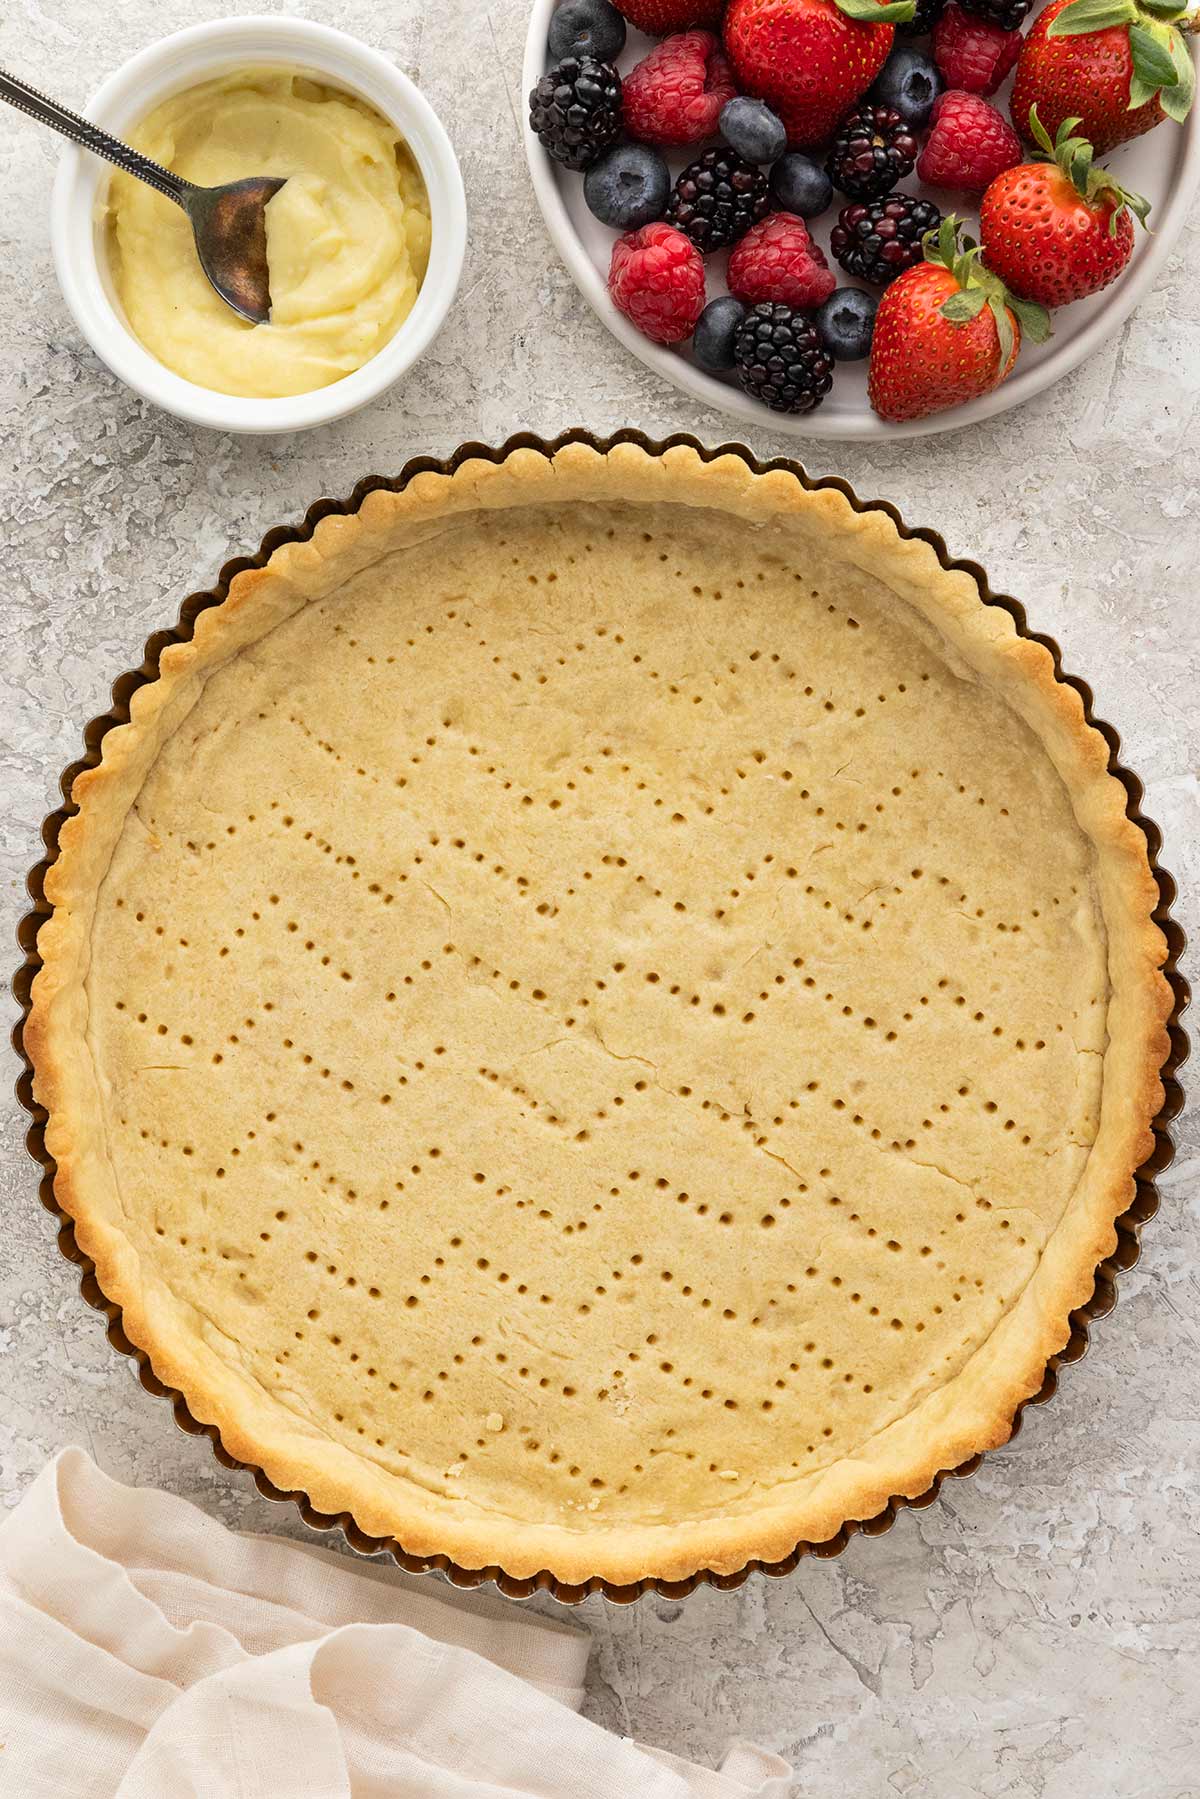
Step 12: Using the Crust
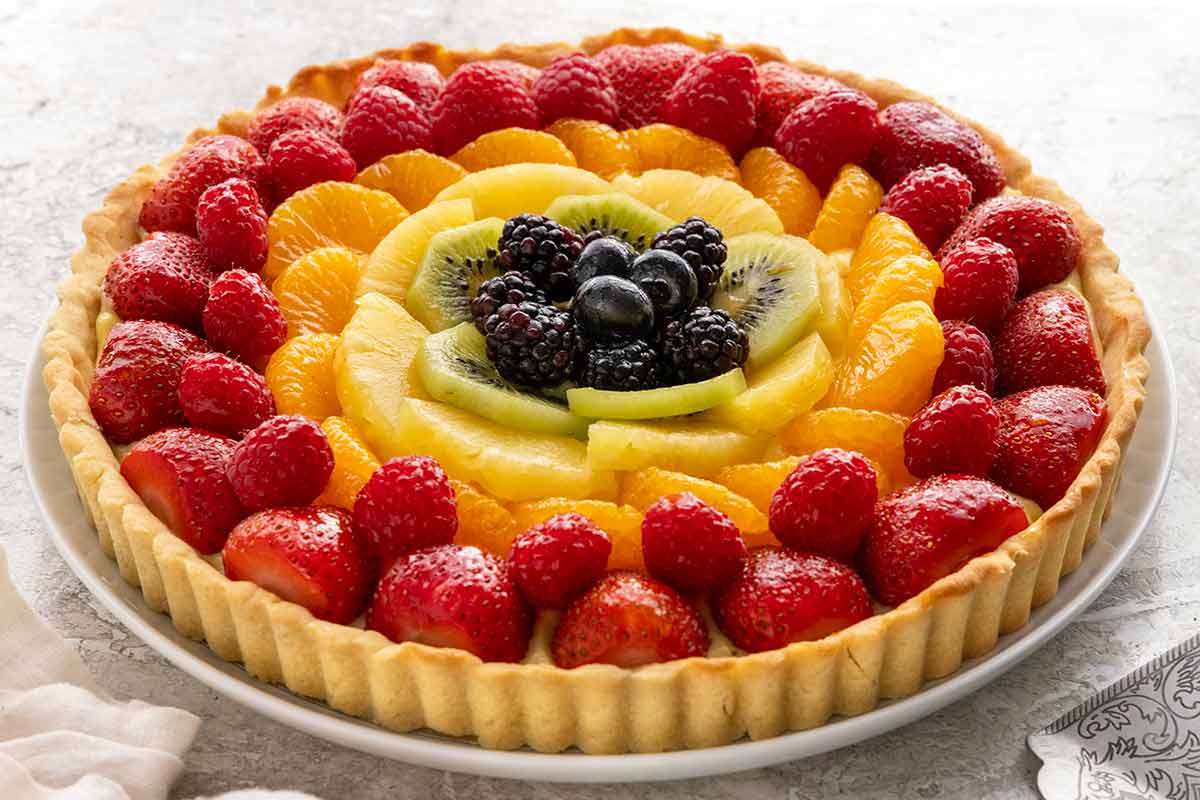
This tart dough is incredibly versatile and serves as the perfect base for many classic desserts. My favorite is a fresh fruit tart filled with vanilla pastry cream and topped with berries, kiwi, or stone fruit. Use it for bright citrus desserts like lemon tarts or key lime tarts. Rich options include chocolate ganache tarts or caramel chocolate tarts.
Par-bake for nutty frangipane tarts filled with almond cream and fruit like pears or raspberries. The crisp, cookie-like texture also works beautifully for simple jam tarts, elegant strawberry tarts, or bite-sized mini tarts. Because the crust is sturdy yet tender, it holds both baked and no-bake fillings, making it a reliable go-to pastry for countless tart recipes.
Make-Ahead Tip: The baked tart shell stores well if you want to prep in advance. Keep it at room temperature for up to 3 days, refrigerate for up to 5 days, or wrap tightly and freeze for up to 1 month.
Frequently Asked Questions
Sweet tart crust (pâte sucrée) is sweeter and more cookie-like than traditional pie crust (pâte brisée). It contains sugar and egg, giving it a firmer texture that works well for tart recipes. Pie crust is more neutral in taste, can be made into a flaky or mealy dough, and is best used for apple pies or pre-baked pie shells for chocolate cream pie or banana cream pie.
The dough can be stored in the fridge for up to 5 days or frozen for up to 3 months, making it a great go-to base for quick desserts.
Blind baking means baking the tart shell before adding the filling. This step sets the structure of the dough and allows moisture from the butter and dough to evaporate, helping the crust become crisp instead of soggy once the filling is added. It’s especially important for custards like quiches, pastry cream, or fruit fillings, ensuring the perfect tart crust that stays firm and flaky.
You can egg wash a tart crust, depending on the filling you plan to use. After blind baking and removing the pie weights, lightly brush the crust with a thin layer of beaten egg or egg white and return it to the oven. The egg proteins quickly set in the heat, forming a thin protective barrier that helps seal the crust and prevent moisture from fillings like vanilla pastry cream or juicy fresh fruit from soaking in, keeping the tart shell crisp. For fully baked shells used with no-bake fillings like chocolate ganache, an egg wash isn’t usually necessary since the crust is already dry and stable. Many pastry chefs prefer using egg white instead of whole egg so the crust seals without becoming overly rich or browning too dark.
Shrinkage usually happens when the dough isn’t chilled enough or when gluten becomes overdeveloped. Chilling the dough in the fridge or freezer helps the crust maintain its shape.
For mini tarts, roll the dough slightly thinner (about 1/16–⅛ inch) so the crust stays delicate and cookie-like. This recipe makes about 6 (4-inch) tarts or 12 (3-inch) tarts.
More Dessert Recipes


If you tried this Tart Crust Recipe, please leave a 🌟 star rating and let me know how it went in the 📝 comments below!
Sweet Tart Crust (Pâte Sucrée)
Ingredients
- 1 ½ cup all-purpose flour
- ½ cup powdered sugar
- ¼ teaspoon table salt
- 8 tablespoons unsalted butter
- 1 large egg
- ½ teaspoon vanilla extract
Instructions
- Mix the Dry Ingredients – Add the flour, powdered sugar, and salt to a food processor. Pulse about 5 times, until combined.
- Cut in the Butter – Slice the cold butter into 8 pieces, then evenly scatter it over the flour mixture. Pulse until the mixture resembles wet sand with some small coarse pieces, about 10 pulses.
- Incorporate the Wet Ingredients – In a small bowl, whisk together the egg and vanilla. Evenly drizzle over the flour and butter mixture. Pulse until a dough forms together, but do not overmix, about 15 pulses.
- Chill the Dough – Shape the dough into a flattened 1-inch-thick disk, then wrap it tightly in plastic wrap. Refrigerate until firm, about 1 hour, or freeze for 30 minutes.
- Roll the Dough – Remove the dough from the refrigerator and let it sit at room temperature for 5 to 10 minutes until slightly pliable, which makes it easier to roll. Lightly dust the counter, dough, and rolling pin with flour. For easier transfer, you can place the dough on a sheet of parchment paper before dusting. Roll the dough, rotating and lightly dusting the bottom as needed to prevent sticking, until it’s about ⅛-inch thick, or large enough to fit your tart pan with a little overhang, roughly a 10 to 11-inch circle.
- Form the Tart Shell – Gently ease the rolled dough into a 9- or 10-inch tart pan, pressing it against the bottom and sides to create an even layer. Roll a rolling pin over the top of the pan to trim the excess dough and create a level edge. Use any scraps to patch thin spots if needed. For less shrinkage during baking, press the dough slightly above the rim of the pan. Use a fork to dock the bottom of the crust, poking holes about 1 inch apart.
- Freeze the Dough – Freeze the tart dough in the pan for 30 minutes. The dough should be very firm. This will help prevent shrinking when baked.
- Heat the Oven – Set the oven rack in the center position. Heat to 375°F (191°C).
- Add the Pie Weights – Place the tart pan on a sheet pan, then line the pie dish with a piece of parchment paper or foil, leaving some overhang to make it easy to lift out. Add the pie weights to cover the bottom and sides; do not overfill. Dried beans or rice can also be used.
- Blind-Bake the Crust – Bake for 15 minutes. Transfer to a wire rack and carefully remove the parchment paper filled with weights. Follow the instructions for a partially or fully baked tart crust:For a Partially Baked Tart Crust: Bake for another 5 minutes, until the edges are lightly golden brown and crisp, but the bottom is slightly undercooked. Follow your recipe for filling and baking.For a Fully Baked Tart Crust: Bake until the edges are golden brown and the crust is fully cooked, about 10 minutes. Cool the crust completely on a cooling rack, about 30 to 40 minutes before adding the desired filling.
- Cool – Transfer the tart crust in the tin to a wire rack. Cool completely before using.
- Using the Crust – Proceed with the partially baked crust, adding the raw filling, and baking according to your recipe. For a fully baked crust, add your desired filling and toppings.
Recipe Video

Notes
- Using a Pastry Cutter: In a medium bowl, whisk together the flour, powdered sugar, and salt. Add the butter pieces and cut them into the flour using a pastry cutter until the mixture resembles wet sand with some pea-sized pieces. Add the whisked egg and vanilla, then stir until a cohesive dough forms.
- Using a Stand Mixer: In the bowl of a stand mixer fitted with the paddle attachment, combine the flour, powdered sugar, and salt. Add the butter pieces and mix on low speed until the mixture resembles wet sand with some pea-sized pieces. Add the whisked egg and vanilla, mixing on low until a cohesive dough forms.
- Egg Wash: After removing the pie weights, brush the edges and bottom of the tart crust with whisked whole egg or egg whites. Bake until golden brown. This will give a shiny appearance and create a light moisture barrier for the filling.
- Chocolate Coating: Melted white, milk, or dark chocolate can be lightly brushed on the inside of the tart shell to create a moisture barrier between the filling. Refrigerate after adding the chocolate coating, then refrigerate to harden before filling.
- Mini Tarts: Roll the dough slightly thinner, about 1/16–⅛ inch, so the crust stays delicate. This recipe makes about 6 (4-inch) tarts or 12 (3-inch) tarts. Blind-bake for 10 minutes, remove the pie weights, then continue baking until lightly golden brown.
- Make Ahead: Wrap the dough in plastic and place it in an airtight container, refrigerated for up to 5 days, or frozen for up to 3 months. The baked tart shell can be stored at room temperature for 3 days, in the refrigerator for 5 days, or wrapped and frozen for 1 month.
- The nutritional information is based on 1 whole tart crust.
Nutrition Facts
Percent Daily Values are based on a 2000-calorie diet. All nutritional information is based on estimated third-party calculations. Each recipe and nutritional value will vary depending on the brands you use, measuring methods, and portion sizes per household.


Leave a Comment